9. Lightning web component and app development:
Build a Lightning Web Component and App to embed your flow into your external website. This contains the form on your site.
Utilise the resources from GitHub: embedFlowInExternalWebsite as a guide. In this example, we follow this guide and will add code to the component and controller of a Lightning component and in a Lightning App.
1. Open the Developer console from the Salesforce Setup cog icon menu.
2. Go to ‘File’ -> ‘New’ -> ‘Lightning Component’.
3. In the New Lightning Bundle dialogue that pops up, provide a Name embedFlowInExternalWebsite. No other options in this box are required in this example. Click the Submit button.
4. Ensure you are navigated to the Component item of this Lightning Component (Hold: Ctrl + Shift + 1) navigate to the embedFlowInExternalWebsite.cmp tab in the console.
5. Replace the aura:component template with the following code:
6. Go to ‘File’ -> Save.
7. Navigate to the Controller Element of the Lightning Component. Click the ‘Controller’ element in the top right panel of the developer console or Hold: Ctrl + Shift + 2. Click the tab called embedFlowInExternalWebsiteController.js.
8. Replace the Javascript template with the following code and reference the API Name of the flow we created previously in this line flow.startFlow("YOUR_FLOW_API_NAME"); Below is our example.
({
  init : function (component) {
      var flow = component.find("flowData");
      flow.startFlow("Membership_Application");
  }
 })
9. Go to ‘File’ -> Save.
10. Go to ‘File’ -> ‘New’ -> ‘Lightning Application’ and provide the Name: embedFlowInExternalWebsiteApp, check the ‘Lightning Out Dependency App’ checkbox and click the Submit button.
11. Ensure we are viewing the embedFlowInExternalWebsiteApp.app tab in the console and can see the aura:application template.
12. Replace the aura:application template with the following code.
13. Go to ‘File’ -> Save All.
We should now see these 3 screens in the developer console:


10. Flow embedding on website:
Embed the Salesforce Lightning Flow into your website using the provided script from the guide in the previous step. This script will render the flow within a designated div element on your website. (The below script utilises a StoreConnect web-page)
First, we need to ensure our Screen Flow has access to our Site Profile.
1. Search ‘Sites’ in the Setup Quick Find bar.
2. Click on the Site Label in the Sites list. Not Edit or the site URL.
3. Click the Public Access Settings button.
4. Scroll down to the ‘Enabled Flow Access’ list and click Edit.
5. Select the flow we created in the last step, from Available Flows column into the Enabled Flows column and then click Save. Note: This Flow should be available if we provided access in Section 7 step 20.
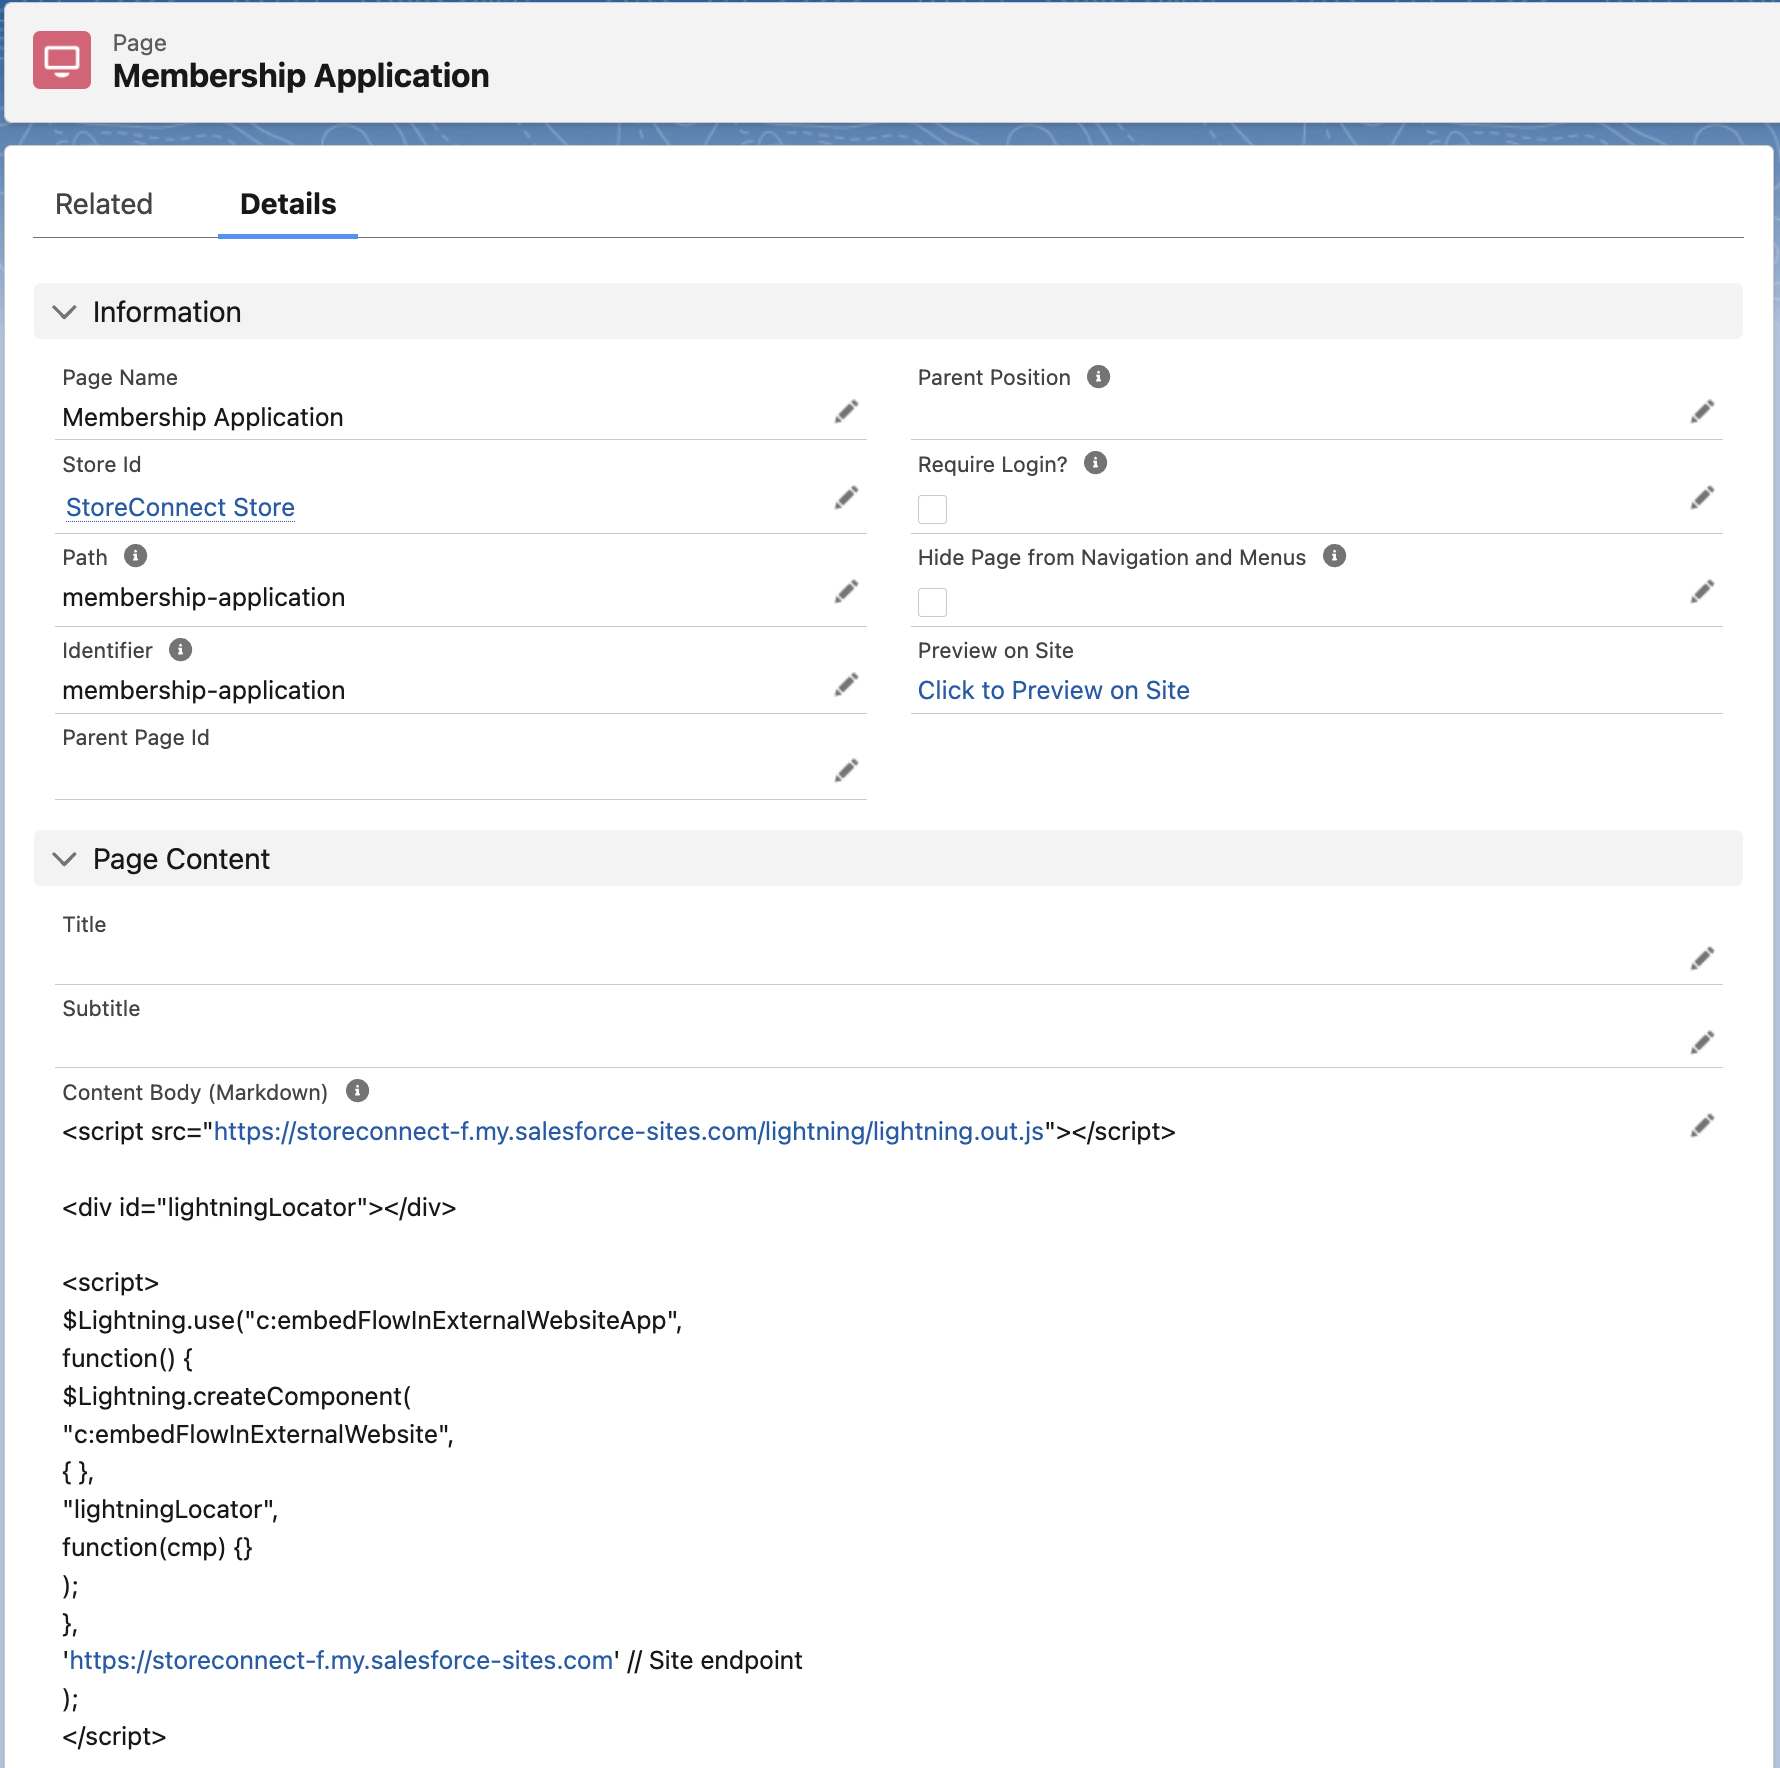
6. Create a WebPage on your website, if using StoreConnect CMS, Create a new Page, name it, give it a path, identifier and associate it with a Store.
7. In the Content field, include the following script and markup. If you are using a CMS or webhost other than StoreConnect, ensure that this script is on your website’s page markup.
8. Where we see [https://YOUR-SALESFORCE-SITE-URL.com](https://YOUR-SALESFORCE-SITE-URL.com), replace this with the URL of the site URL we created in Section 3.
https://YOUR-SALESFORCE-SITE-URL.com/lightning/lightning.out.js</a>"> $Lightning.use("c:embedFlowInExternalWebsiteApp", function() { $Lightning.createComponent( "c:embedFlowInExternalWebsite", { }, "lightningLocator", function(cmp) {} ); }, '<a href="https://YOUR-SALESFORCE-SITE-URL.com">https://YOUR-SALESFORCE-SITE-URL.com</a>' // Site endpoint );
Following these steps, we should see a Page record that looks like this:
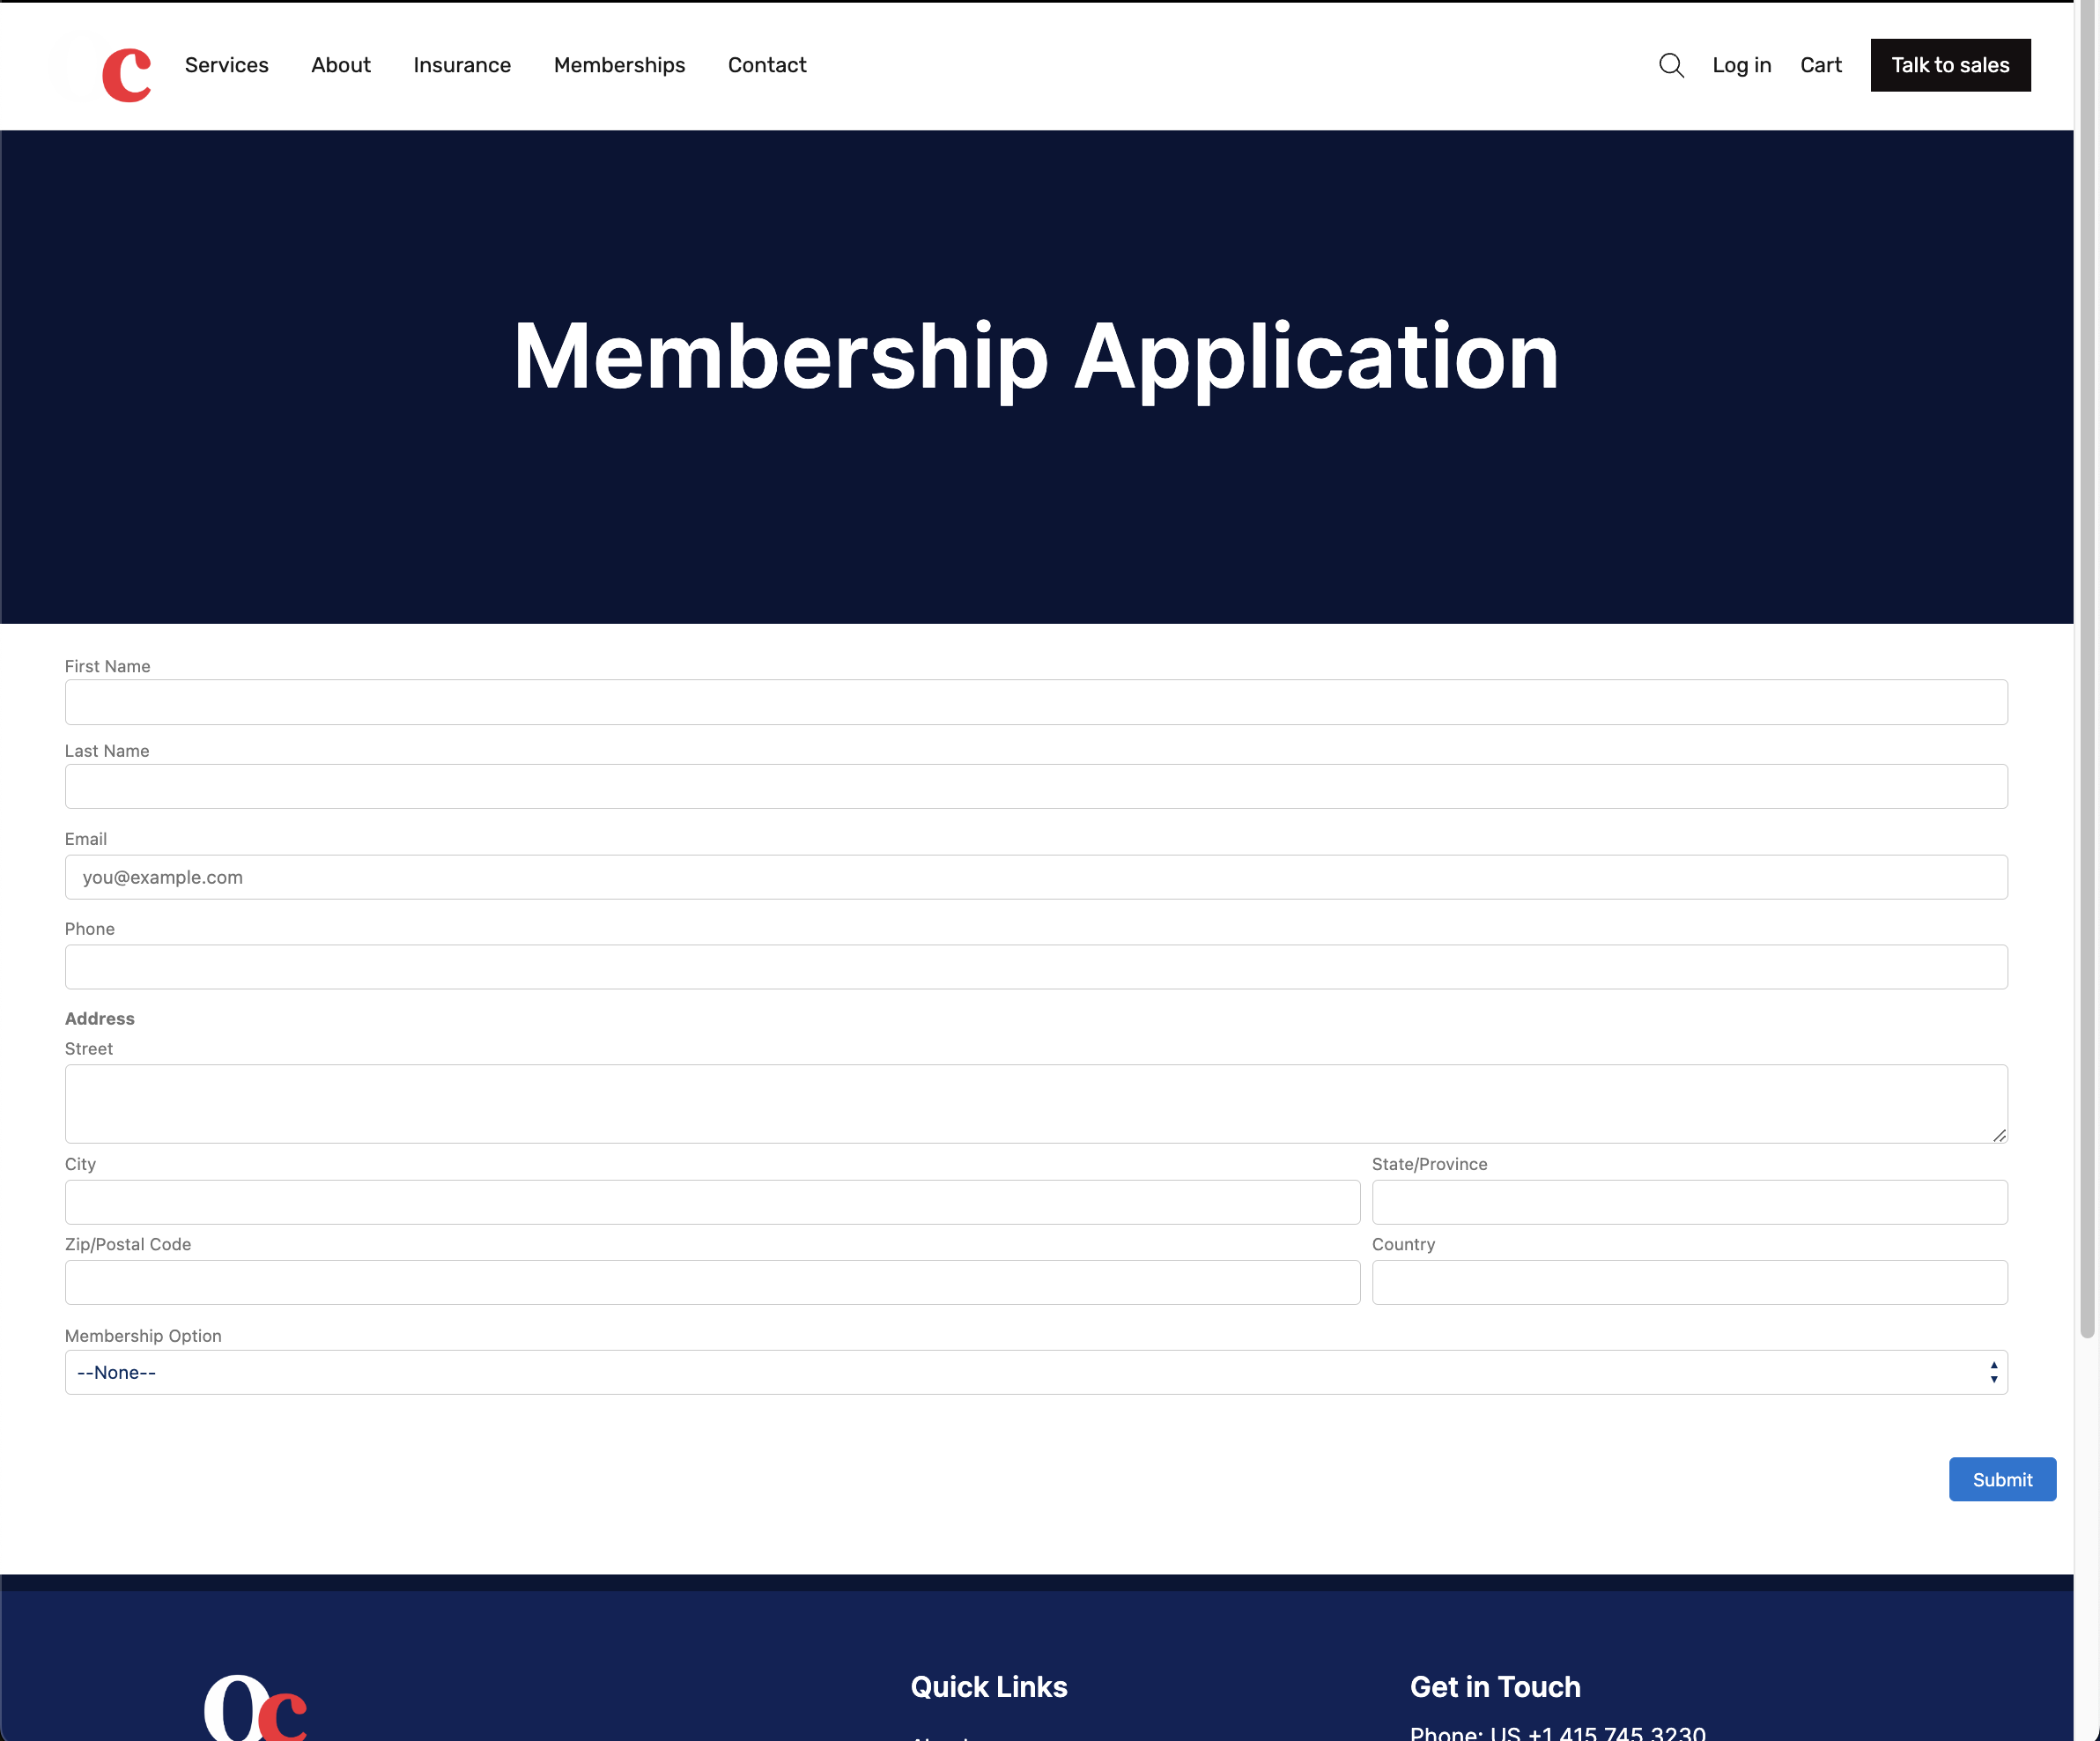
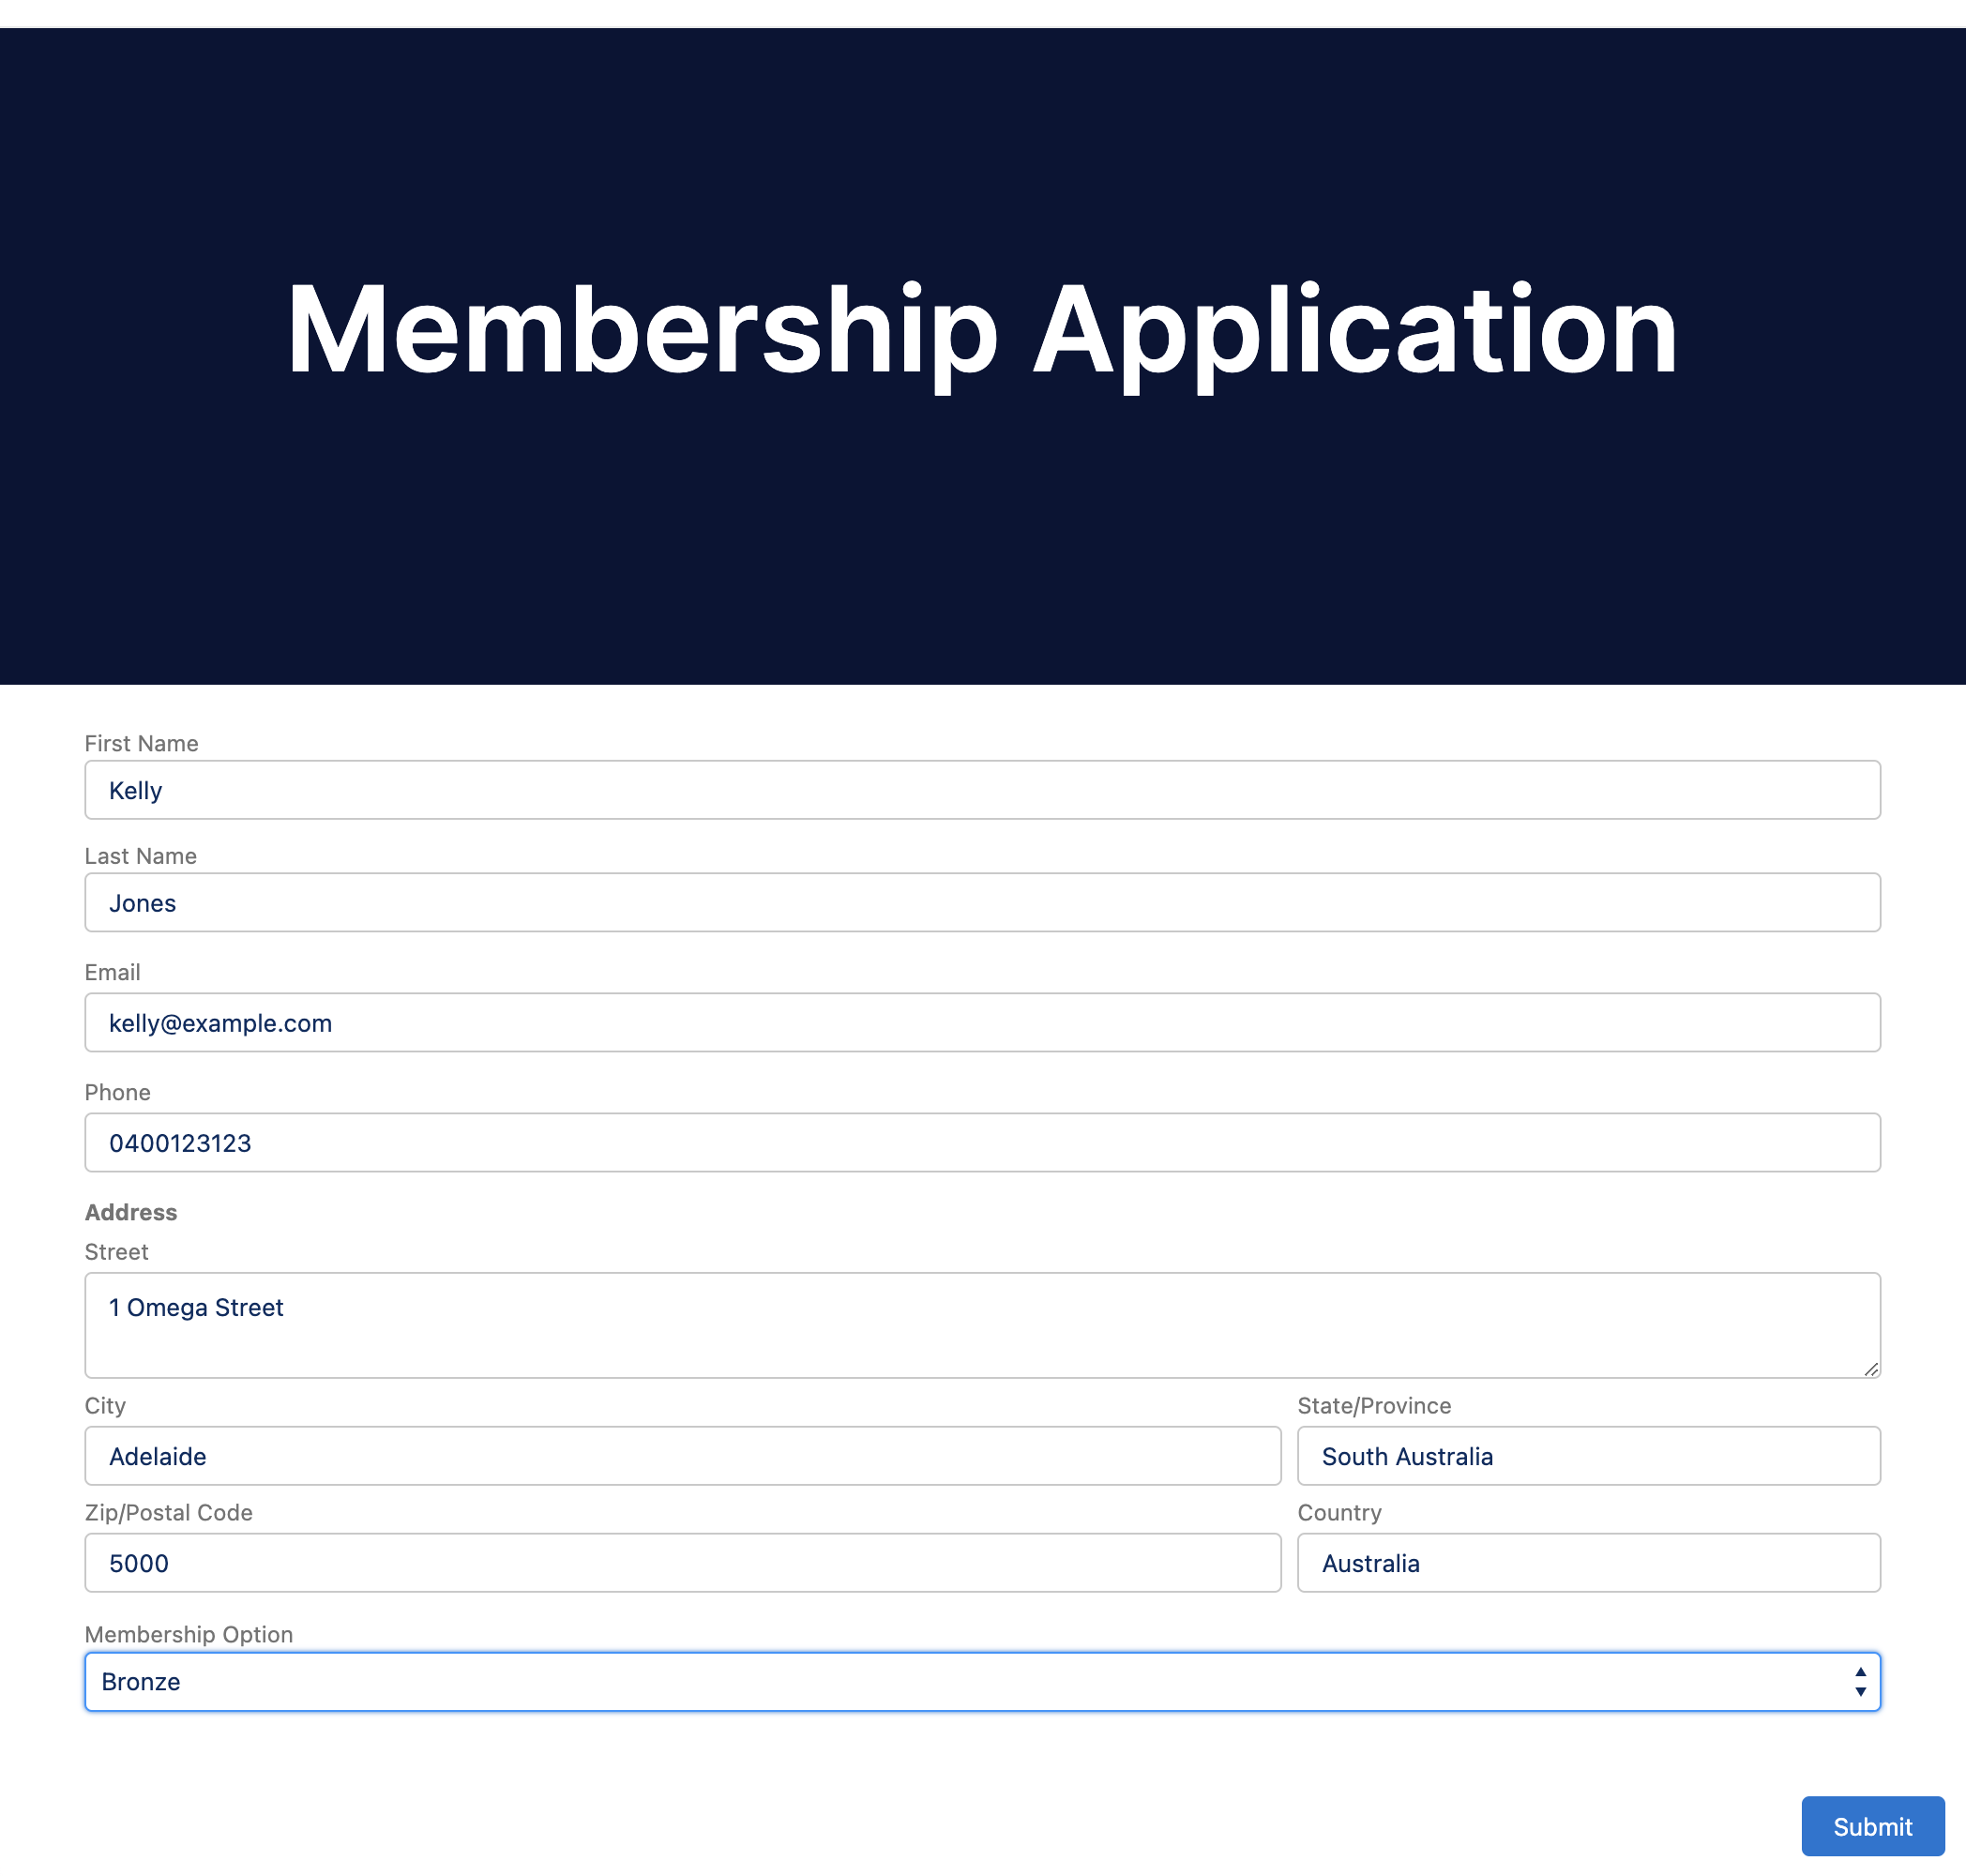
This should render the form on the store public website at the address [https://YOUR-STORE-SITE-URL/PAGE-NAME](https://YOUR-STORE-SITE-URL/PAGE-NAME)] and look like this:
11. Linking flow data to order:
Finally, we create an automation that takes the form data and custom record and links it to the order in Salesforce. We will use a record-triggered flow from the StoreConnect Order Campaigns records that capture UTM codes. In this example, the UTM Source and UTM Token &utm_source=membership-application&utm_token=a3I5j000000sh4PEAQ.
1. Search ‘Flows’ in the Setup Quick Find bar and click Flows under ‘Process Management’.
2. Click the ‘New Flow’ button on the top right of the screen.
3. Ensure the “Record-Triggered Flow” option is selected and click the ‘Create’ button at the bottom right of the modal.
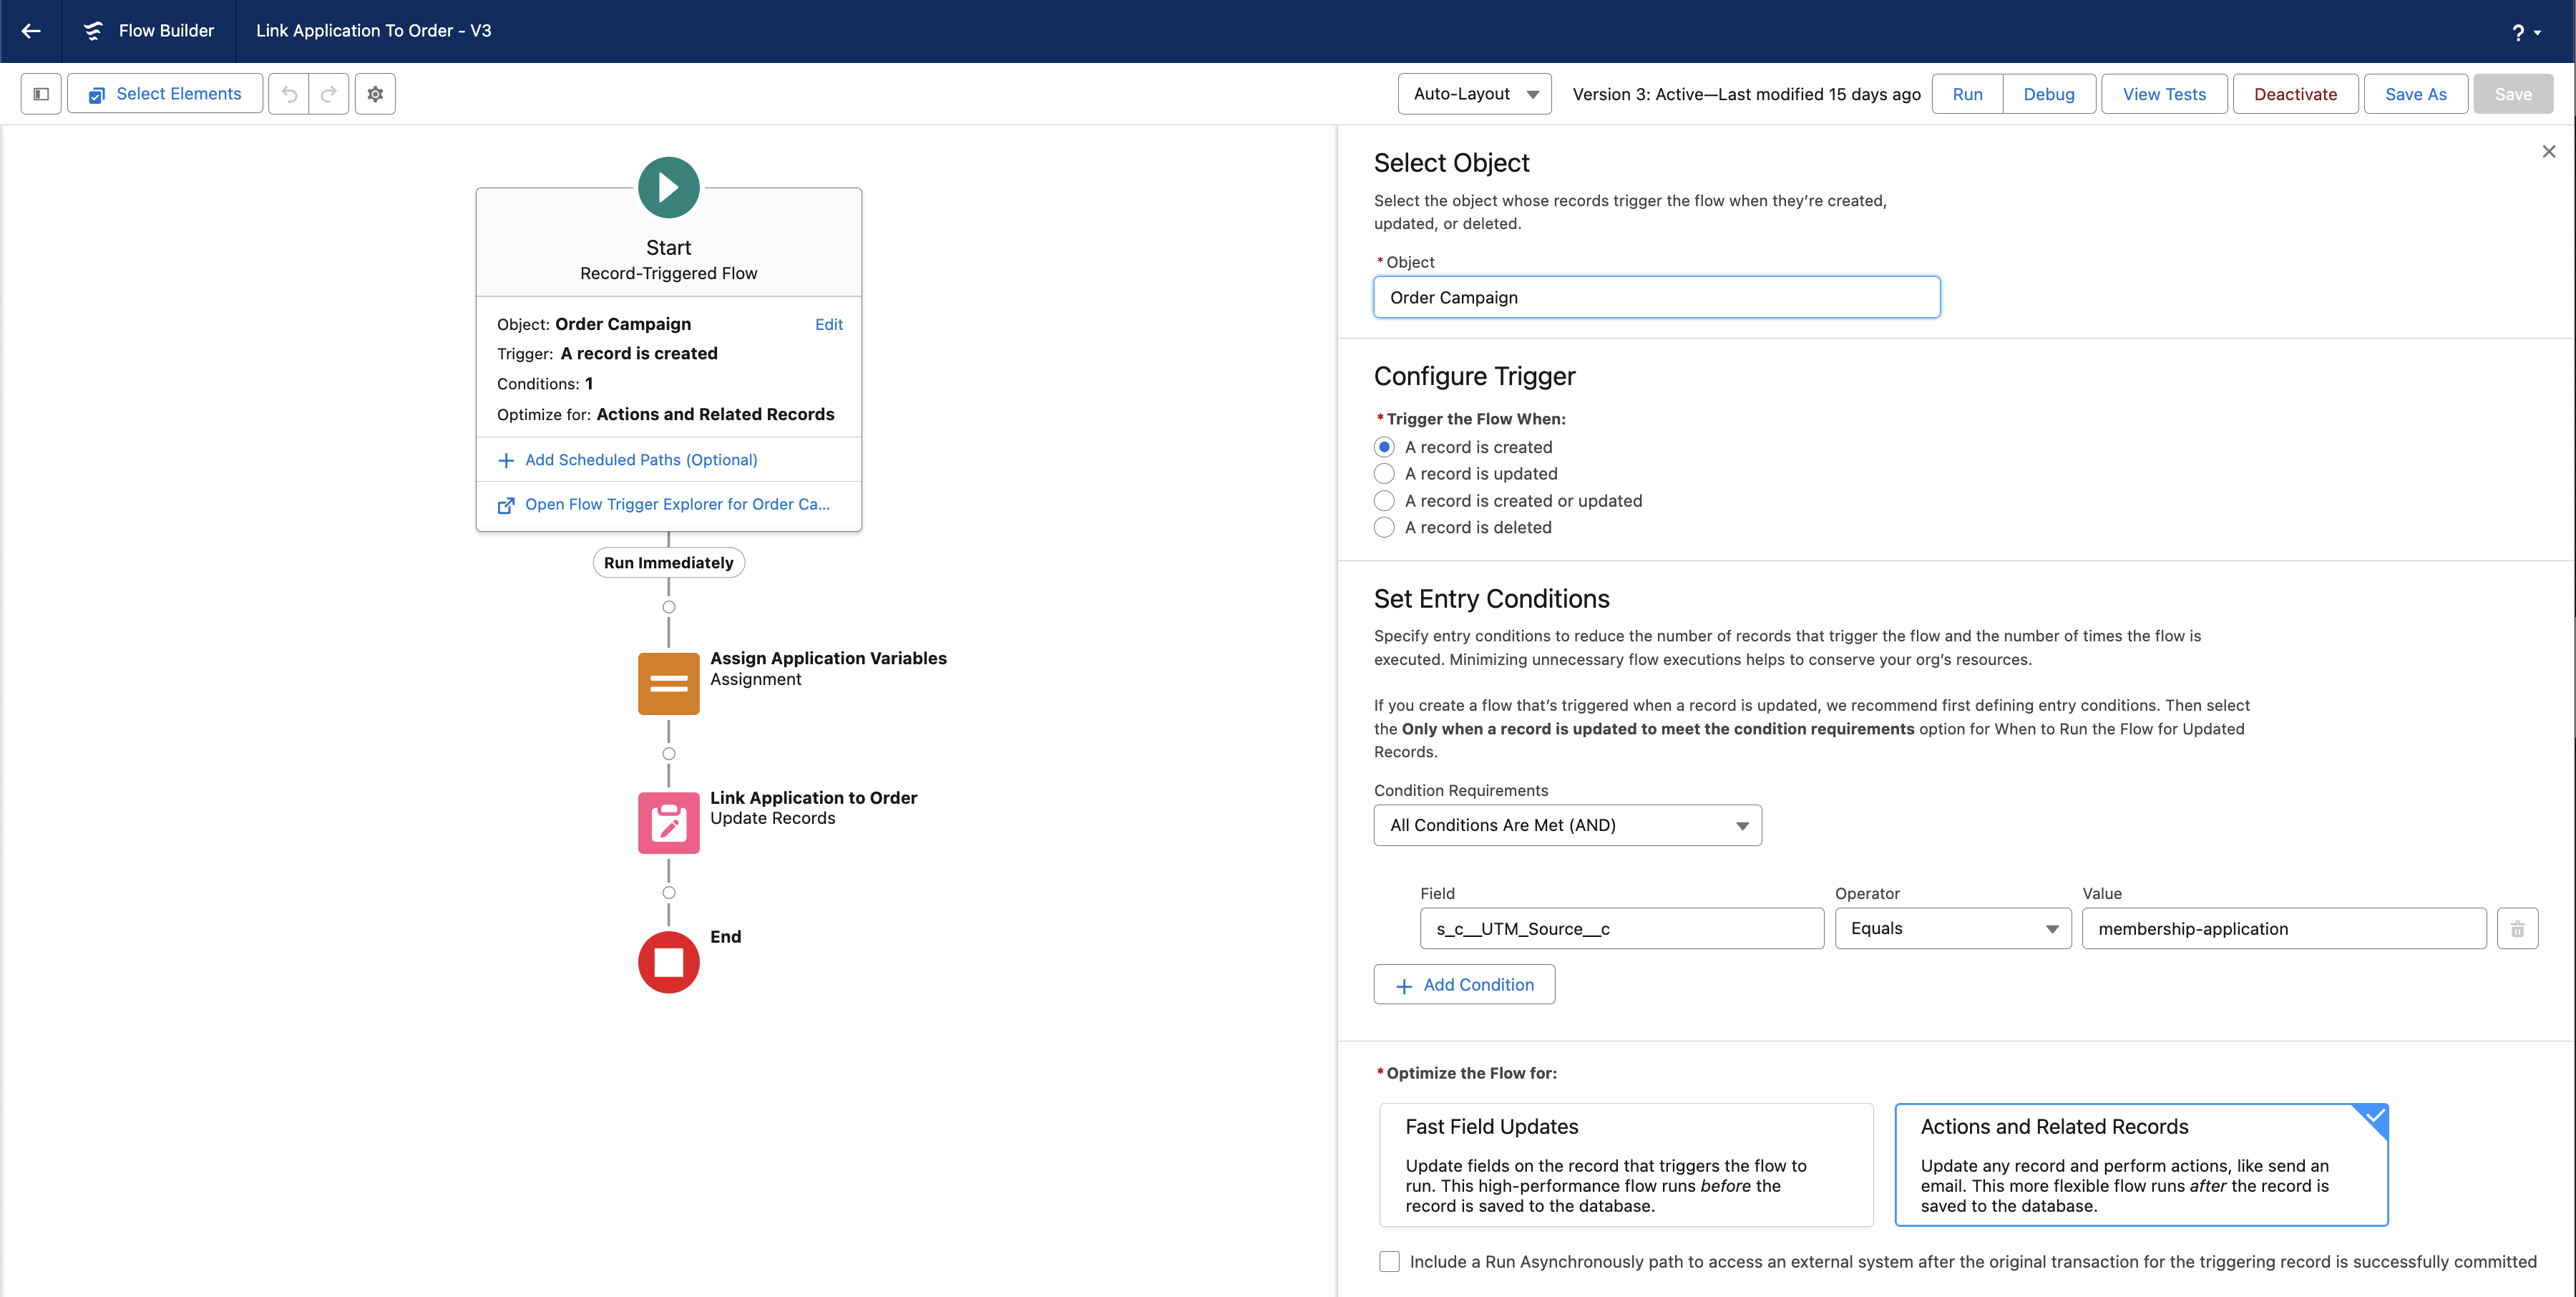
4. Select Order Campaign for the Object.
5. In this example, we only need to set ‘Trigger the Flow When: A record is created’.
6. Set our Condition Requirements to All Conditions Are Met and here we will filter the trigger to when an Order Campaign is created with a UTM source of membership-application. Set the s_c__UTM_Source Field (operator) Equals membership-application for the Value.
7. Optimize the flow for: Actions and Related Records (which is an ‘after update’).
8. Click the ‘Add Element’ circle connector that turns to a plus sign on mouse hover.
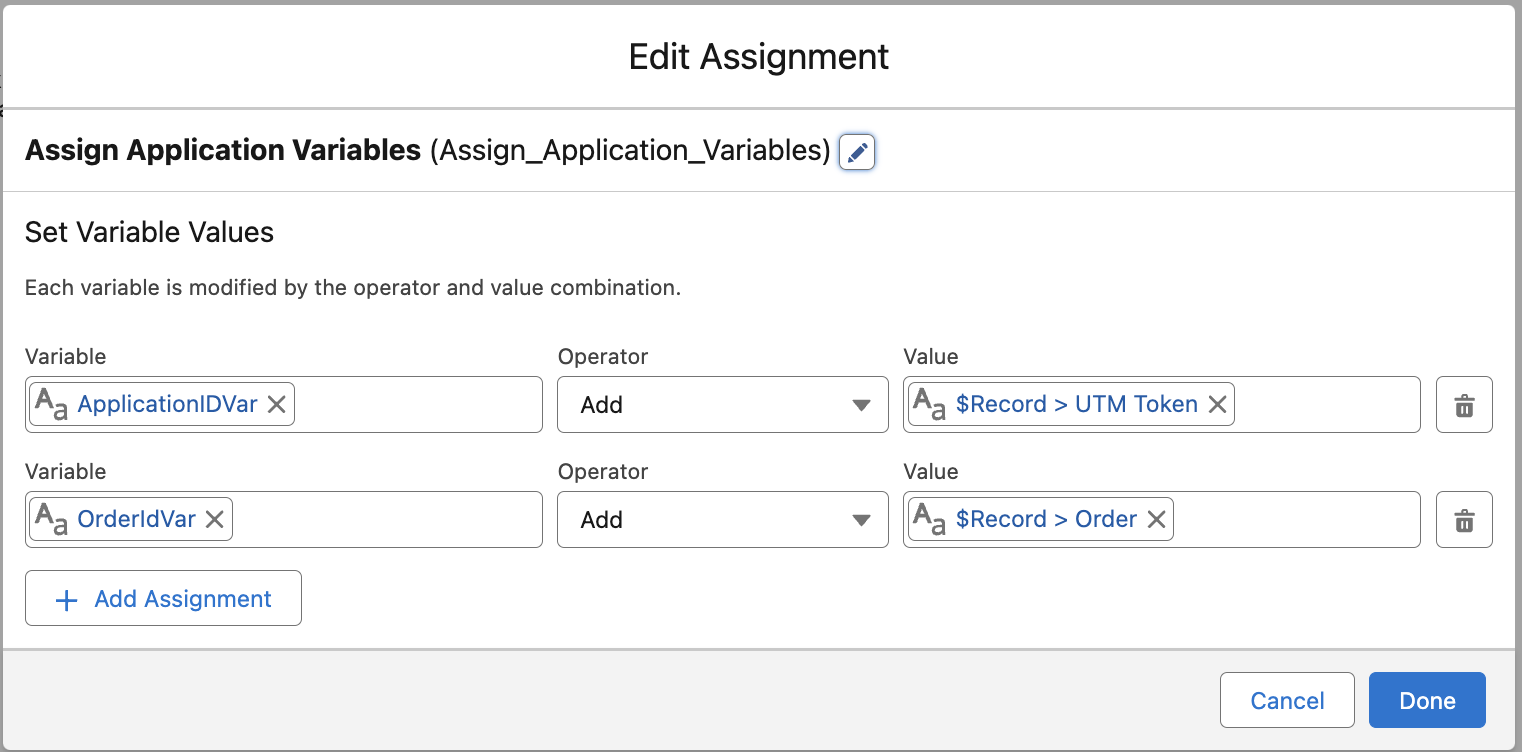
9. Choose an Assignment element and call the API Name Assign_Application_Order_Variables.
10. Create the first variable as a Text Data type and call it ApplicationIdVar, set the Operator to Add and then set the Value to $Record (s_c__Order_Campaign__c) > UTM Token (s_c__UTM_Token__c).
11. Create a second variable as a Text Data type and call it OrderIdVar, set the Operator to Add and then set the Value to $Record (s_c__Order_Campaign__c) > Order (s_c__Order_Id__c).
12. Click the ‘Add Element’ circle connector to add a new function under our variable keys assignment above.
13. Call the Element API Name Link_Application_to_Order.
14. When setting “How to Find Records to Update and Set Their Values”, select Specify conditions to identify records, and set fields individually to find an Application record and link it to the parent Order of this Order Campaign.
15. Set the Update Record Object to Application.
16. Set the filter to ‘All Conditions Are Met’ with the Id Field and Equals (operator) to our ApplicationIdVar for the Value.
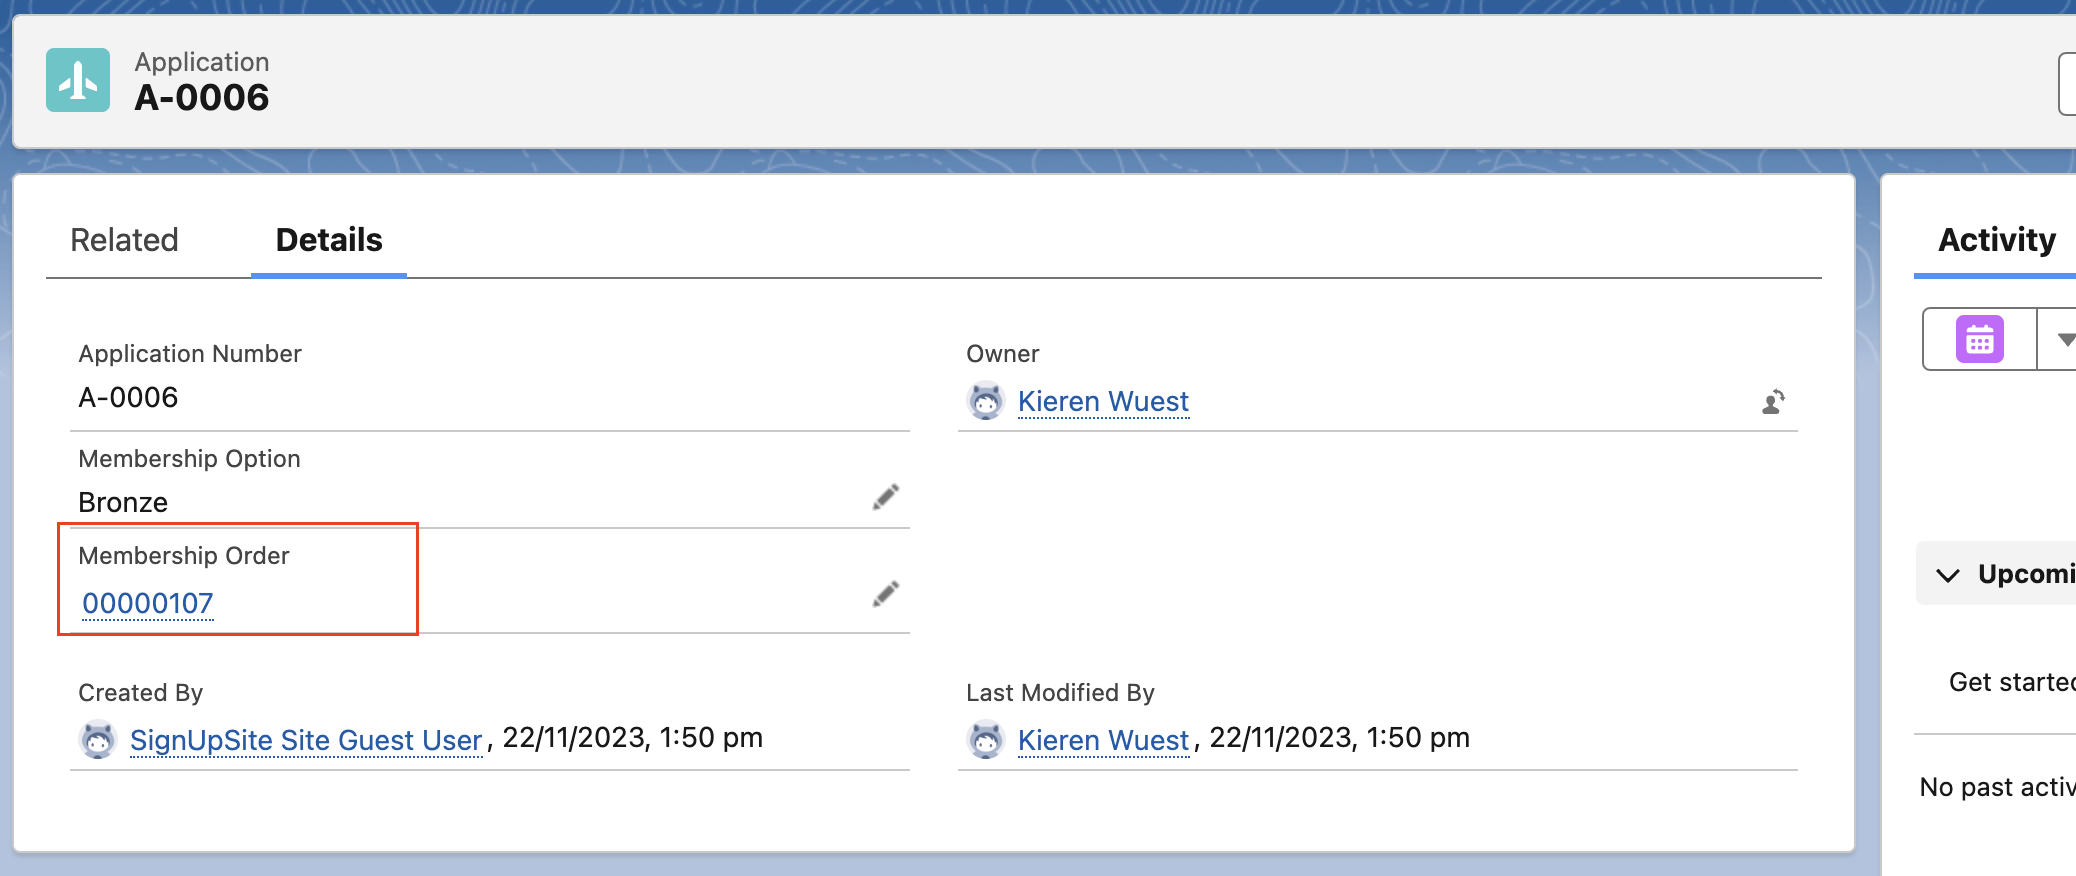
17. To “Set Field Values for the Application Records”, select the Lookup field to the order on our Application custom object, in this case, the field is Membership_Order__c, set the Value to our OrderIdVar variable.
18. We now name, save and activate the flow we created.
19. Click Save and provide a Flow Label and Flow API Name. The Flow API Name we will use is Link_Application_To_Order.
20. In the Show Advanced section, set ‘How to Run the Flow’ to ‘System Context Without Sharing - Access All Data’. Click Save.
21. Click the ‘Activate’ button at the top right of the flow builder interface.
Our flow and trigger function should look like this:
The assignment function should look like this:
The record Update function should look like this:

12. Our solution now should do the following:
1. Produce a Lightning Screen Flow webform on an unauthenticated webpage.
2. Clicking Submit on the Lightning form will create a Custom Object Record.

3. It will then take the required customer and process data, and pass it to a preselected product in a checkout for payment via direct-to-cart URL.

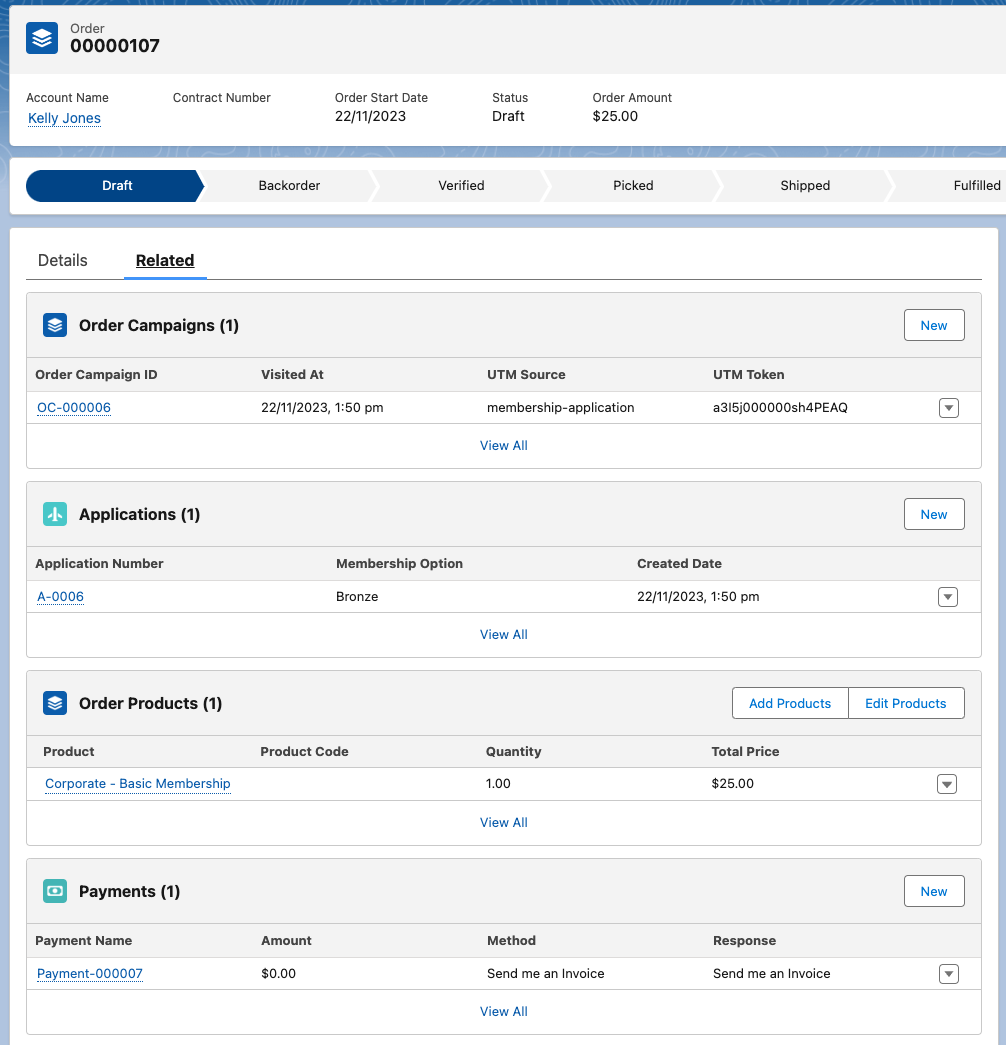
4. Once the checkout creates an Order, Order Items, Order Campaign, Contact and Account in Salesforce, our second flow is triggered from the Order Campaign and links our Application to the Order in Salesforce.
Notes on Future Enhancements: This solution can be extended for file uploads utilising advanced file upload on UnofficialSF. The web form will take a moment to cache the lightning component from the Salesforce servers, which could be further enhanced by creating a webform with a framework such as React for more advanced trailblazers. Stay on the lookout for further enhancements to come.