Rental products allow you to hire out physical items (such as equipment, tools, or vehicles) for a fixed time period. In StoreConnect, rental products rely on products, assets, and subscriptions working together to manage pricing and availability.
Before products can be rented out, they must be correctly configured as both a subscription product and as an asset. These are the minimum requirements.
- Product type is set to ‘rent’
- Subscription term is ‘day’
- Assets exist for the product
- Each asset has a serial number
- Assets are linked to an outlet stock location
Once this setup is complete, products can be rented out. Full configuration details are outlined below.
Rental pricing
Although subscriptions are used behind the scenes, rental products are charged for upfront, for the duration of the rental. For example, if a generator is priced at $80 per day and rented for 3 days, the customer pays $240 at checkout.
Rental products are assets
Rental products must be set up as assets with unique serial numbers and a specific location, to ensure the status of each asset (available or on loan) is trackable. E.g., if you have for rent 10 power drills, you must create 10 assets—each with its own serial number and outlet stock location.
The assets are then linked to the rental product.
Create a rental product
NOTE: Only daily rentals are supported. If the subscription term unit is set to anything other than ‘day’, the product won’t work as a rental.
- Open your products list and add a new product.
- In the Product Information section, enter the relevant details such as Name and Product Code.
- If you want to prevent items from being immediately re-rented, e.g. to allow for cleaning or maintenance after rental, go to the Booking Information section.
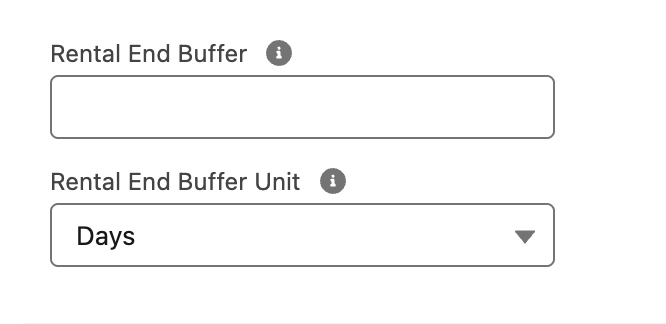
- Set the Rental End Buffer Unit as Days.
- Enter the number of days you want in the Rental End Buffer field.
- In the Subscription Information section:
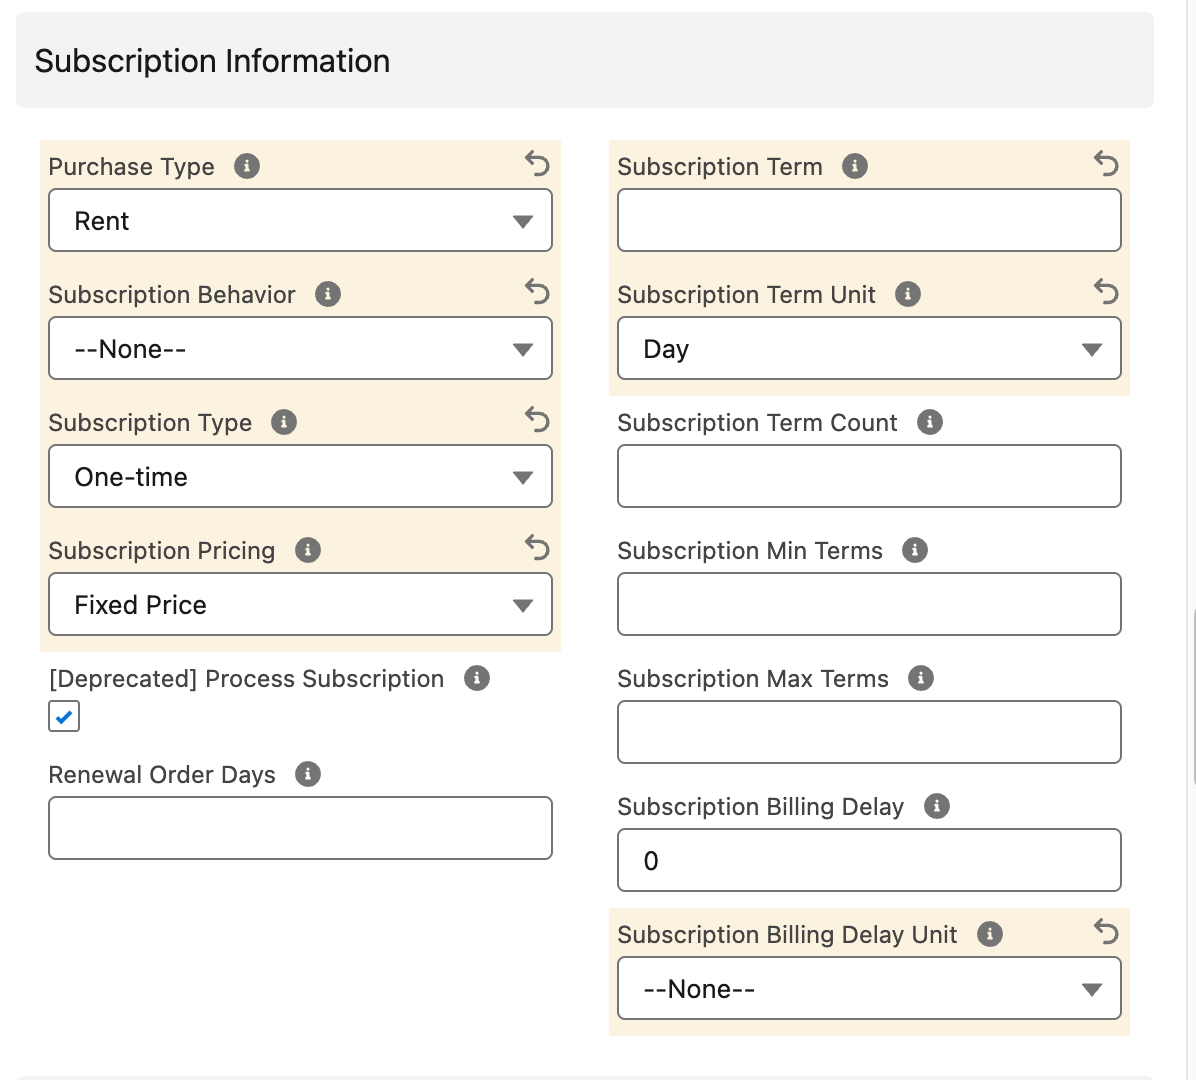
- Set the Purchase Type as Rent.
- Set the Subscription Type as One-time.
- Set the Subscription Pricing as Fixed Price.
- Set the Subscription Term Unit as Day.
- Select Save.
- Next: Add an asset for the rental product as per below.
Rental product assets
Before you add a rental asset:
- Make sure the page layout for the asset record uses the SC_Asset_Layout.
- Ensure any missing fields and related lists are added to your page, for example, the Stock Location lookupfield**.**
- Create a Stock Location record for each location that you store your assets. When the asset is rented, these details are updated to the account and contact who is renting the asset.
Add an asset for a rental product
- Open the assets list, or search ‘Assets’ in the App launcher.
- Select New to add a new asset.

- Give the asset a Name.
- Select the Product this asset relates to.
- Select the Account that currently has this asset (this is likely your organization).
- Select a Contact from that account who is responsible for that asset.
- Select a Stock Location for where the asset will be located.
- Enter a Serial Number for the asset. This is critical for rental products as the serial number is matched to the item when it is rented out and returned.
- Enter a purchase price in the Price field. This is useful for financial reporting of depreciation, etc.
- Enter ‘1’ as the quantity.
- Select Save.
The assets you have set up should now be available to rent in the stock location (outlet).