In StoreConnect, receipt templates are created created using a combination of Liquid templating code and print markup tags.
For this procedure, you will need to be familiar with Liquid and print markup. You will also need the right Salesforce Admin access to add and update templates.
Add or update a receipt template
- Open your store in StoreConnect.
- Go to the Additional Relationships tab
- In the Store Printable Templates section, select New or open an existing template.
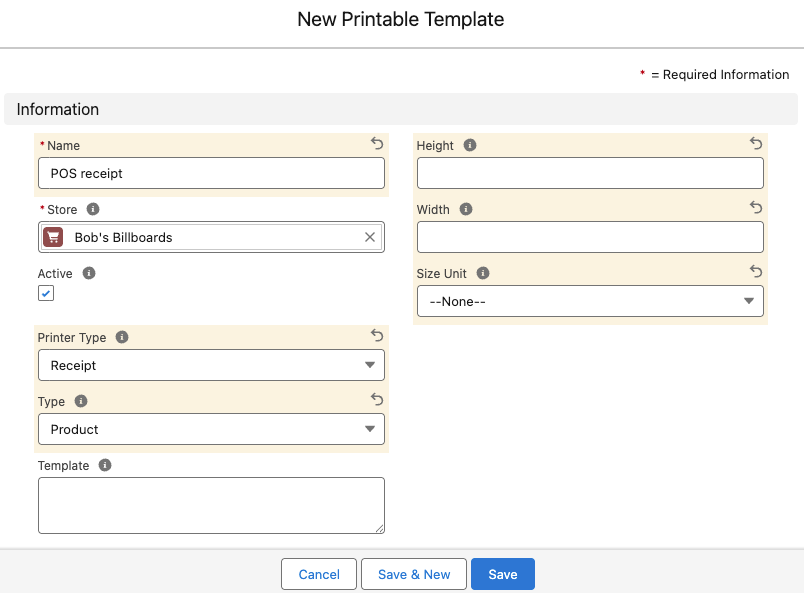
- Give the template a Name. Choose something you will recognize easily later.
- In the Printer Type field, select Receipt.
- In the Type field, select Product.
- Leave the height and width fields blank.
- In the Template field, enter the code for the receipt structure. An example and explanations are provided below.
- Select Save.
- Test and update code until you are happy with the results.
Sample receipt template
{% assign outlet = current_order.outlet %}
{document
  word-wrap=true
}
{# header }

{center}
{image
  src="{{ outlet.images["receipt-logo"].url }}"
  size=80
  dither=atkinson
}
{line}
{% if current_order.type == "layby" %}
LAYBY DOCKET
{line}
{% endif %}
{bold}
{{ outlet.store.name }}
{endBold}
{{ outlet.name }}
{line}
ABN {{ current_order.store.tax_number }}
{line}
{{ outlet.address }}
Ph: {{ outlet.phone }}
{left}
{line}
{table
  cols=2
  margin=1
  align=[left,right]
  row=["{{ current_order.ordered_at | date: "%d/%m/%Y" }}", "{{ current_order.ordered_at | date: "%l:%M:%S%p" }}"]
}
{# items }

{line}
{bold}
{table
  cols=3
  margin=1
  align=[left,right,right]
  width=[*,4,8]
  row=["Item","Qty","Total"]
}
{endBold}
{rule}
{table
  cols=3
  margin=1
  align=[left,right,right]
  width=[*,4,8]
  {% for item in current_order.items %}
  row=["{{ item.product.name }}", "{{ item.quantity }}", "{{ item.total_price | money }}"]
  row=["{{ item.product.product_code }} @{{ item.unit_price | money }} ea.", "", ""]
  {% endfor %}
}

{# total }

{center}
{rule}
{left}
{table
  cols=2
  margin=1
  align=[left,right]
  width=[*,8]
  row=["Subtotal","{{ current_order.subtotal | money }}"]
  row=["Tax","{{ current_order.tax | money }}"]
}

{bold}
{table
  cols=2
  margin=1
  align=[left,right]
  width=[*,8]
  row=["Total","{{ current_order.total | money }}"]
}
{endBold}
{line}
{table
  cols=2
  margin=1
  align=[left,right]
  width=[*,8]
  {% for payment in current_order.payments %}
    row=["{{ payment.type }}","{{ payment.amount | money }}"]
    {% if payment.type == "Cash" and payment.change > 0 %}
      row=["Change","{{ payment.change | times: -1 | money }}"]
    {% endif %}
  {% endfor %}
}
{bold}
{table
  cols=2
  margin=1
  align=[left,right]
  width=[*,8]
  row=["Balance","{{ current_order.balance | money }}"]
}
{endBold}
{line}
{table
  cols=2
  margin=1
  align=[left,right]
  width=[10,*]
  row=["Reference","{{ current_order.order_reference }}"]
  row=["Staff","{{ current_order.register_shift_user.user.code }}"]
  row=["Customer","{{ current_order.contact.name }}"]
  {% if current_order.contact.email %}
  row=["Email","{{ current_order.contact.email }}"]
  {% endif %}
  {% if current_order.contact.phone %}
  row=["Phone","{{ current_order.contact.phone }}"]
  {% endif %}
}
{line}
{center}
{qrcode
  data="{{ current_order.url }}"
  size=6
  model=1
}
{# layby }

{% if current_order.type == "layby" %}
{line}
{rule}
{line}
{bold}
{left}
Layby Terms & Conditions
{endBold}
1) Maximum layby period 3 months
2) Payments due every 2 weeks
3) Cancellations incur 10% fee
{% endif %}
Explanation of receipt template code by section
The way the receipt code works is to display data already defined in StoreConnect, e.g. your store and outlet information, and combine this with transaction information.
Header
{image src="{{ outlet.images["receipt-logo"].url }}" ...}
LAYBY DOCKET
{{ outlet.store.name }}
ABN {{ current_order.store.tax_number }}
Displays elements defined in other parts of StoreConnect:
- A logo from the outlet settings
- Business name and ABN
- LAYBY notice if applicable
Items table
{table cols=3 ... row=["Item","Qty","Total"] ...}
Dynamically lists purchased items with quantity and total per item. Uses a nested loop to show both product name and unit price on two lines, per product.
Totals and payments
row=["Subtotal","{{ current_order.subtotal | money }}"]
row=["Tax","{{ current_order.tax | money }}"]
row=["Total","{{ current_order.total | money }}"]
Shows financial breakdown of subtotal, tax, and total. Then loops through current_order.payments to show all payment types and any change.
Footer information
row=["Staff","{{ current_order.register_shift_user.user.code }}"]
row=["Customer","{{ current_order.contact.name }}"]
Can include:
- Staff and customer info
- Optional phone/email
- QR code linking to order URL
Layby terms and conditions (if applicable)
{% if current_order.type == "layby" %}
Layby Terms & Conditions...
{% endif %}
Conditionally displays terms and conditions, if the order type is layby.