Upload images, media, and other files
On this page
StoreConnect includes a media manager for organizing and managing the images and files you need for products and on your website. In the background, we store and deliver all media through Cloudinary, a CDN (Content Delivery Network). This topic explains how to upload and use media via the media manager, how to update product images, and manage image volume limits in accordance with your plan.
Manage media in folders
Depending on how you want to manage your files over time, you might want to create individual folders to organize media. For example, to separate product images, web images, marketing assets, documents, etc. The media manager displays up to 250 folders. See manage media and images.
Requirements for media
| File type | Accepted formats | Notes | Size limit (Regular plans) | Size limit (Emporium and Flagship) |
|---|---|---|---|---|
| Image | Recommended: jpg, gif, png, tiff, raw, psd, wdp, jpgxr, webpAccepted: Vector images: eps, ai, svg | Products: Minimum 640px width or height, (Recommended) 1024px - 2048px or above.Use same aspect ratio for all product imagesOther images: Banner minimum width 1920pxOut of the box aspect ratio:640px (page embed)1024px (opened in modal) | 5MB | 20MB |
| Video | mp4 | 100MB | 500MB | |
| Document | Standard print formats recommended | 10MB | 20MB | |
| File | doc, docx, rtf, txt | Standard print formats recommended | 10MB | 20MB |
| URL reference (for any file type) | Standard URL |
Upload media to StoreConnect
- In the All Media window, go to the folder you want to add the file to.
-
Select Add media.
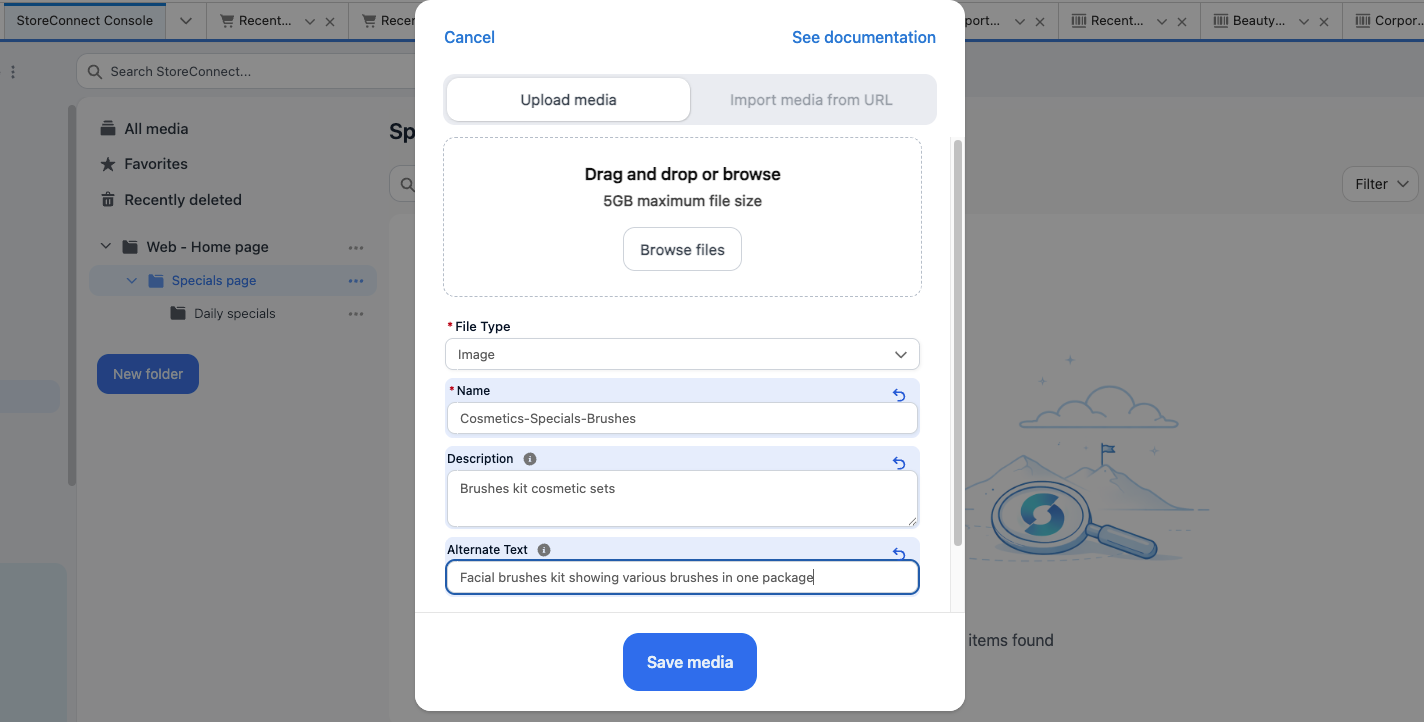
- Choose the File type and enter a Name for the file.
- To upload files from your computer, browse for or drag the files to the Add media window.
- To add files via URL:
- Select Import media from URL.
- Enter the URL in the Import Url field. Note that the URL must be publicly accessible. Files behind authentication or restricted access will not import successfully.
- Complete any additional fields, including advanced options.
- Select Save media.
To bulk upload media, see [Import media in bulk].
Add media to a product record
Uploading or changing images within products automatically maps them and updates them in the media manager.
Copy the media file URL
- In the media manager, locate the file you want to link to.
- Click the menu icon (three dots) and select Copy link.
- Use the URL to reference the image.
Update media to a product record
- Navigate to the product record.
- Upload via the media manager:
-
In the Product Actions section, select Add media.

- Follow the on-screen prompts to upload or reference images.
- Save media.
-
- Upload via the product key relationships:
-
Go to the Media used by this product section.
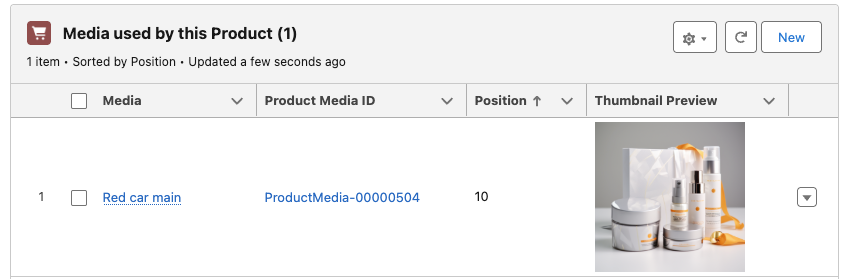
- Select New.
- Complete the form to add media.
-
- Save.
The product record shows the newly added file.
Add and manage where media is used in your content
The media manager enables you to quickly see and manage where an image or file is used in your content.
View and add where media is used
- Open the media record in the media manager.
- Scroll to the bottom of the record.
-
Click to open each object type where media is used.
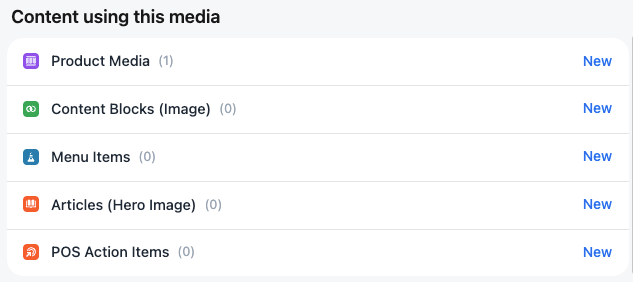
- Click New to add this media to the relevant object. The native Salesforce window opens.
- Follow the prompts to add and then Save.
File name conventions for media
We encourage you to use a consistent convention for naming media so that files can be easy recognized and updated in the future. For example, you might align a product image with a product code or category in your system. However, stick with the conventions that work best for your business and product types.
Example for a product
A lounge suite with the style name Monty that comes in 4 colors, in 2S (2 seater), for which you want to upload 4 different photo angles:
Lounge_Monty_Aqua_2S_front, Lounge_Monty_Aqua_2S_side, Lounge_Monty_Aqua_2S_styled
Example for a web page
Images for blogs:
Page_blog_hero, Blog_[blogname]_hero
Change image sizes
When you upload images, they are stored in the original size, but you can download different sized images when you know how: See Insert media using Liquid, specifically the section on rendering images in various sizes. If you upload images that are smaller than the size to be rendered, image quality can be impacted.
About CDN and media storage
StoreConnect’s media manager work on Cloudinary, a CDN (Content Delivery Network). A CDN is a global network of servers that delivers files from the location closest to each visitor, so images and media load quickly for customers regardless of where they are in the world.
When you upload a file or import one via URL, StoreConnect processes it through Cloudinary and generates a CDN URL that is stored on the media record. This is the URL you reference to display the image on your site.
CDN bandwidth limits
Each StoreConnect plan includes a monthly CDN bandwidth allocation. Bandwidth is the volume of data transferred when your store delivers media — images, videos, and documents — to visitors via the CDN.
| Plan | Included CDN bandwidth per month |
|---|---|
| Boutique | 10 GB |
| Emporium | 100 GB |
| Flagship | 400 GB |
These are soft limits, and store functionality is generally not immediately impacted if you exceed the monthly allocation. StoreConnect monitors bandwidth usage and will contact you if your store consistently exceeds the plan allocation.
:::warning If usage continues beyond the limit, your media may become unavailable to storefront visitors. If this happens, we recommend purchasing a CDN upgrade for your plan — see the StoreConnect pricing page for details. :::
Tips for staying within file size and bandwidth limits
Keeping file sizes small reduces both the likelihood of hitting upload limits and the bandwidth consumed every time a file is delivered to a visitor.
Compress images before uploading
Use a compression tool before uploading images to StoreConnect. Free options include Squoosh, TinyPNG, and ImageOptim (Mac). Aim to reduce file size as much as possible without visible quality loss.
Resize images to their display size
Upload images at the size they will actually display, not at the original camera or export resolution. A banner image displayed at 1920px wide does not need to be uploaded at 4000px or more. Larger dimensions mean larger files and more bandwidth per page load.
Use WebP format for web images
WebP produces significantly smaller files than JPG or PNG at comparable quality and is accepted by StoreConnect. Where your image editing tools support it, export in WebP for any image used on the storefront.
Host videos externally where possible
Video files are large and consume bandwidth quickly. Where possible, host videos on YouTube or Vimeo and embed them in your content rather than uploading them directly to StoreConnect. Reserve direct uploads for cases where an external host is not suitable.
Use appropriately sized images in Liquid templates
Cloudinary can serve images at different sizes via URL transformations. When referencing images in Liquid templates, request the size that matches the display context rather than always loading the full original. See How to insert media using Liquid for details on rendering images at specific sizes.
How media import works
When you add media using an Import URL, StoreConnect processes it through the following pipeline:
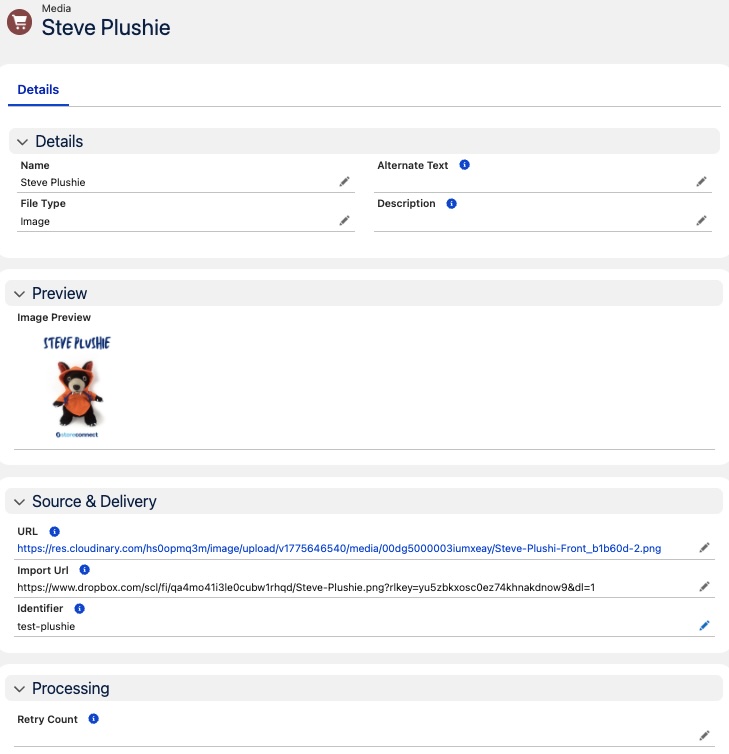
- You populate the Import Url field on the media record with a publicly accessible URL pointing to the source file — for example, a direct link to a file hosted on Dropbox, Google Drive, your own web server, or another CDN.
- The Url field must be blank. If it already contains a value, the import job skips the record.
- A scheduled background job detects the record and attempts to download the file from the Import URL and upload it to the CDN (Cloudinary).
- On success, the Url field is populated with the generated CDN URL and the image displays on the storefront.
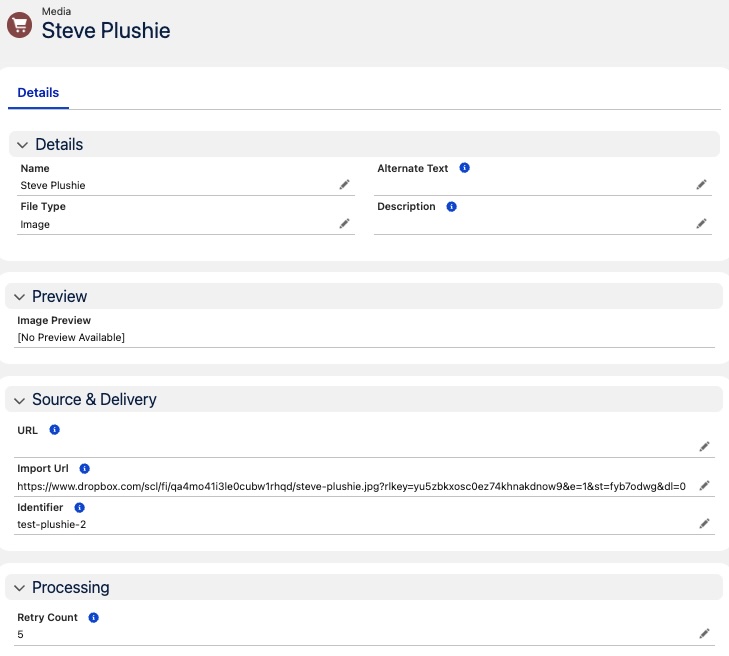
- On failure, the Retry Count field is incremented. The job retries up to 5 times. After 5 failed attempts, no further automatic retries occur and manual intervention is required.
:::note The import job runs on a schedule. After saving a media record, allow a few minutes for the CDN URL to appear in the Url field. :::
Troubleshoot media import and CDN issues
This section covers common issues where a media record fails to generate a CDN URL after using the Import URL method, or where images appear broken on the storefront.
The Url field is blank after setting an Import URL
If the Url field has not been populated after setting an Import URL, work through the following checklist:
- Is the Url field already populated? If the Url field contains any value, the import job skips the record. Clear the Url field and save.
- Is the Import URL publicly accessible? Open the Import URL in an incognito or private browser window. If it requires a login, shows a landing page, or returns an error, the URL is not accessible to the import job.
- Has the Retry Count reached 5? Check the Retry Count field on the media record. If it shows 5, the import has failed the maximum number of times. See Retry count has reached 5 and no CDN URL was generated.
- Has enough time passed? The import job runs on a schedule. Wait a few minutes after saving before investigating further.
- Are StoreConnect sync triggers enabled? If triggers have been disabled (for example, during a package upgrade), the import job does not run. See StoreConnect sync triggers to check and re-enable them.
If none of the above apply, review the remaining sections below for more specific causes.
The Url field already has a value but the wrong image displays
Cause: The Url field is already populated with a CDN URL, so the import job skips this record — even if the current URL points to an outdated or incorrect image.
Resolution:
- Open the media record in Salesforce.
- Clear the Url field so it is blank.
- Confirm the Import Url field contains the correct source URL for the new image.
- Save the record.
- Wait a few minutes for the import job to generate a new CDN URL.
Retry count has reached 5 and no CDN URL was generated
Cause: The import job attempted to download and upload the file 5 times and failed each time. Common reasons include an inaccessible URL, a URL pointing to a sharing page instead of a direct file, or a file type mismatch. After 5 failures, no further automatic retries occur.
Resolution:
- Identify and fix the underlying cause first. Review the sections below to determine why the import is failing.
- Once the cause is resolved, open the media record and set the Retry Count field back to 0.
- Confirm the Url field is blank.
- Save the record. The import job will pick it up on the next scheduled run.
Older versions: retry count shown in the Import Url field
On older versions of StoreConnect, there is no dedicated Retry Count field. Instead, the retry count is stored as a tag prepended to the Import Url value, for example:
[retry:5]https://yoururl.com/image.jpg
This tag is added automatically by StoreConnect — you do not need to add it manually. Once [retry:5] appears, the import job stops retrying the record.
To reset and allow the import to try again:
- Fix the underlying cause of the failure first.
- Edit the Import Url field and remove the
[retry:5]prefix, leaving only the URL. - Confirm the Url field is blank.
- Save the record.
Import URL is not publicly accessible
Cause: The URL in the Import Url field requires authentication, is behind a login wall, or is otherwise restricted. The import job cannot access URLs that are not publicly available. This commonly occurs with:
- Dropbox links that require sign-in, have restricted sharing settings, or contain session parameters.
- Google Drive files that are not shared with “Anyone with the link.”
- URLs on internal networks, intranets, or password-protected sites.
Resolution:
- Copy the Import URL and open it in an incognito or private browser window (not a browser where you are already logged in).
- If the URL requires a login, shows a permission error, or redirects to a sign-in page, it is not publicly accessible.
- Update the sharing settings on the source file to allow public access, or host the file at a publicly accessible URL.
:::tip
Dropbox: Ensure the link sharing is set to “Anyone with the link.” Copy the sharing link, then:
- Change dl=0 to dl=1 at the end of the URL to force a direct download instead of the preview page.
- Remove any st=... parameter from the URL — this is a session token tied to your Dropbox login that the import job cannot use.
- Example: https://www.dropbox.com/scl/fi/abc123/image.jpg?rlkey=xyz&dl=1
Google Drive: Set the file sharing to “Anyone with the link” and use the direct download format: https://drive.google.com/uc?export=download&id=FILE_ID where FILE_ID is the identifier from the original sharing URL. See ▶️ Prepare Google Drive URLs for bulk import for a step-by-step walkthrough.
Other services: Any URL containing session tokens, expiry parameters, or authentication tokens will fail — the import job has no way to authenticate. Always test the URL in an incognito window before using it as an Import URL. :::
Source URL points to a sharing page instead of a direct file
Cause: The Import URL resolves to an HTML preview or sharing page rather than the actual file. For example, a Dropbox link with dl=0 opens a preview page with download buttons, or a Google Drive link opens the file viewer. The import job needs a URL that returns the raw file content, not an HTML page.
Resolution:
- Open the Import URL in a browser. If you see a web page with the file embedded (rather than the file downloading directly), the URL is not a direct file link.
- Convert the URL to a direct download link:
- Dropbox: Change
dl=0todl=1, or replacewww.dropbox.comwithdl.dropboxusercontent.comin the URL. Remove anyst=...session parameters. - Google Drive: Use the format
https://drive.google.com/uc?export=download&id=FILE_ID. - Other services: Look for a “direct link”, “raw file”, or “download link” option rather than the standard sharing URL.
- Dropbox: Change
- Update the Import Url field on the media record with the direct link.
- If the Retry Count is 5, reset it to 0.
- Clear the Url field if it contains a value, and save.
Import URL was truncated because it exceeds 255 characters
Cause: The Import Url field is limited to 255 characters. If the source URL is longer than 255 characters, it is silently truncated when saved, resulting in a broken URL that cannot be resolved by the import job.
Resolution:
- Check whether the Import URL in the media record matches the full source URL. If it appears cut off, the URL has been truncated.
- Shorten the URL by removing unnecessary query parameters, or use a URL shortening service.
- Alternatively, download the file and re-upload it directly through the media manager rather than using the Import URL method.
Images appear broken on the storefront but the media record looks correct
Cause: The media record has a populated Url field and appears correct in Salesforce, but the image does not display on the storefront. This can occur when:
- The CDN URL was generated but the file was not correctly scoped to your organization’s folder in Cloudinary.
- The CDN URL is malformed or points to a resource that no longer exists.
- The required CSP (Content Security Policy) trusted URLs have not been added. See Troubleshoot images and media for CSP setup instructions.
Resolution:
- Open the Url field value in a browser. If the image does not load, the CDN URL is broken.
- Clear the Url field, confirm the Import Url is correct, reset Retry Count to 0 if needed, and save. This forces a fresh import.
- If the issue persists after re-importing, contact StoreConnect support. CDN scoping issues may require intervention from the operations team.
:::note
When resetting a failed import, check both the Retry Count field (set to 0 if it shows 5) and the Import Url field (remove any [retry:5] prefix if present). Both can block the import job from running again.
:::
Website shows a stale or outdated image after re-importing media
Cause: After re-importing media, the storefront continues to display the old image. This is typically caused by browser caching or CDN edge caching serving the previous version of the file.
Resolution:
- Perform a hard refresh in your browser: Ctrl+Shift+R (Windows/Linux) or Cmd+Shift+R (Mac).
- If the old image still appears, clear your browser cache or test in an incognito/private window.
- If the correct image appears in incognito but not in your regular browser, the issue is local browser cache. Clear your cache or wait for it to expire.
- If the old image persists even in incognito, the CDN cache may not have updated yet. CDN caches can take up to 24 hours to fully refresh. If the image remains stale beyond this period, contact StoreConnect support to request a cache invalidation.
File type mismatch prevents successful upload
Cause: The File Type picklist value on the media record (image, video, document, file, or url) does not match the actual content of the file at the Import URL. For example, the File Type is set to “image” but the URL points to a PDF document.
Resolution:
- Open the media record in Salesforce.
- Verify the File Type matches the actual file. Check the file extension in the Import URL or open the URL in a browser to confirm the file type.
- Correct the File Type picklist value.
- If the Retry Count has reached 5, reset it to 0.
- Clear the Url field if it contains a value, and save.
Advanced: bulk re-import CDN URLs for multiple media records
:::warning This is an advanced operation intended for Salesforce administrators. The script below clears the Url field on all media records that have an existing URL, which forces a complete re-import from the Import Url. Always run this in a sandbox environment first and verify results before executing in production. :::
In some situations you may need to regenerate CDN URLs across many media records at once — for example, after a sandbox refresh or a CDN migration. The following Apex script can be executed in the Salesforce Developer Console (Setup > Developer Console > Debug > Open Execute Anonymous Window):
```apex
List
This script:
- Queries all media records in the org.
- For each record that has an existing Url value, copies the current Url into the Import Url field and clears the Url field.
- Updates all affected records. The scheduled import job will then process each record and generate fresh CDN URLs.
After running the script, allow time for the import job to process all records. The time required depends on the number of media records in your org.
Add and update media in previous StoreConnect versions (pre 20.15)
Add and update media (old version)
Upload individual media in StoreConnect
- In StoreConnect go to Content management > Media.
-
Select New. The New media window opens.
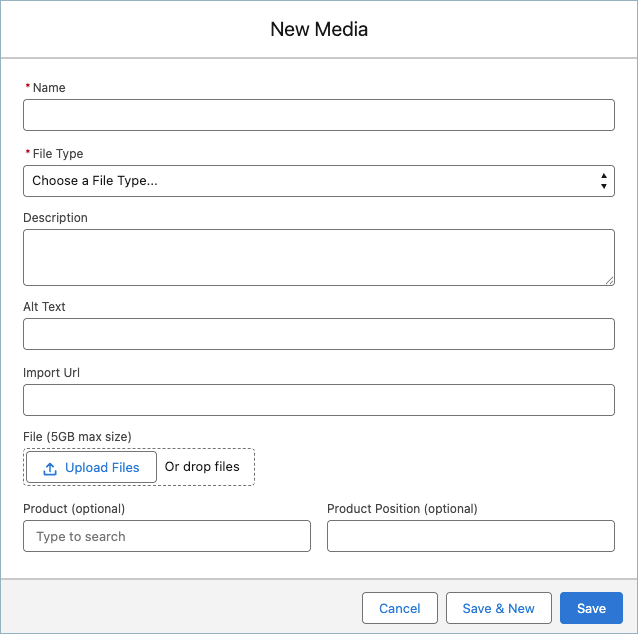
- Enter a Name for the media. Remember to choose something meaningful and easy to recognize.
- Choose the File Type.
- (Optional) Provide a description. For example, where the image is used. This can be useful if you have a lot of images similarly named.
- Enter some brief Alt Text for the image. This is required for accessibility compliance and helps with SEO on your site.
- If adding a file by reference (e.g. from bulk storage), enter the Import URL to reference the file.
- If you are adding a file via upload, select Upload Files or drag and drop the media onto the upload area.
- Select the Product associated with the image, and enter the Product position if there are multiple images for the product.
- Select Save.
Update existing media files
If you want to change a raw media file, you need to delete the old one, add a new one, and then re-link it to where it is supposed to appear.
If the image you want to change is referenced as a publicly accessible URL, edit the original media record, and just update the URL.
- In StoreConnect go to Content management > Media. A list of all your media appears.
- Search, filter, or browse to find the media record you want to update.
- Open the media record.
- Replace the URL in the Import URL field.
- Select Save.
The new file will be downloaded into StoreConnect automatically. It can take a few minutes for the job to run in the background and potentially another minute for the changes to show up on your site.
Was this article helpful?
Thanks for your feedback! It helps us improve our docs.