Log in as a customer in Salesforce
On this page
When you sign in as a customer, you can do anything they can do, such as place orders, change payment details, check out, etc.
Follow these steps to set this up, and to ensure the correct access and permissions are configured, and watch the video demo.
Step 1: create certificate and enable identity provider
- From the Salesforce Setup, search for Certificate and Key Management.
- Click Create a Self-Signed Certificate.

- Give the key a Label and Unique name.
- Set the Key Size to 2048.
- Select Save.
- In the Salesforce Setup, search for Identity Provider.

- Click Enable Identity Provider.
- Select the certificate you just created.
- Click Save.
Step 2: create an external client app
- In Salesforce Setup, search for External Client App Manager.
- Select New External Client App.
- Configure the app basic information:
-
- External Client App Name - StoreConnect Log In as Contact
- API Name - StoreConnect_Log_In_as_Contact
- Contact Email - Enter the contact email for Salesforce to use in case they want to contact you or your support team
- Distribution State - Leave as Default
- Contact Phone - Enter the contact phone for Salesforce to use in case they want to contact you or your support team
- Info URL - https://support.storeconnect.com/article/log-in-from-salesforce
- Logo Image URL - https://res.cloudinary.com/dwxallkfp/image/upload/v1771547748/documentation-media/log-in-as-contact/StoreConnect_Icon_Logo-100x100.png
- Icon URL - https://res.cloudinary.com/dwxallkfp/image/upload/v1771547748/documentation-media/log-in-as-contact/StoreConnect_Icon_Logo-100x100.png
- Description - Allows users to log into store accounts from Salesforce
- For example:

-
- Skip the API (Enable OAuth Settings) section.
- In the Web App (Enable SAML Settings) section:
- Enable SAML - True
- Entity Id - https://{your-stores-domain.com}/auth/saml/metadata
- ACS USR - https://{your-stores-domain.com}/auth/saml/auth
- Issuer - https://{your-stores-domain.com}/auth/saml/metadata
- Name ID Format - urn:oasis:names:tc:SAML:1.1:nameid-format:emailAddress
- Signing Algorithm for SAML Messages - SHA1
- IdP Certificate - Choose the self-signed certificate you created in the first step.
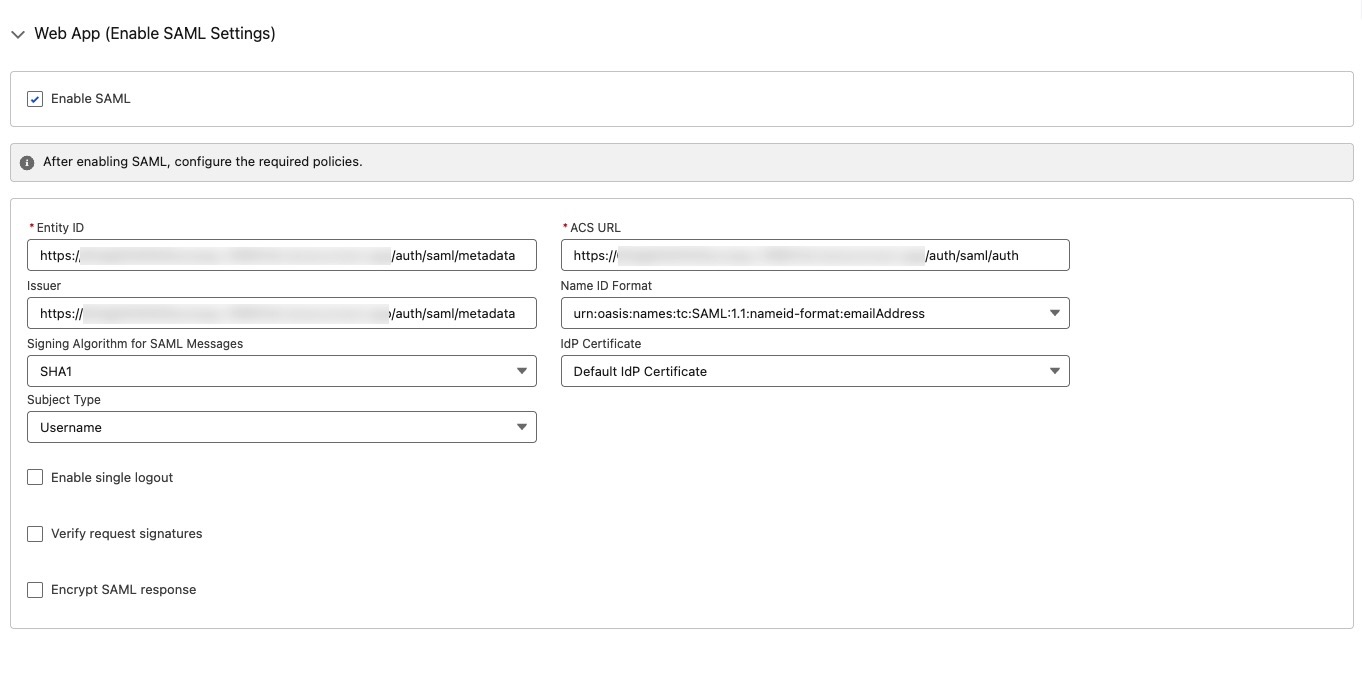
- Save the changes.
Step 3: set app policies
Next, you need to give access to the external client app by adding it to a profile, permission set or both.
- Edit the app.
- Add a Custom start page.
- Enter the Custom Start URL: https://{your-stores-domain.com}/
- Select Profiles and Permissions Set.
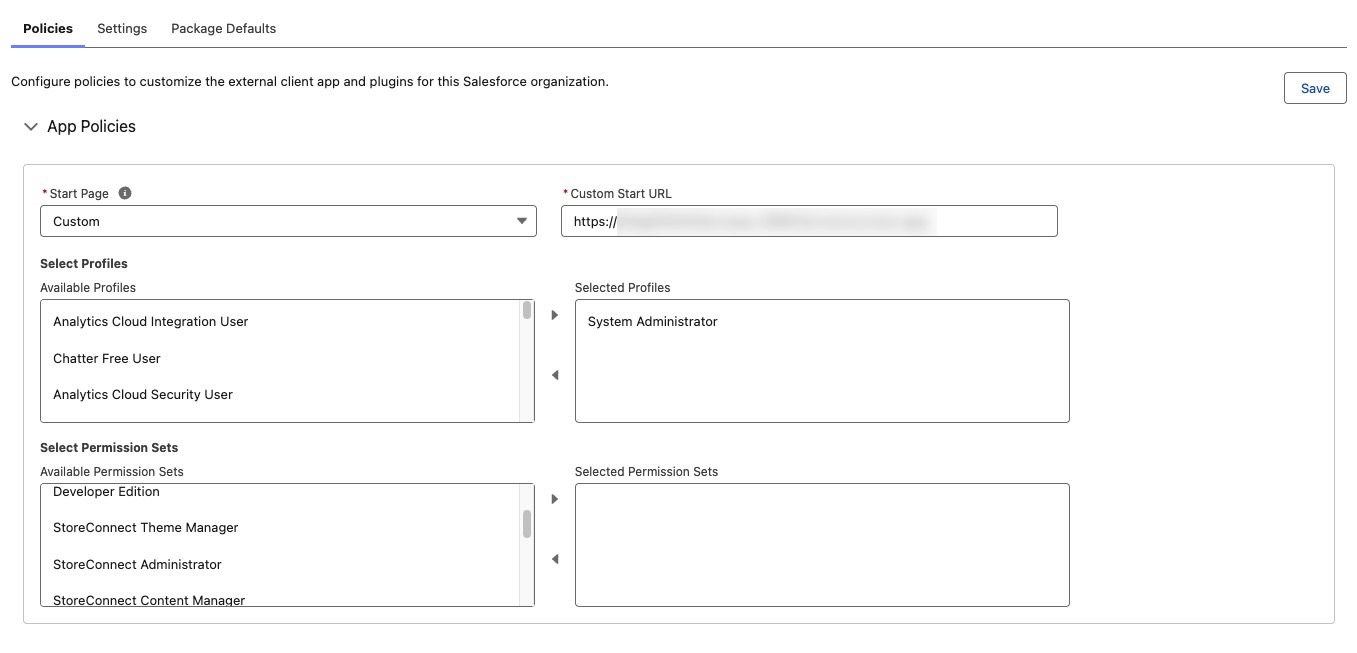
- Select any profiles you want to give broad access to, or for tighter control, create a permission set and assign that only to users who should have access to login as a contact from Salesforce.
- Save.
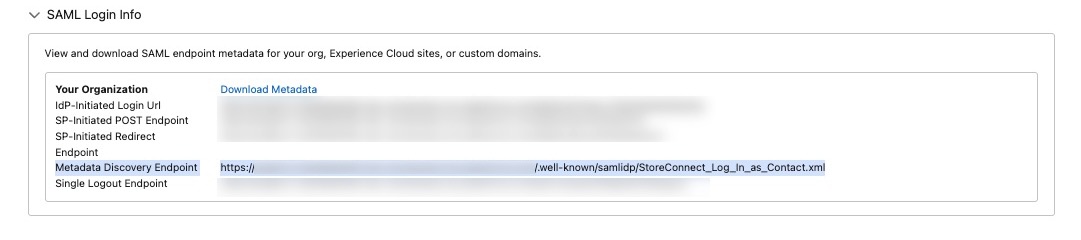
- Scroll down to the SAML Policies section, go to SAML Login Info and copy the Metadata Discovery Endpoint.
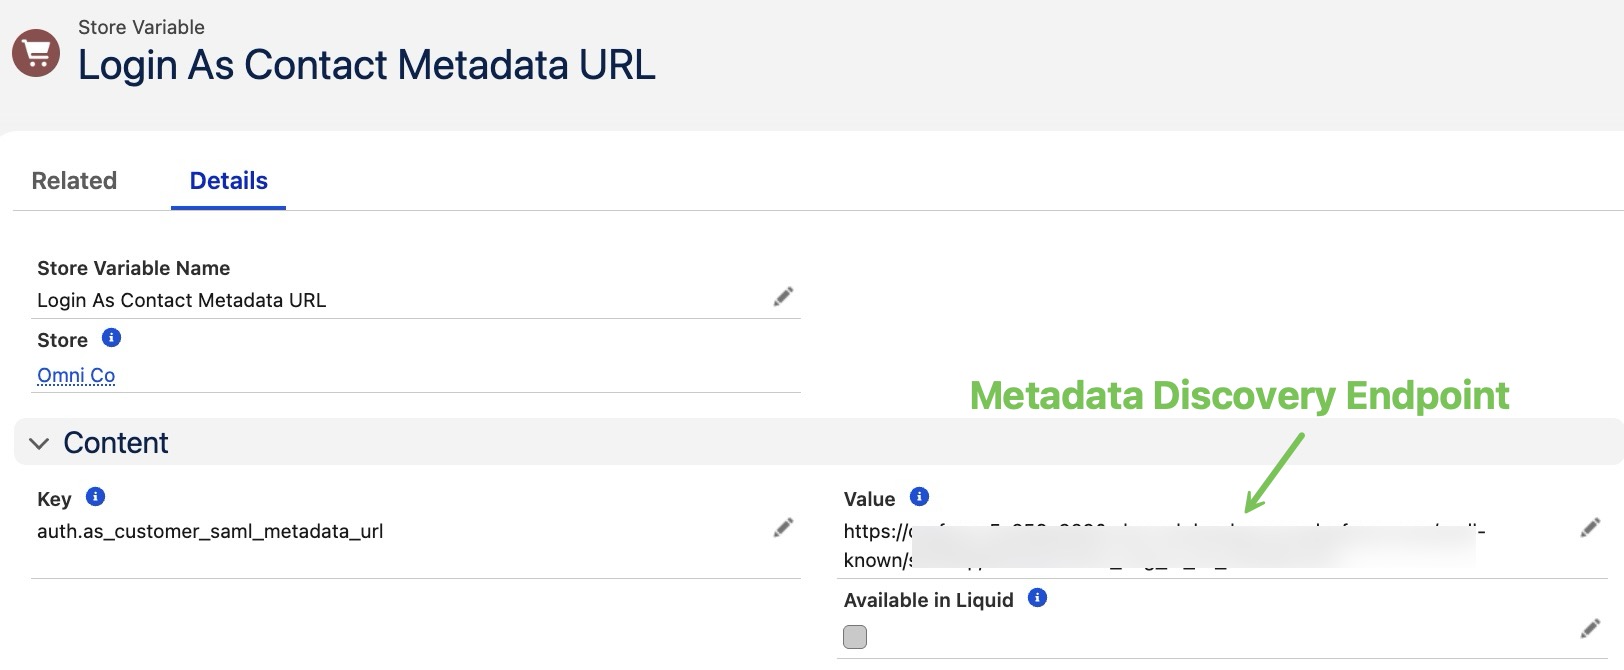
Step 4: set store variables
You need the Metadata Discovery Endpoint you copied at step 8, above.
- Open your Store in StoreConnect.
- In the Store Variables section, select New.
- Call the variable Log in as contact metadata.
- Enter this Key: auth.as_customer_saml_metadata_url
- Value field: Paste the Metadata discovery endpoint you copied in the previous step.
- Save.
Step 5: create a log-in link
For ease of access, create a log-in link for the contact page.
- Open the Contact object in Salesforce.
- Create a custom field.
- Enter the Data Type as Formula.
- Enter Log into store as the Label.
- For the Formula Return Type, choose Text.
- In the Formula field, enter this code, but using your own store’s domain.
HYPERLINK(
"https://{your-stores-domain.com}/auth/saml/sign_in?sfid=" +
CASESAFEID(Id),
"Click here to log in as " + FirstName + " " + LastName )
- Make sure the field is visible to the profiles that will use it by adding the field to the page layout. The feature will now work for those staff who are authorised and have access to the link.
Step 6: set up multiple stores with login capability
To set more stores, repeat from Step 2: Create an External Client App using the unique store domain.
Update an expiring or expired certificate
To update a certificate, you need to replace all instances of where the certificate is used. Note that you won’t be able to log in as a contact until all steps are updated.
There are two locations where the new certificate will need to be updated: Identity Provider (In Salesforce Setup) and External Client App (IdP Certificate).
- Go to Setup > Identity Provider.
- Click Create a new certificate.
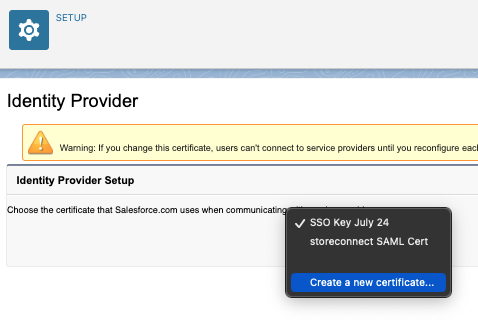
- Give it a name (e.g. You can make it StoreConnect Log In [Month])
- Click Save.
- Next, update the External Client App’s IdP Certificate.
- Test logging in as a contact to verify it is now working with the new certificate.
Troubleshooting steps
- Confirm the Contact has a Username. This confirms the contact has an account created on the store. If it does not have a username, send an invitation. This will email an invite and create a user on the website (if the fields are missing, add it to your page layout).
- Ensure the External StoreConnect ID is populated. (If it is empty, click the Lightning button labeled “Sync to SC” to populate the ID.) See how to add this field here.
- Check for duplicate Contacts.
- Ensure the Contact email is unique and not shared with another contact.
- Review your Sync Error Log for references to affected records and get them to sync.