

Move data from sandbox to production
On this page
Use this process to move StoreConnect records from a sandbox into production. The same approach works between any two Salesforce orgs.
Before you begin
- Confirm the StoreConnect package version matches in both orgs. Check Setup > Installed Packages in each. A version mismatch means fields may not exist in the target org.
- Install a data loader that can export records and their relationships, such as dataloader.io.
- List every object you plan to migrate, using the full list of StoreConnect objects as your guide.
- Plan the insert order around data dependencies before you export anything. See plan the migration below and the example insert order at the end.
:::warning Some things do not migrate and must be handled separately or by hand:
- StoreConnect settings metadata can be exported, but you can only update those settings manually in the production org. See Setup > Custom Metadata Types.
- Media files move separately. See media imports below.
- Domains and mail addresses should not be copied across. They differ between environments, and overwriting a production domain takes the live store down.
- Salesforce record IDs from the sandbox do not exist in production. Never map a field containing a Salesforce ID to a lookup field in the target org. :::
Export recommendations
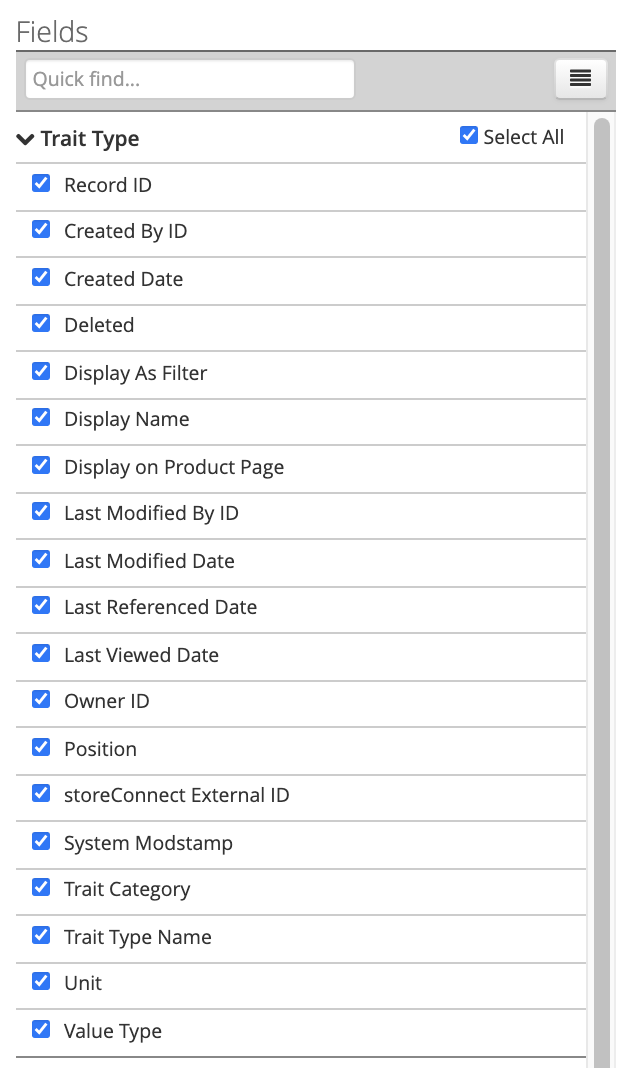
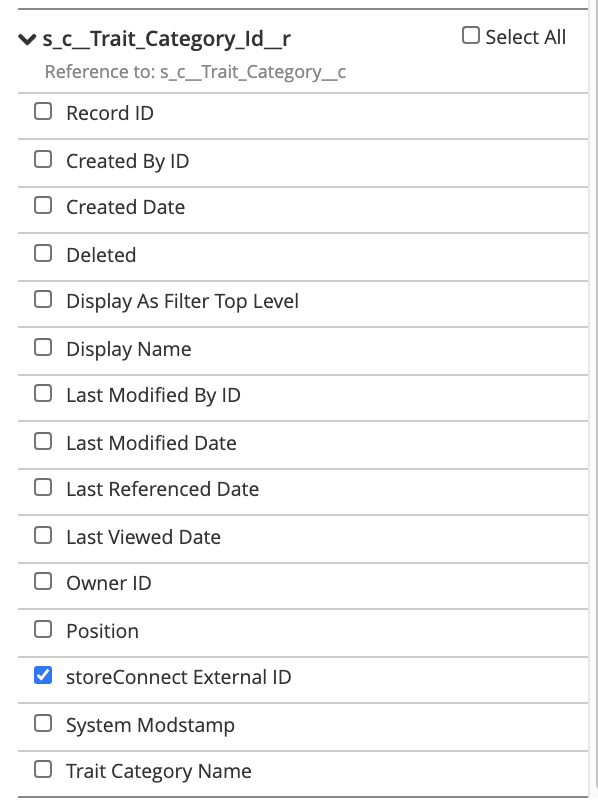
- When exporting an object, include all its fields plus a unique identifier from any related objects. Use StoreConnect’s External IDs to re-establish the links in the production org.
- To keep the record owner on each record, export the Username field, then edit the export file to strip the
.{SandboxName}suffix from the end of each username.
Export the StoreConnect external ID with records
All StoreConnect records have a StoreConnect External ID that is unique and can be used to help match imported records.
If you need to bring over non-StoreConnect objects, you will need a unique field to reference. You can use the Salesforce Record ID, or add a special text field to the object in the other org to hold that ID temporarily, until the migration is completed.
Example: export trait records
Trait records have a dependent relationship: every Trait Type belongs to a Trait Category, and Trait Values belong to a type. See product traits for how the three fit together, and apply product traits using templates if your store also uses trait templates, which have their own records to migrate.
To relate each Trait Type to the correct Trait Category, include the StoreConnect External ID of each trait category in the export file.
If your store uses trait templates, insert Product_Trait_Template__c and Product_Trait_Template_Item__c after the trait records and before Product2. Each product looks up to its template, so a product inserted first loses its template assignment.
Plan the migration
Import objects in a logical order that accounts for dependencies such as custom lookups. Expect to test your first approach and adjust the plan.
Dependencies
A dependency is where one object needs another to exist before its values can be imported. Identify these before you start.
Circular dependencies need two passes. Page has a lookup to Store, and Store has lookups to Page. Insert the Store records first without mapping any lookups to Page, then insert the pages, then come back and update the store records with the page lookups.
Do the same wherever records reference another record on the same object, such as Page, Article Category, and Menu Item.
Menu Item is the one most often missed, because it fails quietly. Most menu items point at a Parent that does not exist yet when you insert them, so Parent is left blank and no error is raised. The result is a menu with every item at the top level. Insert the menu items flat, then run a second pass to set Parent on each one. Confirm the nesting on the storefront afterward.
Record mapping in the CSV
Map the exported data column by column, using the StoreConnect External ID as the reference where IDs must be maintained between objects.
Optional identifier fields that do not need pre-populating, such as Owner ID, populate automatically if you leave them blank.
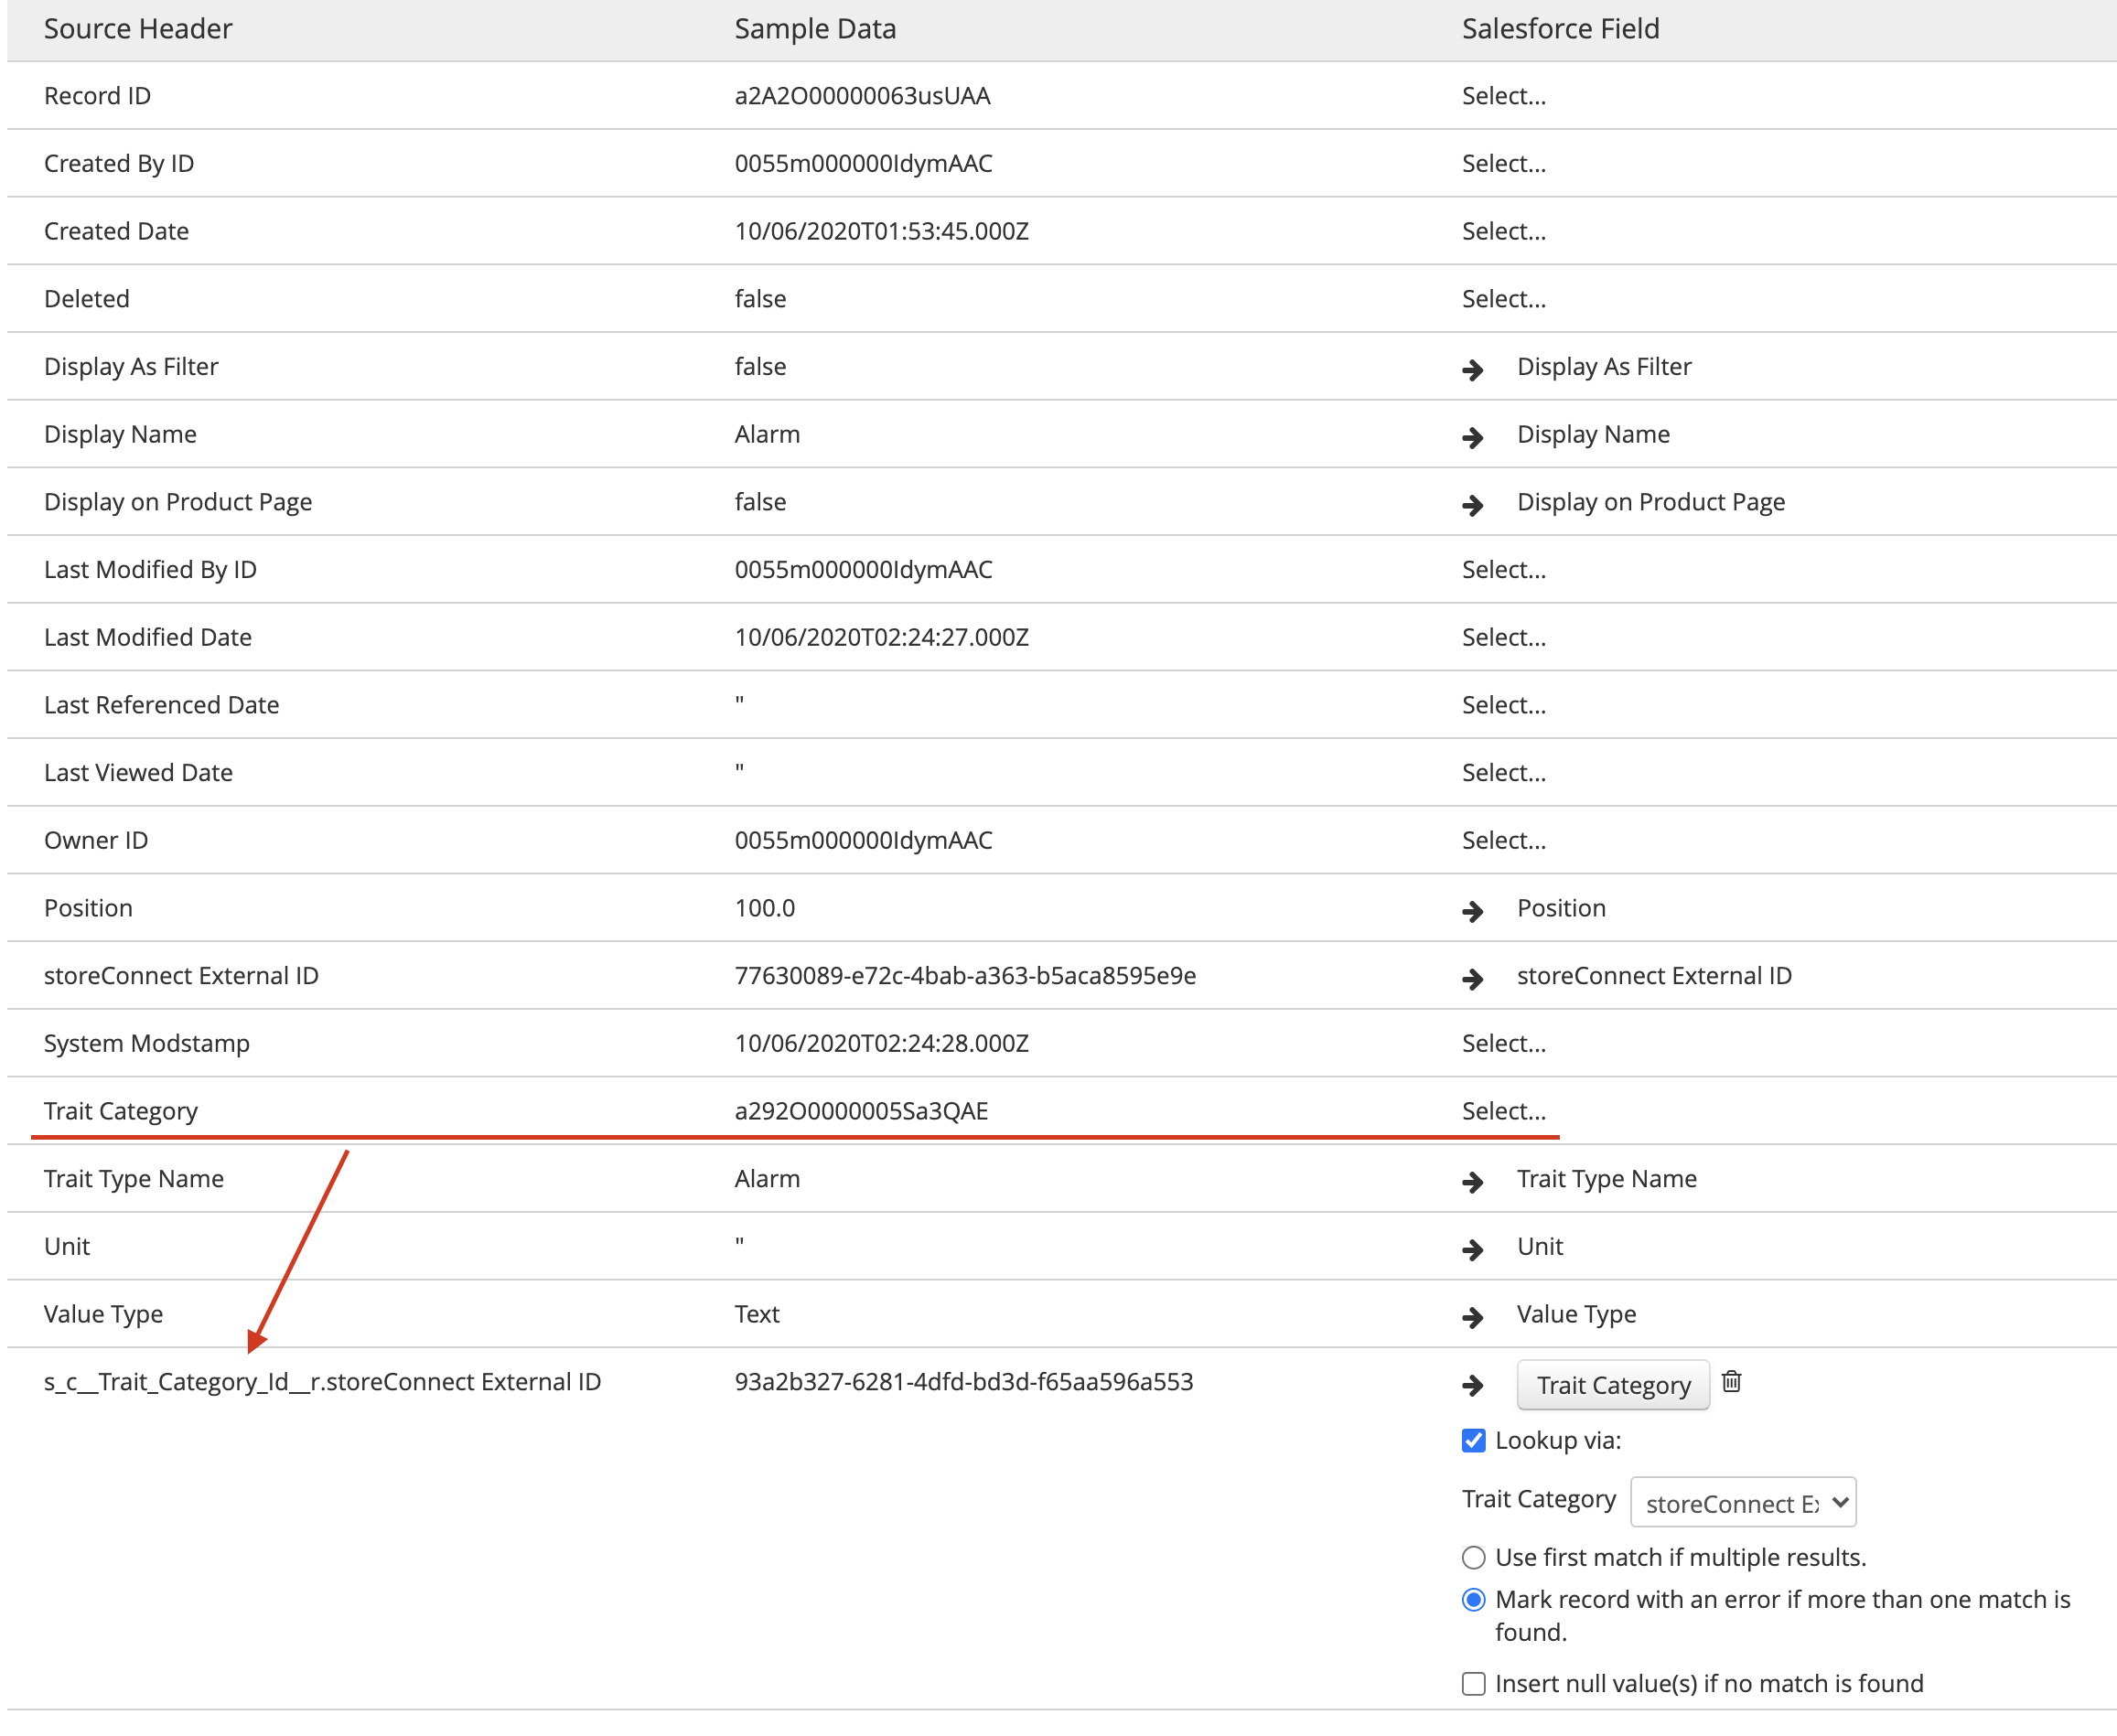
Source Header is the column header in the export CSV, Sample Data is the value from the first record in that CSV, and Salesforce Field is the field you are mapping the column to in the production org.
Media imports from the StoreConnect CDN
If you use StoreConnect’s content delivery network (CDN) to store and reference media, the production URLs need to point at production CDN files.
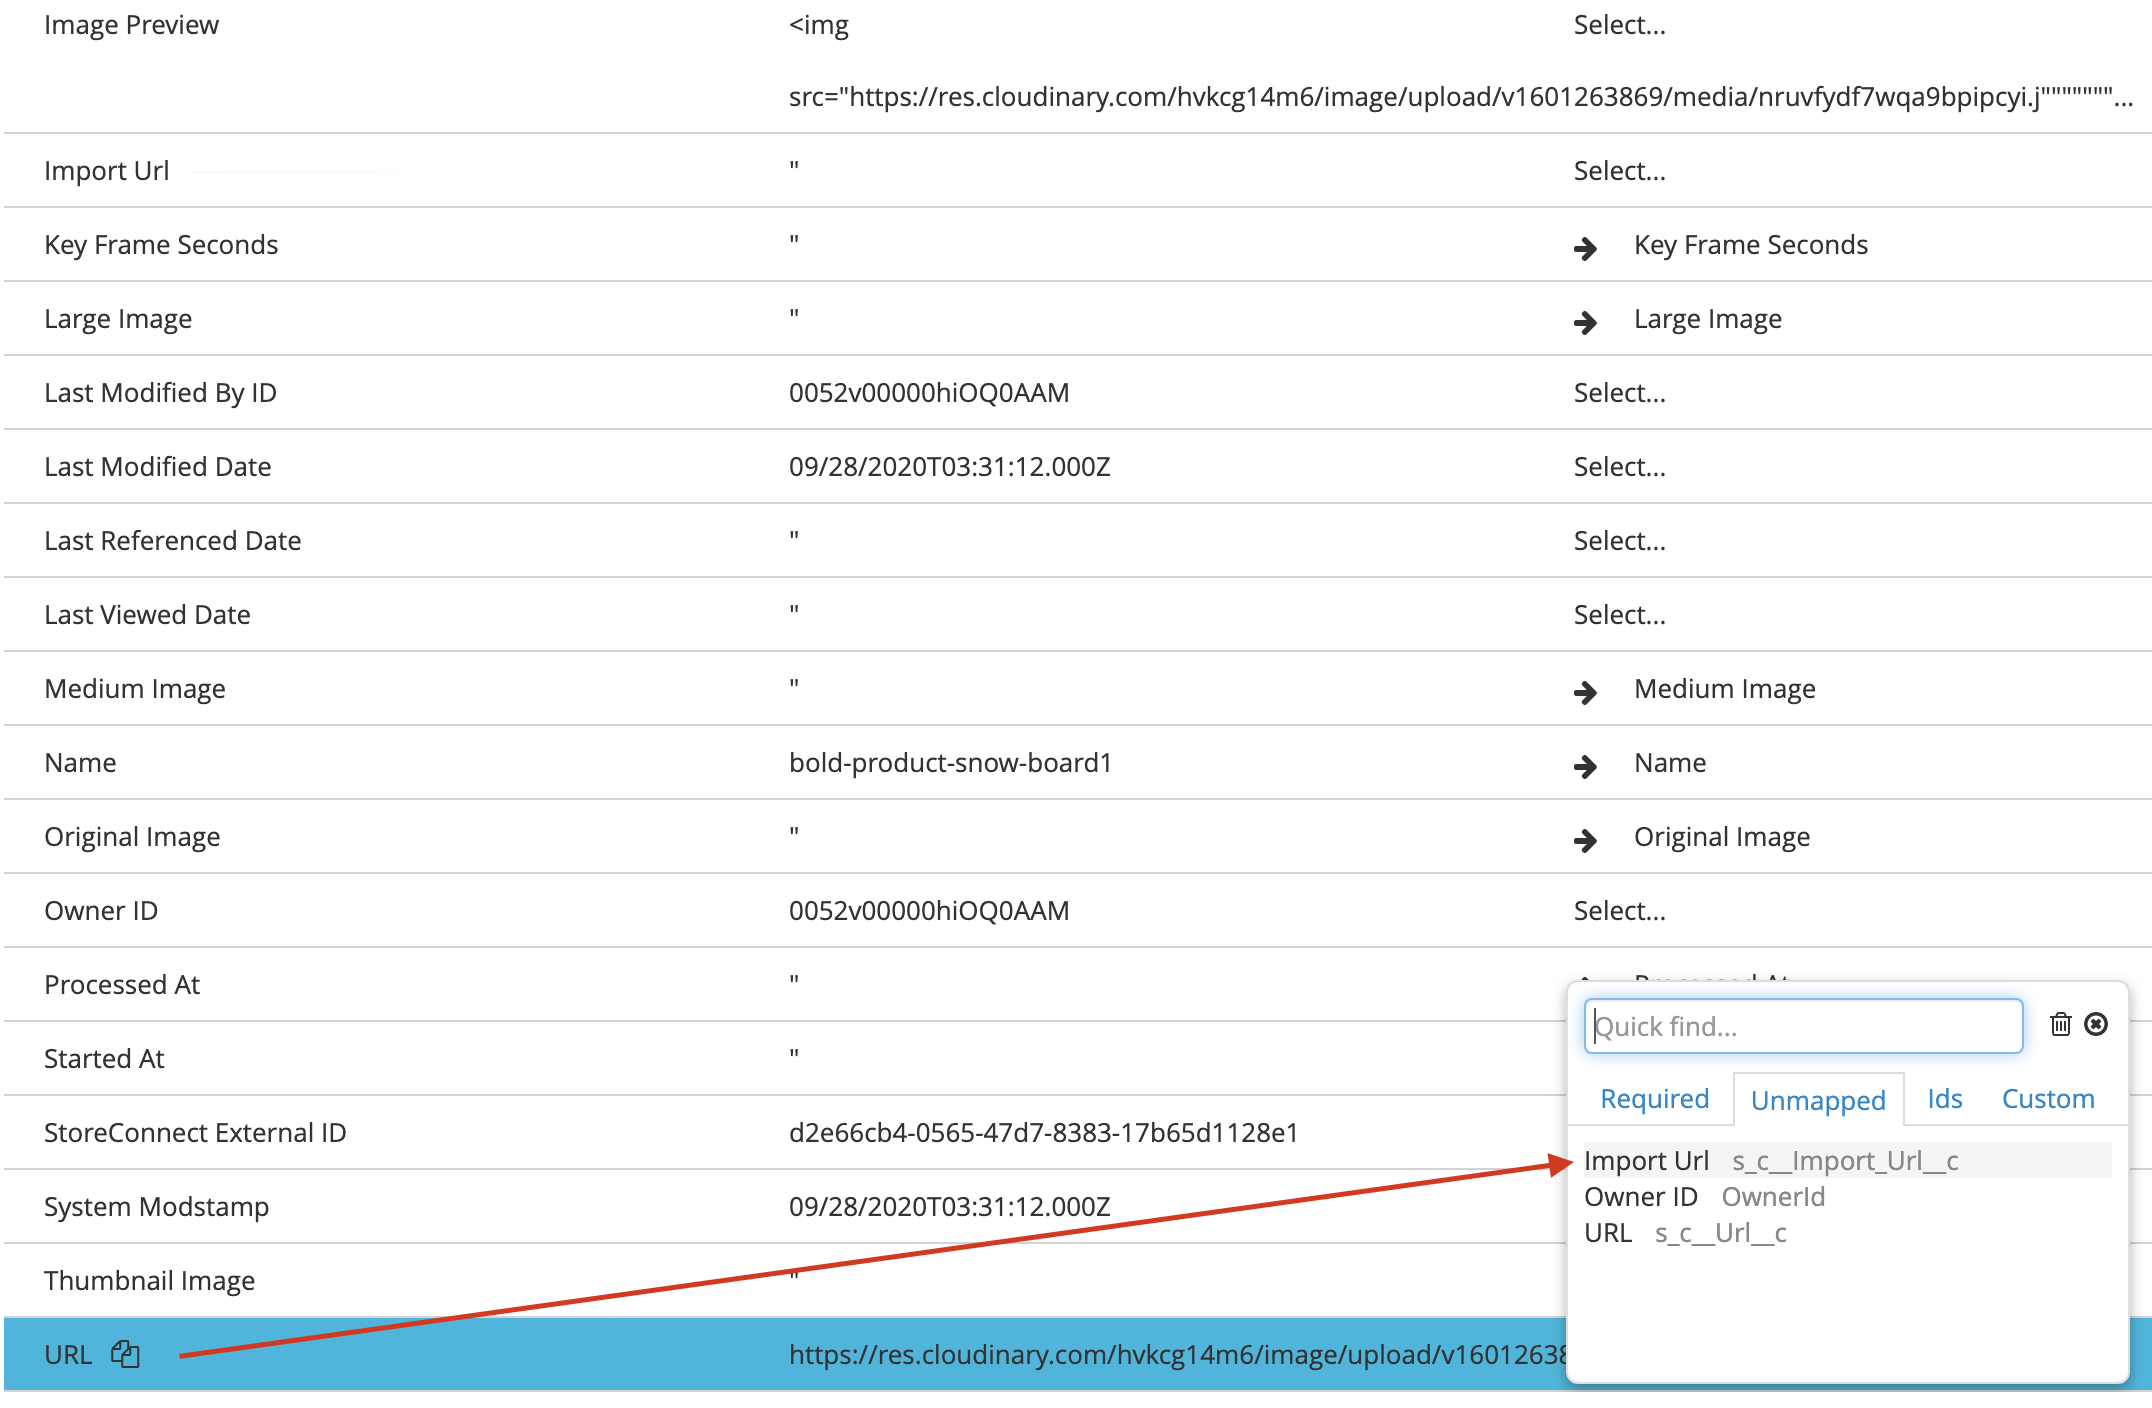
In the CSV, map the existing URL column to the Import URL field in your production org, and map nothing to the URL field. When Import URL has a value and URL is blank, StoreConnect generates the new URLs for you rather than you updating each one by hand.
Verify the migration
Once the import is complete, confirm it worked before you rely on the production org:
- Compare record counts per object between the two orgs, and account for any difference.
- Open a sample of records and confirm their lookups resolve to the right related records, rather than being blank or pointing at the wrong record.
- Open the production storefront and check that categories, products, prices, pages, and menus all render.
- Open a menu and confirm the nesting matches the sandbox, rather than every item sitting at the top level. A flattened menu means the second pass over Parent did not run.
- Compare the content of a few long text fields, such as a theme template or a translation, rather than only counting records. A truncated import passes a record count check while the template or translation is left incomplete.
- Confirm media displays on product and content pages, which shows the CDN URLs generated correctly.
- Confirm each Store record still has its own production domain and has not been overwritten with the sandbox value.
:::tip Make your next round of changes in the sandbox rather than production, particularly anything driven by an AI agent, then migrate it across using this process. See build on StoreConnect using AI agents. :::
Tips and troubleshooting
- Missing picklist values. Picklist values in the sandbox may not exist in production, and records that use them fail to insert. Which fix you need depends on where the value came from:
- StoreConnect’s own values — open the StoreConnect Console, click Setup in the header actions bar, then click Manage picklist values. It compares every StoreConnect picklist in your org against the current package and adds only what is missing, leaving your existing values untouched. See managing StoreConnect upgrades.
- Values you added yourself — Manage picklist values lists these as
Unknownand leaves them alone. Add them by hand in Setup, then re-insert the records that failed.
:::note Manage picklist values is available to a user on the standard System Administrator profile who also has StoreConnect administrator access. On a custom profile the option appears but stays disabled, even if that profile grants the same permissions. If you need it, assign the standard profile to one user for the task and change it back afterward. :::
- Do not deploy a whole picklist field between orgs. Deploying the field replaces its entire value set, so any value the target had that the source does not is silently removed, and records already using it stop validating. Add the individual missing values instead. If you have already done this and lost values, Manage picklist values restores the StoreConnect ones.
- Match on API Name, not Label. When you add a picklist value by hand, its API Name must match the value in the source org. The Label can differ.
- Route mapping conflicts. A stale Route Mapping holds a path against a store, so a page, article, or category importing to that path fails with a “slug or path must be unique” error, with no conflicting record visible. Import Route Mapping last, and skip any whose From value already exists in production. See route mapping.
- Duplicate transactional emails. StoreConnect creates a default set of Transactional Email records when you insert a Store, and one of them is enabled. Importing your own set on top leaves two records for the same checkout step and order status. After importing, review the list and delete the generated records you do not want, so only one email is enabled for each step.
- Categories that share a path. Two categories cannot occupy the same path in one taxonomy. Older orgs sometimes still hold a pair that predates this rule. Only the first imports; the second fails as a duplicate, and its hierarchy rows and menu items fail with it. Give the duplicates distinct paths in the source org before you export.
- Duplication errors on products and price book entries. StoreConnect’s shipping and promotion products are added by the package at install time. They do not need importing or updating, so these errors are safe to ignore.
- Store domains. When updating a Store record, do not overwrite the domain. It differs between the staging and production websites.
- Sending addresses. Confirm each store’s Mail From Address is set up as an Organization-Wide Address in the production org.
Example of insert order
This is a guide only. Build your own insert order to account for the data and field dependencies in your org. Leave out anything your store does not use.
Three groups are easy to overlook. Without the Theme records that hold your templates and translations, the store renders unstyled. Without the Menu records, it has no navigation. Without the store-scoped settings (Store Variable, Style Block, Script Block), store-specific behavior is missing.
Pricebook2Media__cCountry__cZone__cZone_Country__cTax__cTheme__cTheme_Template__cTheme_Asset__cTheme_Variable__cTheme_Locale__cLocale_Translation__cContent_Block__cContent_Blocks_Children__cTrait_Category__cTrait_Type__cTrait_Value__cProduct_Trait_Template__cProduct_Trait_Template_Item__cStock_Location__cStore__cStore_Variable__cStyle_Block__cScript_Block__cForm__cForm_Question__cStore_Form__cTransactional_Email__cShipping_Provider__cPayment_Provider__cShipping_Rate__cTaxonomy__cProduct_Category__cProduct_Category_Hierarchy__cContent_Blocks_Product_Categories__cPage__cContent_Blocks_Pages__cArticle_Category__cArticle__cArticles_Article_Categories__cContent_Blocks_Articles__cProduct2PricebookEntryProducts_Product_Categories__cContent_Blocks_Products__cProduct_Media__cProduct_Tax__cProduct_Variant__cRelated_Product__cTrait__cMenu__cMenu_Item__cRoute_Mapping__c
Theme comes before Store because the store looks up to it. Menu Item comes near the end because it links to pages, categories, articles, and products, which all need to exist first. Route Mapping goes last, because inserting a page, article, or category creates its route mapping for you.
Was this article helpful?
Thanks for your feedback! It helps us improve our docs.