Set up a StoreConnect sync user
On this page
When you create a StoreConnect sync user with a Salesforce Integration license, it consumes only one Salesforce license for the integration.
Step 1: Create the sync user
Make sure you save or take note of the profile details as you will need to log in and verify as this user later.
- Open the Salesforce Set Up area.
- Search or browse for Users.
- Create a new user. We recommend you call it something like StoreConnect sync user, so you can recognize it later.
- Select the following options:
- User License: Salesforce Integration
- Profile: Salesforce API Only System Integrations
- Select Save.
Step 2: Assign permissions to the sync user
- In the sync user record, scroll to the Permission Set License Assignments section and select Edit Assignments.
- Select the Salesforce API Integration, then select Save.
- Scroll to the Permission Set Assignments section and select Edit Assignments.
- Add the StoreConnect Sync Standard Permission and the StoreConnect Sync User Permission, then select Save.
You may also need to do some or all of the following procedures.
Step 3: Enable the View All Data permission
When using the Salesforce Integration license, the sync user also needs the View All Data system permission for the best sync experience. Without it, StoreConnect may show a Missing Salesforce Permissions warning and sync can be slow or degrade. Enable it on the StoreConnect Sync Standard Permission permission set after it has been assigned to the sync user.
- In Salesforce, search for permission sets in the Quick Find.
- Locate and select StoreConnect Sync Standard Permission. The permission set record opens.
- Scroll down and select System Permissions. The system permissions record opens.
- Select Edit, then scroll down the list and find View All Data.
- Select the checkbox to enable it, then select Save.
Step 4: Authorize the store connection
Once the sync user is created and permissions are assigned, you authorize the connection from within the StoreConnect console using OAuth.
- In the StoreConnect Console, open the Setup Guide or go to Setup > Change sync user.
- Select the sync user you just created if it is not already selected, then click Authorize.
- A new browser tab opens. Sign in to Salesforce using your sync user details and approve the authorization request.
:::note If the authorization tab is blocked by your browser or was closed before completing, click Reopen sign-in to open it again. A Cancel button is available if you need to start over. :::
- Return to the StoreConnect console — the page polls automatically and shows progress. When the connection is established, setup continues.
Set record type defaults
If multiple record types are in use on objects such as Accounts, Contacts and Orders, the sync user will need to know what record type to assign for any records created on the website side.
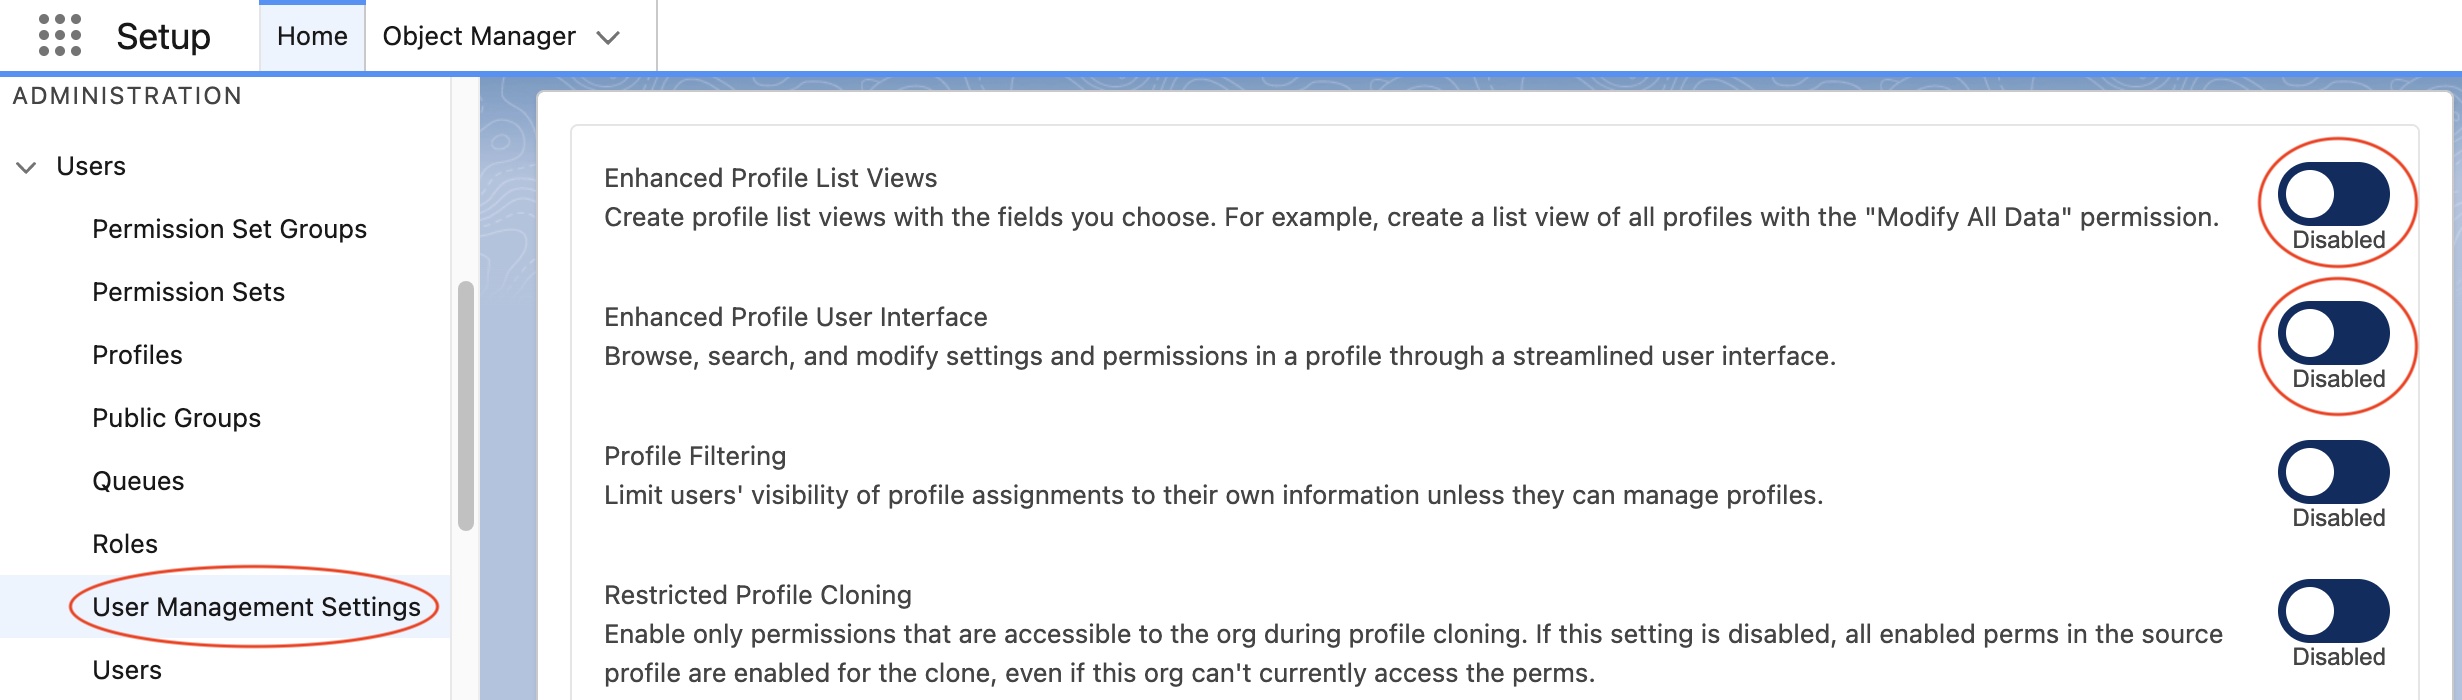
- Navigate to Salesforce Setup > User > User Management Settings.
-
Disable Enhanced Profile List Views and Enhanced Profile User Interface options. This is required to see the settings.
- Navigate to User > Profiles > Minimum Access - API Only Integrations.
- Scroll to the Record Type Settings and click Edit on the Object you have record types for.
- Add the Record Types required.
-
Select the default record type for any new records.

Change the sync user
Use this method when you want to switch the StoreConnect sync user to a different Salesforce user.
- Go to the StoreConnect Console.
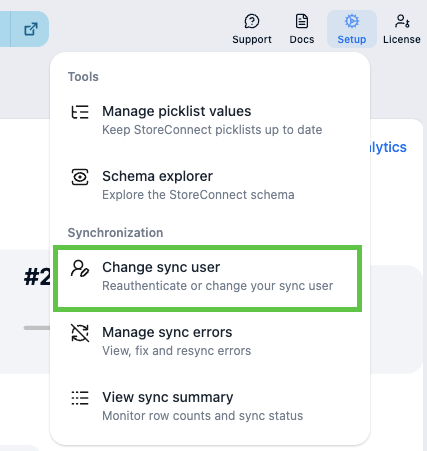
-
Go to the top-right Setup menu and click Change sync user.
- In the dialog that appears, select the new sync user by username or email and click CApply permissions. You cannot select the same user that is already connected.
- Click Authorize. A new browser tab opens.
- Sign in to Salesforce using your sync user and approve the authorization request.
- Return to the StoreConnect console — the page polls automatically. When the new connection is established, the dialog closes.
StoreConnect applies the required permissions to the new sync user automatically.
Advanced: delete and add a new sync user via the developer console
Note: If you do not have developer console access to perform this advanced procedure, you can switch back to the original user by following the ‘Change a sync user’ procedure again, see above.
- In Salesforce, open the Developer Console.
- Go to the Query Editor tab.
- Run the following SQL query:
SELECT Id, Name, s_c__Text__c
FROM s_c__Setup_Configuration__c
WHERE Name = 'selected_sync_user_id'
- When the record appears:
- Select the row.
- Delete the record.
- Close the Developer Console.
- Refresh the StoreConnect Console.
- Click Sync > Change sync user.
- Add the sync user and apply permissions.
The new user will now be prompted to re-authenticate.
Recommended best practices
- Use a dedicated sync user (not a personal account)
- Avoid changing the sync user unless necessary
- Document sync user credentials securely
- If a password changes, follow the Advanced steps above to re-authenticate cleanly
Was this article helpful?
Thanks for your feedback! It helps us improve our docs.