

Square
On this page
Square is a third party payment provider. If you use Square, you can integrate it directly with StoreConnect. Square works for:
- Standard checkout transactions
- Subscription payments
- Apple Pay and Google Pay transactions
- Pre-authorization
- Enforcing additional security with 3D Secure (3DS) and Enterprise-grade Encryption
- In-person card payments on Square Terminal devices, paired to a StoreConnect register
:::tip
Already have your credentials? Go to Configure Square in StoreConnect.
:::
What you need
- A Square developer account.
- Square credentials and location IDs.
- A sandbox environment (recommended).
- Outlets set up in StoreConnect (POS only).
- Minimal code and admin know-how.
:::warning A physical Square Terminal cannot pair using sandbox credentials. Use the production Application ID and Access Token from Square’s Credentials page for API Key and API Secret. See Square’s Sandbox overview and Testing in sandbox below. Sandbox is fine for testing the online storefront.
API Mode does control which Square environment online payments use, so set
it to production for a live store. Terminal pairing always runs against Square
production, so pairing succeeds or fails on the credentials themselves, not on
this field.
:::
Get Square credentials
- If you haven’t got a Square developer account, create one and add an application.
-
Create a new application just for StoreConnect. Each Square app comes with access credentials for use in a Sandbox or Production environment.
:::tip Set up a sandbox first to test it works how you want, then update to the production credentials later. :::
-
In Square, go to the Credentials page of your app.
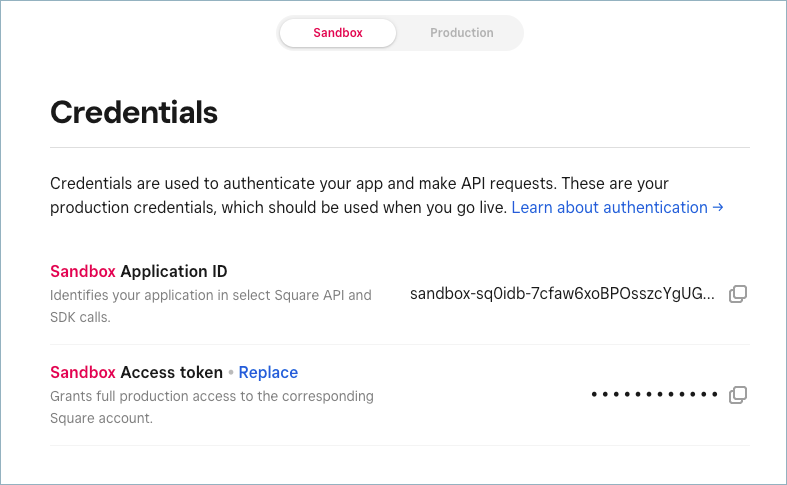
- Copy the Application ID and Access Token.
-
Go to the Locations section and copy the Location ID.

:::note Sandbox and production are separate Square environments: credentials, Location IDs, and other resources from one cannot be used with the other. If you switch API Mode from sandbox to production later, you need a fresh Application ID, Access Token, and Location ID from the production app, not just a mode toggle. :::
Testing in sandbox
Square’s Sandbox is a free, isolated environment for testing without moving real money. See Square’s own Sandbox overview and Sandbox payments docs for the full reference. A few things that matter for a StoreConnect setup:
-
Card-not-present (online storefront) testing is supported. Use Square’s test card numbers to trigger predictable outcomes at checkout:
Card Number CVV Result Visa 4111 1111 1111 1111111Approved (any future expiry) Mastercard 5105 1051 0510 5100111Approved (any future expiry) Visa 4000 0000 0000 0002111Declined Postal code
99999and expiry01/40simulate a postal-code or expiration-date error respectively. -
Card-present (POS terminal) testing is not supported at all, in any form. Square’s own docs are explicit: “Square hardware, such as a POS terminal, cannot be used in the Sandbox,” and “Testing card-present scenarios is currently not supported.” This is the same limitation behind the production-credentials requirement for pairing a physical terminal; see the warning under What you need.
Configure Square in StoreConnect
- Open StoreConnect and go to Settings > Payments > Payment providers.
- Select New. Complete the fields as follows, then Save:
| StoreConnect field | Square data |
|---|---|
| Name | Square. For a test provider, add - Test. |
| Provider | Select Square from the list. |
| API Mode | Enter sandbox or production. |
| API Key | The Application ID from your Square account. |
| API Secret | The Access Token from your Square account. |
| API Options | See API Options format below. |
API Options format
-
Enter the options as YAML key/value pairs, one option per line. JSON is valid YAML, so a braced object parses the same way:
yaml show_wallets: true location_id: YOUR_LOCATION_ID -
For an option that holds a set of values, such as
pos_outlets, write the nested keys on one line inside{ }:yaml show_wallets: true location_id: YOUR_LOCATION_ID pos_outlets: { a24ao000001lE6zAAE: L003B9TTM5NC5, default: L003B9TTM5NC5 }All options live in one API Options value. Add new options to what is already there rather than replacing it.
-
Add only the options you need:
Option Purpose location_idThe Square Location ID for online payments. POS ignores this and takes its location from pos_outlets.show_walletsSet trueto show Apple Pay and Google Pay at checkout.pos_outletsMaps each StoreConnect outlet to a Square Location ID for POS (see below). A web-only store needs
location_id. A POS-only store needspos_outlets. A store that takes both needs both.
:::warning Do not split a nested option across indented lines. This form looks correct and fails:
```yaml
pos_outlets: a24ao000001lE6zAAE: L003B9TTM5NC5 default: L003B9TTM5NC5 ```
Line breaks that follow a key are normalized before the field is parsed, which
can collapse the indented block into a single invalid line. The whole field then
resolves to empty: no error appears on the record, and POS calls that need
pos_outlets (including terminal pairing) return a 404. Keep nested values on
one line inside { }, as in step 2.
Two other things break parsing the same silent way: curly quotes copied from a rendered page, and tab characters used for indentation. Use straight quotes and spaces. :::
POS only: add POS locations to Square
- Add each POS location to Square to generate unique Location IDs. See add locations in Square via API.
- Map each Location ID to its outlet record in StoreConnect. Each outlet has a unique Salesforce ID (or SFID).
- Keep both the SFID and the Location ID to hand. You need them to configure the payment provider, below.
Copy the SFID for each outlet
- Open an outlet in StoreConnect.
-
In the URL shown in your browser, copy the SFID. It looks something like
a24ao000001lE6zAAE.
- Copy it for mapping to the Square Location ID in the format outlined below. If you have many store locations, map them out on a spreadsheet for verification.
-
Add
pos_outletsto the API Options of the Square payment provider in StoreConnect, alongside the options you already set:yaml show_wallets: true location_id: YOUR_LOCATION_ID pos_outlets: { a24ao000001lE6zAAE: L003B9TTM5NC5, a24ao000001gzZZAAY: L003B9TTM5NC5, default: L003B9TTM5NC5 }Inside
pos_outlets, each key is an outlet SFID and each value is that outlet’s Square Location ID. The optionaldefaultkey is used for any outlet not listed. Keep the wholepos_outletsvalue on one line inside{ }; see the warning in API Options format. -
Save the payment provider details. The setting might now look something like this:

POS only: add Square POS payment options as a store variable
:::note
Like other payment methods, the Square POS option needs to be added as a Store Variable. You can do this before or after pairing a Square device at a register, but ideally before.
:::
- Open your Store record in StoreConnect.
- Go to the Store Variables related list and select New.
- Name the variable. The name is for your own reference only, so any name works. For example,
POS: Square payments. -
Enter this Key:
pos.payment_options.card_square_integrated.enabled -
Enter
trueas the Value. -
Select Save, then resync the register. POS reads payment settings from its local cache, so a new or changed store variable is not visible on the device until it resyncs.

POS only: pair Square terminal devices
The Square Terminal uses a device code and cloud pairing, so it needs internet access. No USB or Bluetooth connection to the register is required.
:::warning
Pairing needs genuine production credentials. Square hardware cannot be used in
the Sandbox, so API Key and API Secret must be the production
Application ID and Access Token; see the warning under What you need. If
Request a code fails or the terminal will not accept the pairing code, check
the credentials and pos_outlets before anything in this section.
:::
Three systems are involved in setting Square up end to end, though not all three come into this particular step:
| System | What it is | Where it’s used |
|---|---|---|
| StoreConnect POS | The POS app on your register | Request the pairing code, then confirm pairing |
| Square Developer Dashboard | developer.squareup.com, used earlier in Get Square credentials | Not needed here. Credentials are fetched once, upfront |
| Square Terminal | The physical hardware device | Enter the pairing code |
- In StoreConnect POS, go to Settings > Payment integrations. Square appears in this list once the store variable is set and the register has resynced. Select it.
- Select Request a code. A pairing code appears, showing Awaiting pairing.
- On the physical Square Terminal, use one that isn’t already signed in or paired elsewhere. If it’s currently signed in, sign out first: the device code option only appears on the sign-in screen.
- On the sign-in screen, choose Use a device code, enter the pairing code from POS, and tap Sign in. Wait for the terminal to finish loading. It should settle on a blank screen showing only the Square logo.
- Back in StoreConnect POS, select Confirm pairing. Once pairing completes, the button changes to Disconnect, confirming the terminal is paired. Square is now available in checkout.
:::tip Because a paired terminal runs on production credentials, a test transaction moves real money. Discount a POS product down to a token amount (for example, $0.25) for the test sale, then process a refund afterward to return the funds. :::
Check it worked
- At the register, resync the device. POS caches payment settings locally, so a newly added store variable is not visible until it resyncs.
- Start a sale and go to payment. Square should appear as a payment option.
- If it does not, check in this order:
- The store variable
pos.payment_options.card_square_integrated.enabledexists on the Store record with the valuetrue. - The payment provider is Active, and Channels is blank or
includes
pos. Do not narrow Channels toposon a provider that also handles online payments, as that drops it out of web checkout. - The outlet’s SFID appears in
pos_outlets, or adefaultkey is present. A missing entry is what makes Request a code return a 404. - API Options parses. A nested option split across indented lines, curly quotes, or tab indentation each make the whole field resolve to empty with no error on the record.
- If you are pairing a physical terminal: API Key and API Secret are genuinely the production Application ID and Access Token. See the warning under What you need.
- The store variable
Was this article helpful?
Thanks for your feedback! It helps us improve our docs.