View the StoreConnect data model via the Schema Explorer
On this page
The Schema Explorer is an interactive entity relationship diagram (ERD) viewer built into the StoreConnect Console. It lets you visualize all StoreConnect custom and standard Salesforce objects, browse their fields, and explore how objects relate to each other. It is intended for technical audiences including developers, business analysts, and architects who need to understand the StoreConnect data model.
Requirements
- Salesforce System Administrator profile
- SC_Administrator custom permission set
Users without these permissions will see the Schema Explorer option disabled in the console header.
Open the Schema Explorer
- In the StoreConnect Console, click the Setup button in the header actions bar.
-
Under Tools, click Schema Explorer.
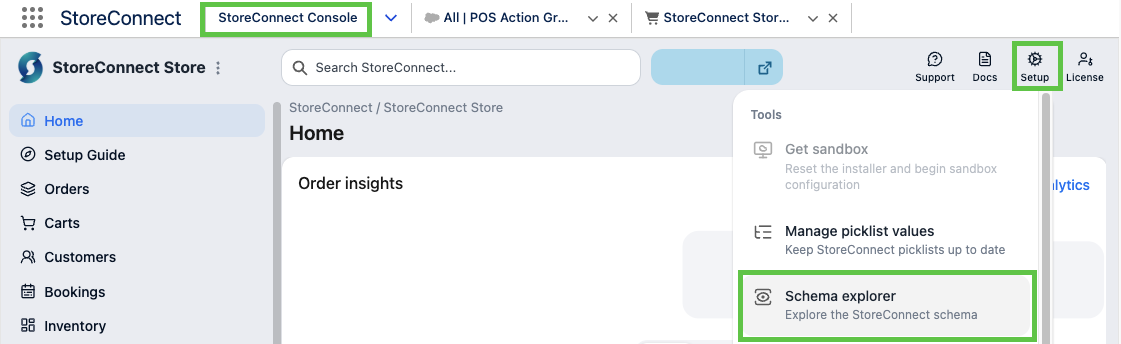
The Schema Explorer opens as a full-screen overlay.
Interface overview
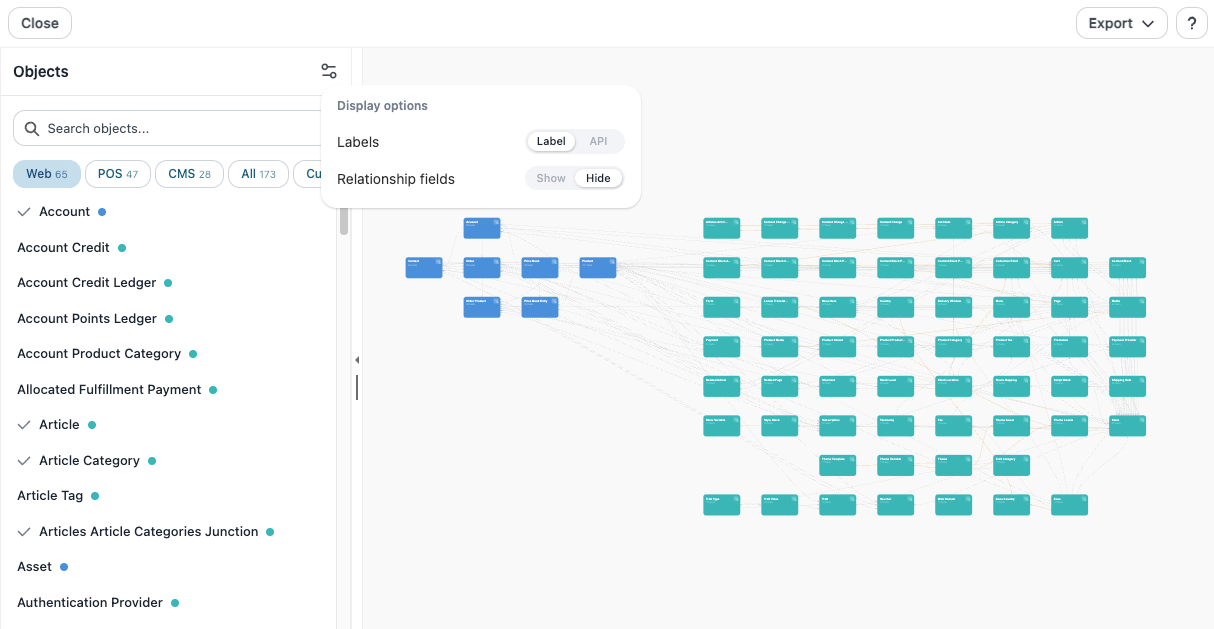
The Schema Explorer has three main areas:
- Left panel — Object list for filtering, searching, and selecting objects to display on the canvas.
- Canvas — The main diagram area where objects appear as nodes with relationship lines between them.
- Right panel — Field detail panel for the currently selected object. Expands when you click an object.
The header contains zoom controls, display settings, export options, and a help button to start the guided tour.
Filter and search objects
Use the left panel to control which objects appear on the canvas.
Filter by category
Select a category tab to filter the object list:
- All — All StoreConnect objects.
- Web — Objects related to the web store.
- POS — Objects related to the point of sale.
- Custom — Custom objects added by the StoreConnect managed package.
- Standard — Standard Salesforce objects used by StoreConnect.
Search objects
Type in the search field at the top of the left panel to filter by object label or API name.
The canvas
Overview (default view)
When you first open the Schema Explorer, the canvas shows all selected objects as nodes. Each node displays the object name and its field count. Relationship lines between objects can be toggled on or off using Display options.
Click a node on the canvas to select it and open the field detail panel on the right.
Detail view (relationship traversal)
Double-click a node, or click a node then click Inspect fields, to enter the detail view for that object. The detail view shows:
- The selected object as a larger centre node.
- Its directly related objects arranged around it.
- Relationship connectors labelled with the source object name and source field name (for example, Order / s_c__Account__c). Labels are draggable to reposition them.
- Lines colour-coded and styled by relationship type: Lookup and Master-Detail are visually distinct.
- The right panel auto-expands to show all fields for the focused object.
Click any surrounding node to re-centre the detail view on that object — this is how you traverse relationships through the data model.
To return to the overview, re-expand the left panel.
Canvas navigation
| Action | Result |
|---|---|
| Click and drag | Pan the canvas |
| Mouse wheel / trackpad scroll | Zoom in and out |
| Click a node | Select object, open field detail panel |
| Double-click a node | Enter detail view for that object |
Use the zoom controls in the header to zoom in, zoom out, fit all objects into view, or reset to the default zoom level.
Inspect fields
When an object is selected, the right panel lists all fields with the following details:
| Column | Description |
|---|---|
| Label | The field’s display label |
| API name | The field’s API name |
| Type | Field data type (e.g. Text, Lookup, Picklist) |
| Required | Whether the field is required |
| Unique | Whether the field value must be unique |
| External ID | Whether the field is marked as an external ID |
| References | For Lookup and Master-Detail fields, the related object |
| Picklist values | Available values for picklist fields |
| Description | The field description if one is set |
Filter fields
Use the filter tabs above the field list to narrow results:
- All — All fields.
- Custom — Custom fields only.
- Standard — Standard Salesforce fields only.
- Required — Required fields only.
- Unique — Fields with unique constraints.
- External ID — Fields marked as external IDs.
- Lookup — Lookup and Master-Detail relationship fields.
Search fields
Type in the field search input to filter by field label or API name within the selected object.
Copy field API name
Click the copy icon next to any field to copy its API name to the clipboard.
Open in Object Manager
Click the Object Manager link in the field panel to open the selected object directly in Salesforce Setup > Object Manager.
Display options
Click Display options in the header to toggle:
- Show labels / API names — Switch node and field labels between their display labels and Salesforce API names.
- Show edge labels — Show or hide the relationship connector labels on the canvas.
Export
Click the Export button in the header to export the current schema view.
| Format | Description |
|---|---|
| DBML | Database Markup Language — a developer-oriented format for use with tools such as dbdiagram.io to further visualise and document the schema. Includes table definitions, column types, primary keys, constraints, and foreign key references. |
| SVG | A vector image of the current canvas view, suitable for documentation and presentations. |
| PNG | A raster image of the current canvas view. |
:::tip DBML export is most useful for developers and architects who need to share or document the data model outside of Salesforce, or import it into external diagramming tools. :::
Guided tour
Click the Help button in the Schema Explorer header to start an interactive guided tour of the interface. The tour can be started at any time from the help button.
Was this article helpful?
Thanks for your feedback! It helps us improve our docs.