Record a stocktake
On this page
A stocktake records the result of a physical count of stock at a location. When you save one, StoreConnect creates a Stock Adjustment record that becomes the new baseline for all future Count on Hand calculations. Use a stocktake after you have physically counted units at a location and want the system to start from that figure.
You can record a stocktake against a single Stock Level, or against many Stock Levels at once by exporting your records to a spreadsheet and re-importing them. Both methods use the same underlying fields and produce the same Stock Adjustment records — the bulk method simply applies them to hundreds or thousands of products in one operation.
For smaller corrections — such as a unit that was damaged or an extra one found — use Change Quantity or Set Quantity on the Stock Level record instead of a stocktake. See Manage stock levels for a comparison of all three methods.
Choosing a method
How you count depends on the size of your catalog and how often you count. Two established approaches map onto the tools below:
- Cycle counting — count a small, rotating portion of your inventory on a regular schedule (for example, high-value or fast-moving products weekly, everything else quarterly) rather than closing to count everything at once. This keeps records accurate with minimal disruption and suits ongoing operations. Cycle counts are usually small, so edit the affected Stock Levels directly, or edit several at once from a list view.
- Full physical count — count every product at a location within a single window, typically for an annual audit. For a store with hundreds or thousands of products, do this by exporting your Stock Levels to a spreadsheet and re-importing the counts in bulk.
| Method | Best for | How |
|---|---|---|
| Single product | A handful of products; ad hoc cycle counts | Edit the Stock Level record directly |
| List view | A moderate set of products at one time | Inline-edit several Stock Level records together |
| Bulk import | Full counts across a large catalog | Export to a spreadsheet, enter counts, re-import |
Where to find Stock Level records
Every counted product has one Stock Level record per location. To view the record, do one of these:
- Open the Stock Levels list directly from the App Launcher to browse or filter across all products and locations.
- Open a product record and use the Stock Levels related list to jump straight to that product’s Stock Level at each location.
Opening the Stock Level from the product record is often quickest when you are correcting a single item you already have on screen.
Record a stocktake on a single product
Before you begin, have your physical count to hand for the product and location you are updating.
- Open the Stock Level record for the product and location you counted.
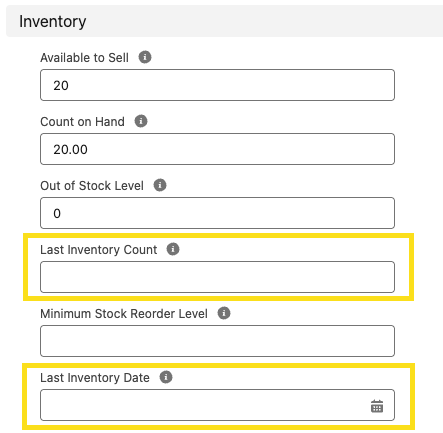
- Scroll to the Inventory section and enter the physical count in the Last Inventory Count field.
-
Enter the date the count was taken in Last Inventory Date.
- Select Save.
Allow around 30 seconds for the recalculation to complete, then refresh the record to confirm the updated Count on Hand and Available to Sell.
:::warning Last Inventory Date must change from its current saved value for the stocktake to take effect. If today’s date is already saved on the record, saving again with the same date does nothing — even if you changed Last Inventory Count.
To run a second stocktake on the same day, set Last Inventory Date to a different date first, save, then set it back to the correct date and save again. Alternatively, use Set Quantity instead — it has no date dependency and takes effect immediately. :::
Count several products from a list view
For a small cycle count of a few products, you do not need to open each record. Open the Stock Levels list, add the columns you need (such as Last Inventory Count and Last Inventory Date), then inline-edit the values across multiple rows and save them together. StoreConnect processes each changed row exactly as it would a single record.
Record a stocktake in bulk
For a full physical count across a large catalog, edit your counts in a spreadsheet and re-import them. StoreConnect does not have a dedicated stocktake import screen — instead you update the Stock Level records directly using a standard Salesforce data tool such as the Data Import Wizard (built into Salesforce), Data Loader, or a service like dataloader.io. This is the same approach used for other large data updates in Salesforce.
Importing values into the Stock Level fields fires exactly the same processing as editing a record by hand, so the same Stock Adjustment records are created and Count on Hand recalculates for every row.
:::note The StoreConnect product importer (Product Setup) updates products and price book entries — it does not update stock. Bulk stock updates are made against the Stock Level object using a Salesforce data tool, as described below. :::
Step 1: Export your Stock Levels
Export the Stock Level records for the location you are counting. Include at least the record ID, the Product, the Stock Location, and the current Count on Hand so you have a reference while entering counts.
Step 2: Enter your counts in the spreadsheet
For each product you counted, complete the columns for the type of update you want. Remove any rows you are not changing.
- To record a stocktake (reset the baseline to a counted figure): fill in both Last Inventory Count (the counted quantity) and Last Inventory Date (the date of the count).
- To set an exact total without a formal stocktake: fill in Set Quantity. StoreConnect replaces Count on Hand with this value.
- To adjust by a relative amount: fill in Change Quantity with a positive or negative number.
When you map your spreadsheet columns in the data tool, match each column to the field’s API name — this tells the import which field to write to. StoreConnect’s custom fields use the managed-package namespace, so every API name starts with s_c__ and ends with __c:
| Field | Field API name | Use |
|---|---|---|
| Last Inventory Count | s_c__Last_Inventory_Count__c |
The counted quantity for a stocktake |
| Last Inventory Date | s_c__Last_Inventory_Date__c |
The date of the count (required with Last Inventory Count) |
| Set Quantity | s_c__Set_Quantity__c |
An exact replacement total |
| Change Quantity | s_c__Change_Quantity__c |
A relative increase or decrease |
These are field API names — they identify which field each column updates. Do not confuse them with two other identifiers: the record’s Salesforce ID (used in step 3 to match each row to its existing record), and the StoreConnect External ID field (s_c__sC_Id__c), which is for StoreConnect’s internal sync and must never be modified. See the Stock Level object reference for the full field list.
:::warning
Never map your counts to Count on Hand (s_c__Count_On_Hand__c) or Available to Sell (s_c__Available_To_Sell__c). These are calculated fields — any value you import into them is overwritten. Always use Last Inventory Count / Last Inventory Date, Set Quantity, or Change Quantity.
If both Set Quantity and Change Quantity are populated on the same row, only Set Quantity is applied. :::
Step 3: Import the file
Import the spreadsheet as an update to the Stock Level object, matching each row to its existing record by its Salesforce record ID — the 15- or 18-character ID from your export, not one of the field API names above. Matching on the record ID prevents duplicate Stock Levels being created.
:::tip Test with a small sample of rows first, confirm the counts update as expected, then run the full file. :::
Step 4: Confirm the update
StoreConnect creates the Stock Adjustment records and recalculates Count on Hand and Available to Sell. Large imports are processed in the background in batches, so allow extra time before refreshing to confirm the results. Any import errors appear in your data tool’s result log.
:::note The same gating rules apply in bulk as for a single record. A stocktake row only takes effect when Last Inventory Date differs from the value already stored and Last Inventory Count differs from the current Count on Hand. Re-importing the same date and count for a product does nothing. :::
For an automated, ongoing feed from an external inventory or ERP system, an integrator can write to the same Stock Level fields programmatically using the Salesforce Bulk API. The processing rules are identical to a manual import.
How StoreConnect processes a stocktake
When you update the inventory fields on a Stock Level — whether by hand or via import — StoreConnect checks three conditions before creating a stocktake adjustment:
- Last Inventory Date has changed from its previous value
- Last Inventory Count is not blank
- Last Inventory Count differs from the current Count on Hand
All three must be true. If your physical count matches what Count on Hand already shows, saving does nothing — no adjustment record is created and no recalculation runs.
When the three conditions are met, a Stock Adjustment record is created:
- Type:
Initial Inventoryif this is the first stocktake ever recorded for this Stock Level;Stock Take Adjustmentfor all subsequent stocktakes - Amount: the value you entered in Last Inventory Count
- Date: the value you entered in Last Inventory Date
Count on Hand and Available to Sell then recalculate automatically. The recalculation sums all adjustments since the most recent stocktake — so the stocktake figure becomes the new starting point, and only movements after it affect the running total.
Previous stock adjustments are never deleted or modified. They remain in the related list as a complete audit trail of all movements before the stocktake.
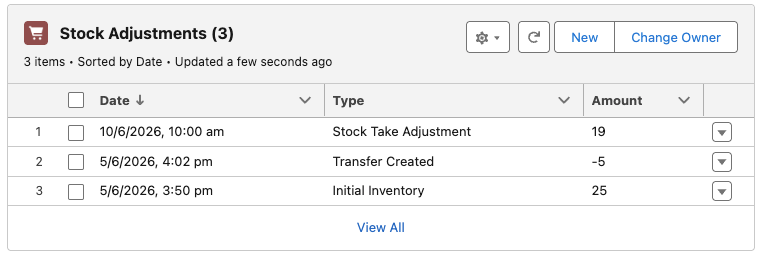
View stocktake and adjustment history
Each stocktake appears as a row in the Stock Adjustments related list on the Stock Level record. The Type column shows Stock Take Adjustment or Initial Inventory to distinguish it from other movements such as shipments and transfers.
- Open the Stock Level record.
-
In the related list, select View All on the Stock Adjustments list.
You can use this list to confirm that a stocktake was recorded correctly and to see the sequence of all stock movements before and after it.
Was this article helpful?
Thanks for your feedback! It helps us improve our docs.