

Location finder
On this page
Set up a location finder so customers can search for the physical places that sell or service your products, such as outlets, stockists, or service centers. You can have several location finders on one site, for example one for outlets and one for service centers.
Choose how customers will search
Decide this before you start, because it determines whether you need a Google Maps API key.
| Search style | What the customer does | What it needs |
|---|---|---|
| Basic search | Selects a country and/or state and sees matching results | Nothing beyond the location records themselves. Results are a straight filter on address data. |
| Map results | Sees results plotted on a map | A valid Google Maps API key in the google_maps_api_key store variable |
| Proximity search | Finds the locations closest to them | The same API key, with the Geocoding service permitted on your Google Maps account |
The three objects behind a location finder
Setting up a location finder uses three objects:
- Account — defines the location and its details.
- Location Group — defines the location finder itself, for example Outlets or Service Centers.
- Location Group Account — a join object found under the Accounts related list. It associates Location Groups and Accounts, so one location can belong to many location groups.
Set up a location finder
- Go to the Location Groups list and click New.
- Give the group a Name, set its Path (the finder appears at
/find/{path}), and relate it to the Store it should appear on. - Select Active. Only active location groups show on the website.
- Save the record.
- Open an Account you want to list as a location and select the Is Location checkbox.
- Set the Location Address Source to
Billing AddressorShipping Address, or leave it empty and fill in the Location Address fields yourself. See location address fields for the full list. - Save the Account.
- On the Account, go to the Location Groups related list and add the location group you created. This creates the Location Group Account join record.
- Repeat steps 5 to 8 for each location.
- Visit
/find/{path}on your store and confirm your locations appear and can be searched.
An Account only appears as a location when both of these are true: Is Location is selected, and the account belongs to a Location Group.
:::note If you use the billing or shipping address as the source, the location address fields are populated with a copy of the source address whenever the record is created or updated. Editing the source address updates the copy on the next save. :::
Account location details
- Is Location — determines whether an Account is being used as a location. It affects nothing else, but the account is only treated as a location when this is selected.
- Location Address Source — a picklist. Leave it empty, or set it to
Billing AddressorShipping Addressto prefill the address fields below.
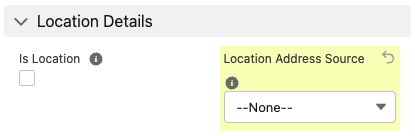
- Is Location — determines whether an Account is being used as a location. It affects nothing else, but the account is only treated as a location when this is selected.
- Location Address Source — a picklist. Leave it empty, or set it to
Billing AddressorShipping Addressto prefill the address fields below.
Location address fields
Used when Location Address Source is empty.
| Field | Description |
|---|---|
| Location City | Address City |
| Location Country | Address Country |
| Location Postal Code | Address Postal Code |
| Location State | Address State |
| Location Street | Address Street |
| Location | Geolocation field for latitude and longitude |
| Location Path | The URL path the location is available at on the website (depending on theme). It must be unique per store. |
| Location Display Name | The location name that shows on the website (depending on theme). If not provided, the Account’s Name field is used. |
| Location Email | The location’s email address to show on the website (depending on theme). |
| Location Phone | The location’s phone number to show on the website (depending on theme). |
| Location Website | The location’s web address to show on the website (depending on theme). |
| Location Info Markdown | Content to show on the website (depending on theme). |
| Location_Meta_Description | For SEO Search Description |
| Location_Meta_Keywords | For SEO Keywords |
| Location_Meta_Title | For SEO Title |
When you supply the location address fields manually, you must also supply latitude and longitude values in the Location geolocation field. Without them, the location cannot appear on the map or be found by a proximity search.
Location Group fields
| Field | Description |
|---|---|
| Active | Only active location groups show on the website. |
| Display Name | The name of the location finder on the website. If not provided, the Name field is used. |
| Meta Description | Content for the meta tags (used for SEO) |
| Meta Keywords | Content for the meta tags (used for SEO) |
| Meta Title | Content for the meta tags (used for SEO) |
| Path | The URL path the location finder is available at on the website. It must be unique per store. Your location finder is found at /find/{path}. |
| Store | A location group must be associated with a Store. It only shows on the website for the store it is associated with. |
Location filters
The simplest implementation of Location Finder searches on location alone. There are two ways to refine the search further.
Category filters
For a Product Category to be relevant to a Location Group, it must share the same Store via taxonomy as the location group. The product category can belong to any of the store’s taxonomies.
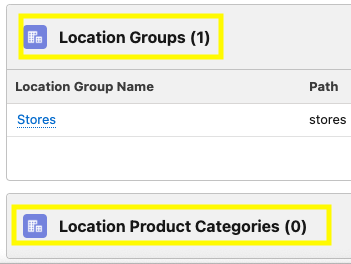
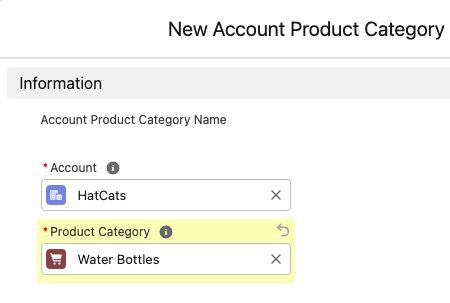
The product categories do not need to contain any products. They are purely a way to tag locations for search purposes.
Product filters
Product filters build on category filters. Set up your category filters first, then add Products to those categories. The search can then return location results for a specific product.
You can add a link or button on the product page that opens that product on the location finder page. For example, the finder might be called Stores and the button labeled Where to Buy.
Google Maps integration
Location Finder reads one store variable, google_maps_api_key.
When it is set to a valid Google Maps API key, the map appears on the location finder (depending on theme). Permitting your Google Maps account to use the Geocoding service also enables proximity searching, so customers can find locations near them.
If Salesforce address fields are not populating geolocation data, check that the corresponding Data Integration Rules for geocoding are active and that the address data is complete and accurate. Salesforce publishes an article on this common org question.
URL parameters
You can control parts of Location Finder by passing URL parameters. The parameters are visible in the address bar as you use the location finder, and you can use them to send a customer straight to a page with a particular location or account already shown.
Was this article helpful?
Thanks for your feedback! It helps us improve our docs.