

Log in as a customer in Salesforce
On this page
When you sign in as a customer, you can do anything they can do, such as place orders, change payment details, check out, etc.
This feature uses SAML single sign-on. Salesforce authenticates you (the staff member) and passes a signed assertion to the store. The customer’s password is not required and is never checked.
Follow these steps to set this up, and to ensure the correct access and permissions are configured, and watch the video demo.
Step 1: Create certificate and enable identity provider
- From the Salesforce Setup, search for Certificate and Key Management.
-
Click Create a Self-Signed Certificate.

- Give the key a Label and Unique name.
- Set the Key Size to 2048.
- Select Save.
-
In the Salesforce Setup, search for Identity Provider.

- Click Enable Identity Provider.
- Select the certificate you just created.
- Click Save.
Step 2: Create an external client app
:::warning Do not use Migrate to External Client App on an existing Connected App. Best practice is to create a new External Client App from scratch using the steps below. :::
- In Salesforce Setup, search for External Client App Manager.
- Select New External Client App.
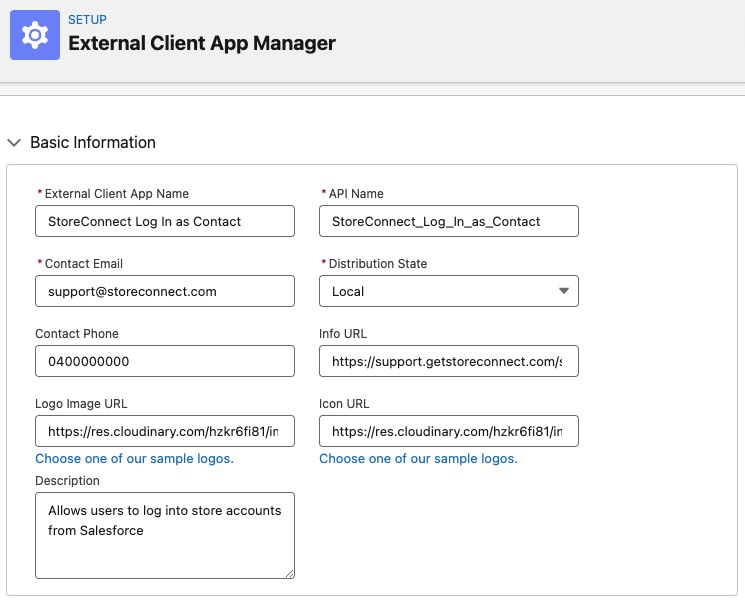
- Configure the app basic information:
- External Client App Name - StoreConnect Log In as Contact
- API Name - StoreConnect_Log_In_as_Contact
- Contact Email - Enter the contact email for Salesforce to use in case they want to contact you or your support team
- Distribution State - Leave as Default
- Contact Phone - Enter the contact phone for Salesforce to use in case they want to contact you or your support team
- Info URL -
https://support.storeconnect.com/article/log-in-from-salesforce - Logo Image URL - https://res.cloudinary.com/hzkr6fi81/image/upload/v1779181620/media/StoreConnect_Icon_Logo-100x100.png
- Icon URL - https://res.cloudinary.com/hzkr6fi81/image/upload/v1779181620/media/StoreConnect_Icon_Logo-100x100.png
- Description - Allows users to log into store accounts from Salesforce
- Skip the API (Enable OAuth Settings) section.
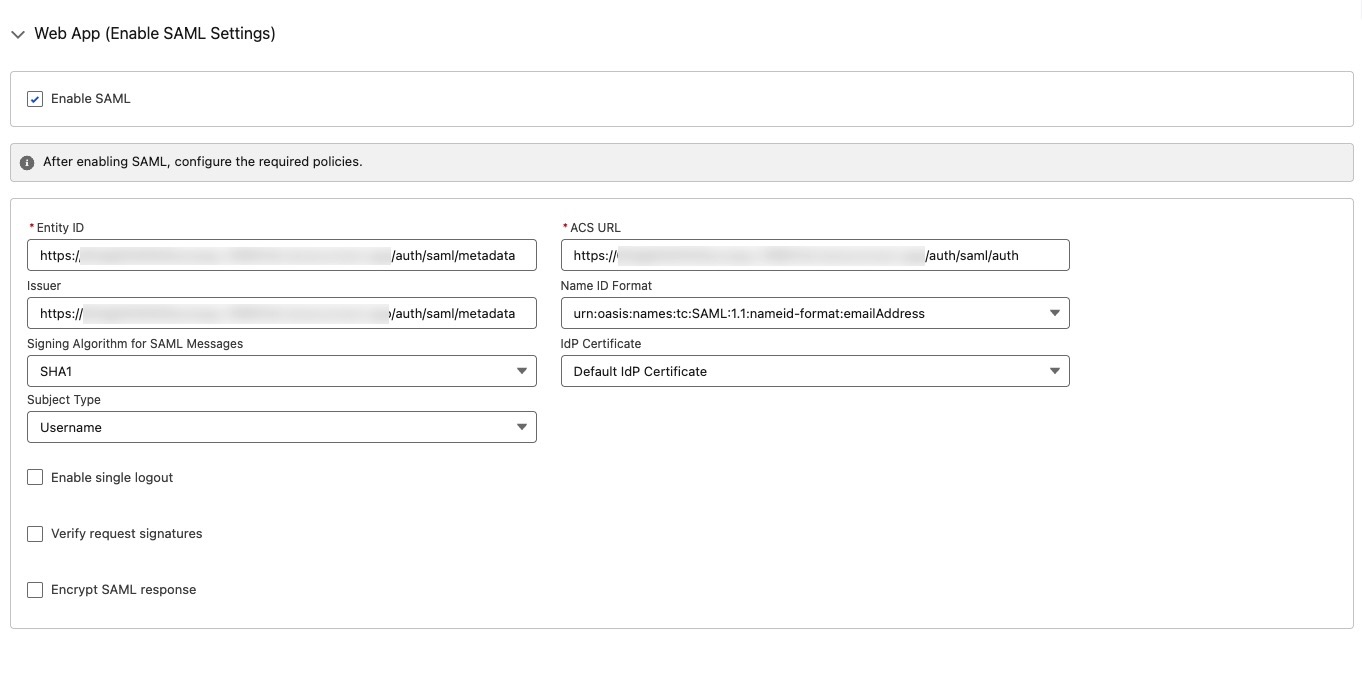
- In the Web App (Enable SAML Settings) section:
- Enable SAML - True
- Entity Id - https://{your-stores-domain.com}/auth/saml/metadata
- ACS URL - https://{your-stores-domain.com}/auth/saml/auth
- Issuer - https://{your-stores-domain.com}/auth/saml/metadata
- Name ID Format - urn:oasis:names:tc:SAML:1.1:nameid-format:emailAddress
- Signing Algorithm for SAML Messages - SHA1
- IdP Certificate - Choose the self-signed certificate you created in the first step.

:::note
If your store uses a URL path for region or scope (for example /au, /us, /b2b, /b2c, /wholesale, or /trade; a path can be any segment after your store domain), every SAML URL must include that path:
-
ACS URL:
https://{your-store-domain}/{your-path}/auth/saml/auth -
Entity Id:
https://{your-store-domain}/{your-path}/auth/saml/metadata -
Issuer:
https://{your-store-domain}/{your-path}/auth/saml/metadata
All three must include the store path, so that no two External Client Apps hold the same Entity Id and Issuer. Where two apps do share them, signing in from one of those stores can log the staff member in to the other store instead, with no error shown.
Each store on a path needs its own External Client App.
In Step 4, set the store variable to that app’s own Metadata Discovery Endpoint, not the identity provider’s shared metadata URL. The store sends the entityID declared by whichever document that variable points at, so the shared URL makes it send a value no app claims, and the sign-in fails with 1605.
If the store variable is not set, the store generates its SAML URLs from the bare domain only, identical to every other store on that domain. Only one store on that domain can then use the feature, and sign-in from the others gives no indication of why it did not work.
If Entity Id and Issuer do not match what the store sends, Salesforce returns idpError=1605 Unable to resolve request into a service provider. :::
- Save the changes.
Step 3: Set app policies
Next, you need to give access to the external client app by adding it to a profile, permission set or both.
- Edit the app.
- Add a Custom start page.
- Enter the Custom Start URL: https://{your-stores-domain.com}/
-
Select Profiles and Permissions Set.
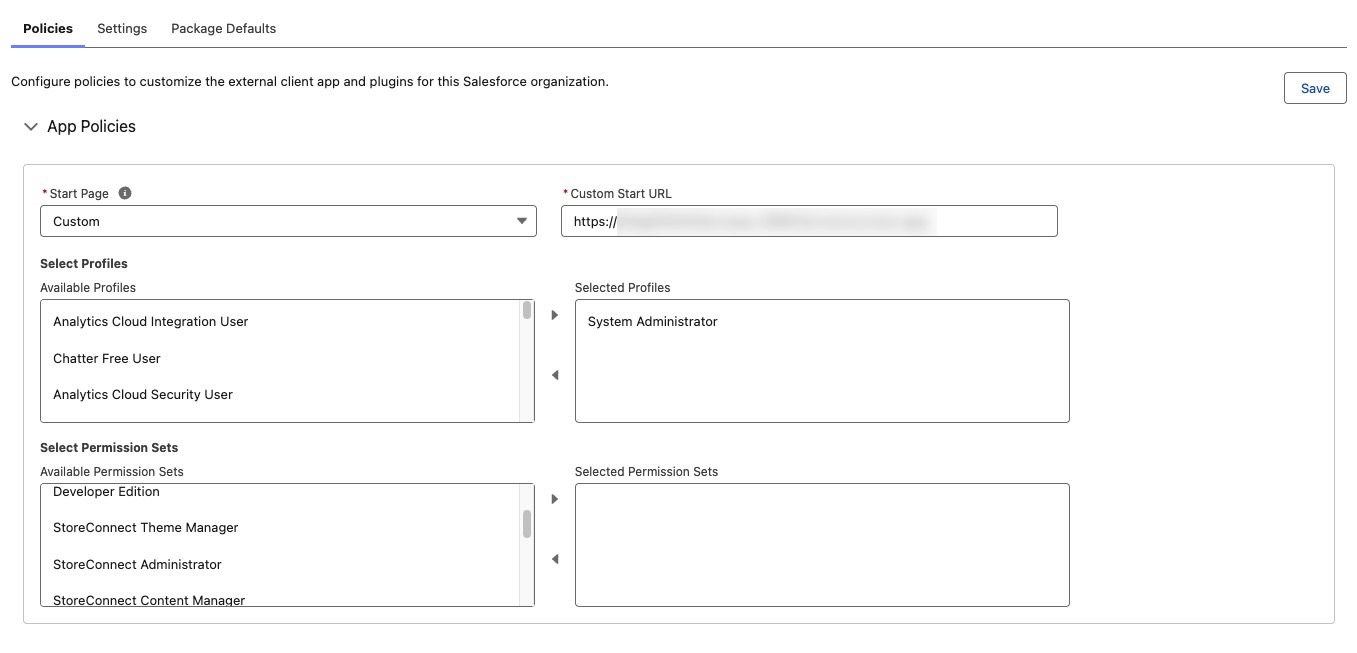
- Select any profiles you want to give broad access to, or for tighter control, create a permission set and assign that only to users who should have access to login as a contact from Salesforce.
- Save.
-
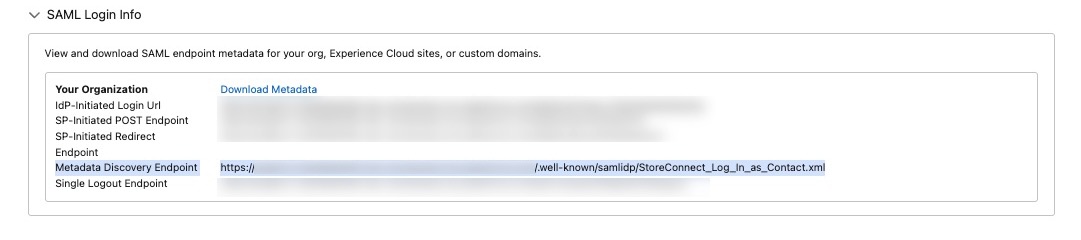
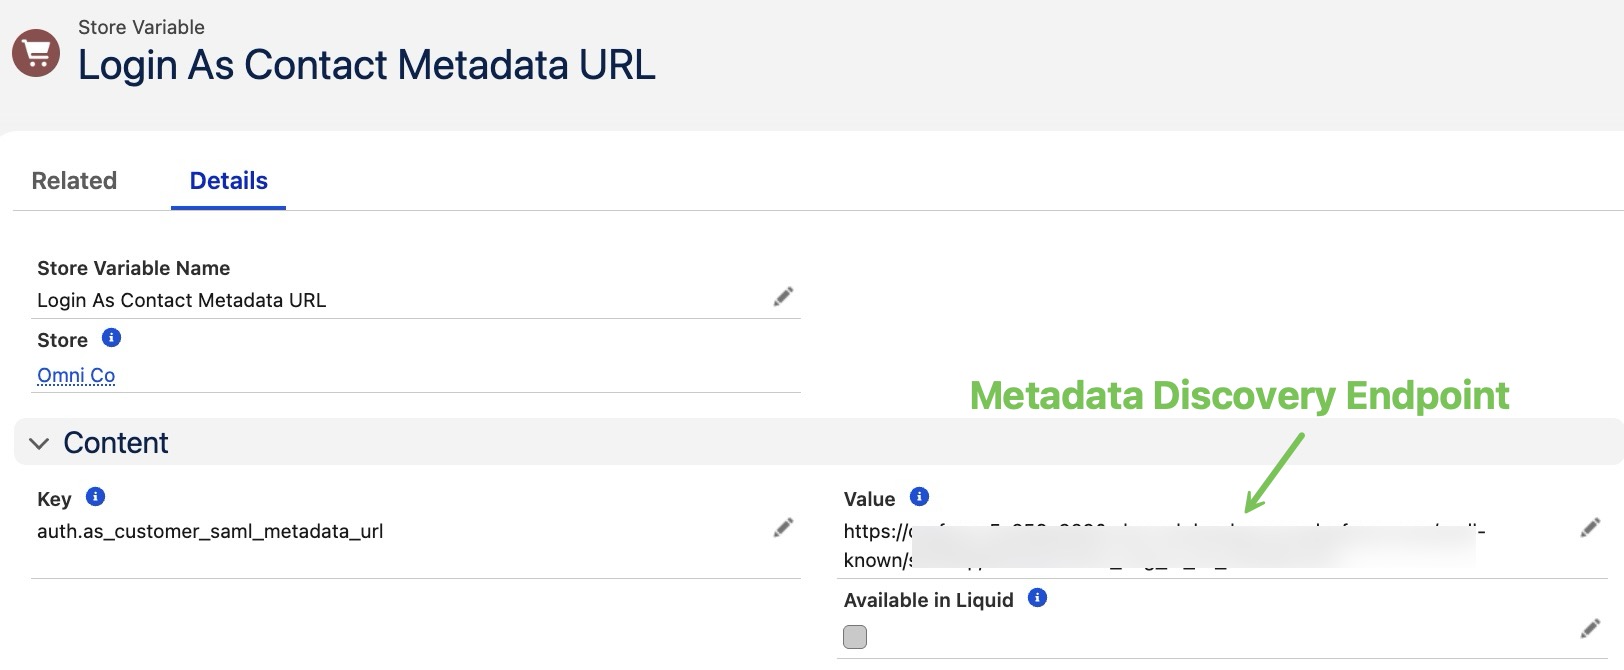
Scroll down to the SAML Policies section, go to SAML Login Info and copy the Metadata Discovery Endpoint.
Step 4: Set store variables
You need the Metadata Discovery Endpoint you copied at the end of Step 3. It is specific to one External Client App, and it takes this form, where the last segment is the app’s API name:
https://{your-my-domain}.my.salesforce.com/.well-known/samlidp/{app-api-name}.xml
Use that app-specific URL. Your store does not build its Issuer from its own domain or path. It sends whatever entityID the document at this URL declares, which is why the endpoint has to be the app’s own: only then does the Issuer the store sends match the Entity Id you set in Step 2.
The identity provider’s shared metadata URL (/.well-known/samlidp.xml) looks similar and returns a valid document, but it declares the identity provider’s own entityID, which no External Client App claims. Sign-in then fails with idpError=1605 Unable to resolve request into a service provider.
- Open your Store in StoreConnect.
- In the Store Variables section, select New.
- Call the variable Log in as contact metadata.
- Enter this Key: auth.as_customer_saml_metadata_url
- Value field: Paste the Metadata discovery endpoint you copied in the previous step.
-
Save.
Step 5: Create a log-in link
For ease of access, create a log-in link for the contact page.
- Open the Contact object in Salesforce.
- Create a custom field.
- Enter the Data Type as Formula.
- Enter Log into store as the Label.
- For the Formula Return Type, choose Text.
- In the Formula field, enter this code, but using your own store’s domain.
HYPERLINK(
"https://{your-stores-domain.com}/auth/saml/sign_in?sfid=" +
CASESAFEID(Id),
"Click here to log in as " + FirstName + " " + LastName )
Make sure the field is visible to the profiles that will use it by adding the field to the page layout. The feature will now work for those staff who are authorized and have access to the link.
Step 6: Set up multiple stores with login capability
To set more stores, repeat from Step 2: Create an external client app for each unique store domain or path.
Verify the login lands on the right store
A sign-in that lands on the wrong store still succeeds and reports no error. Check where it actually goes rather than whether it appeared to work.
- Open the sign-in link for a contact and look at the address bar immediately after the redirect settles, before clicking anything. It must be your store’s URL, including its path. The page you reach after navigating on can be served from cache and look correct even when the session belongs to another store.
- Open Setup > Identity Provider Event Log. Each sign-in writes a row showing the
SamlEntityUrlthe store sent and theAppIdit was matched to. A sign-in that lands on the wrong store recordsErrorCode = Successagainst a different app, which is why nothing surfaces as an error. - Confirm no two apps claim the same identity. The first query under “Check every store at once” below returns the
EntityUrlof every app; no two rows should share one. Where they do, sign-in from one of those stores can land on the other. - To see exactly what your store sends, open the sign-in link, take the
SAMLRequestquery parameter, base64-decode it, then raw-inflate it. TheAssertionConsumerServiceURLattribute and the<saml:Issuer>element must both match the External Client App you configured. The XML uses single quotes.
Check every store at once
Two queries confirm the configuration across all of your stores without signing in to each one.
Every app must hold values no other app holds, and each must carry its own store path:
SELECT DeveloperName, AcsUrl, EntityUrl, Issuer FROM ExtlClntAppSamlPlcyCnfg ORDER BY DeveloperName
Every store must point at its own app’s endpoint, so each value must end in a different app name:
SELECT s_c__Store_Id__r.Name, s_c__Value__c FROM s_c__Store_Variable__c
WHERE s_c__Key__c = 'auth.as_customer_saml_metadata_url'
A value ending in /.well-known/samlidp.xml is the shared identity provider metadata, not an app endpoint, and needs replacing with that store’s own.
Each store also publishes what it advertises, which must include its path:
https://{your-store-domain}/{your-path}/auth/saml/metadata
Compare the entityID and AssertionConsumerService values there against the app’s Entity Id and ACS URL.
One contact can use several stores
A Contact is not scoped to a store. The same Contact can sign in to every store in the org that has this feature configured, and there is no need to duplicate a customer per store. Contact.s_c__Store_Id__c records only the most recent store that contact used; it does not restrict anything.
Once each store has its own Entity Id, Issuer and ACS URL, verify this by opening the same Contact’s sign-in link on two stores in turn. Each lands on its own store, signed in as that Contact.
Update an expiring or expired certificate
To update a certificate, you need to replace all instances of where the certificate is used. Note that you won’t be able to log in as a contact until all steps are updated.
There are two locations where the new certificate will need to be updated: Identity Provider (In Salesforce Setup) and External Client App (IdP Certificate).
- Go to Setup > Identity Provider.
-
Click Create a new certificate.
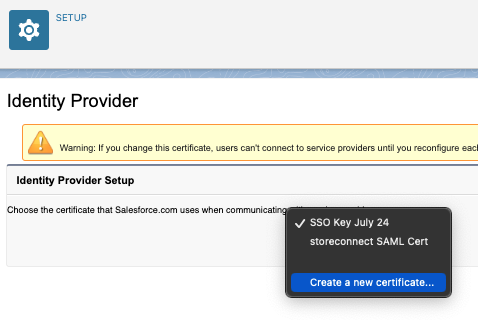
- Give it a name (e.g. You can make it StoreConnect Log In [Month])
- Click Save.
- Next, update the External Client App’s IdP Certificate.
- Test logging in as a contact to verify it is now working with the new certificate.
Troubleshooting
- Confirm the Contact has a Username. This confirms the contact has an account created on the store. If it does not have a username, send an invitation. This emails an invite and creates a user on the website (if the field is missing from the page layout, add it). The contact does not need to have accepted the invitation or set a password, but the username must have been created by sending an invitation. See the note below on usernames set another way.
- Ensure the External StoreConnect ID is populated. (If it is empty, click the Lightning button labeled “Sync to SC” to populate the ID.) See Syncing records with StoreConnect IDs
- Check for duplicate Contacts.
- Ensure the Contact email is unique and not shared with another contact.
- Review the Sync Error tool for references to affected records and get them to sync.
- If login fails with a SAML error (such as idpError=1605 Unable to resolve request into a service provider or Authentication Failed), check the Identity Provider Event Log in Salesforce Setup. It records each inbound SAML AuthnRequest with the resolved service provider, the Issuer, the requesting user, and the success or failure outcome. Entries showing the service provider as unknown indicate the External Client App is not resolving SAML requests. Start by verifying the Entity Id, ACS URL, and Issuer match the URLs your store sends. If the configuration looks correct but the error persists, the app is likely in a broken state, recreate it from scratch to see if the issue resolves.
- On a domain shared by several stores, if the Identity Provider Event Log shows a different External Client App resolving with
ErrorCode = Success, your store is sending an Issuer that another app claims. Either two apps hold the same Entity Id and Issuer, or theauth.as_customer_saml_metadata_urlstore variable is not set for your store, so it falls back to the bare domain that another store already uses. Check Step 2, then Step 4. - On a domain shared by several stores, a 1605 error points at the store variable rather than the app. It usually means
auth.as_customer_saml_metadata_urlis set to the identity provider’s shared metadata URL (/.well-known/samlidp.xml) instead of your app’s own Metadata Discovery Endpoint, so the store sends the identity provider’sentityID, which no app claims. Check Step 4. - If the sign-in fails before it reaches Salesforce, returning a StoreConnect error rather than a SAML one, the store cannot build the request. This is a store variable problem, not an External Client App problem, so the Identity Provider Event Log records nothing at all.
- Do not enable Encrypt SAML Response. Checking it prompts for an encryption certificate that this flow has no way to use. A retrieved app can serialize an encryption type even when encryption is off, so that value alone does not mean the setting is enabled.
- Confirm Subject Type is set to Username. It sits directly below Name ID Format and is easy to miss. StoreConnect matches the assertion against the Contact’s store-user username, which is why the Contact must have one.
“Could not find any users matching: {ContactId}”
This message means the SAML side already succeeded: the service provider resolved, the assertion was signed and accepted, and any store path was handled correctly. Salesforce’s Identity Provider Event Log will show Success for the request. Only the final step failed, matching the contact to a store user.
Stop investigating the External Client App, certificates, and URLs when you see this. The cause is the contact record.
Almost always, the contact has a Username that was not created by sending an invitation, for example one written by a data load, an integration, or the API. The field looks correctly populated in Salesforce, but no matching user was ever created on the website, so there is nothing for the login to match. Two things make this hard to spot:
- The Username field looks completely normal on the contact record.
- Salesforce refuses to re-invite the contact, with “Cannot invite this Contact because they already have a StoreConnect Username. Please use the Reset Password facility instead.” That reads like confirmation that the account is fine.
To resolve it:
- Contact has no Username: send an invitation. The username populates, the website user is created, and login works immediately. The invitation does not need to be accepted.
- Contact has a Username but login still fails with this message: use Reset Password to create the website user, or test with a contact that was invited normally.
Was this article helpful?
Thanks for your feedback! It helps us improve our docs.