

Invite customers to create an account
On this page
There are four ways someone can be given access to an account with your store:
- Request the user sets a password after checkout.
- Send an invite via email to a contact in Salesforce.
- Use the store’s registration form.
- Pre-populate contacts in bulk for self-serve password reset (recommended for large migrations).
Only one of these methods can be used per contact.
:::note Account invitations do not expire. A customer with a pending (unaccepted) invitation can gain access either by accepting their invitation or by resetting their password from the sign-in page. They do not need to accept the invitation first. However, password reset links expire after 6 hours. :::
Method 1: Sign up on checkout
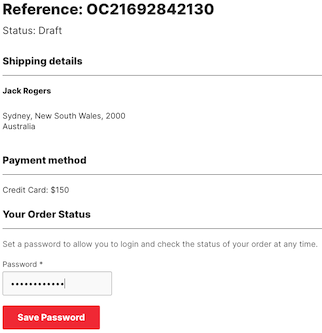
When a customer completes a purchase on your store, you can offer an option for them to set a password and open an ‘account’. This allows them to check on their orders, manage details, etc.
Method 2: Send an email invitation
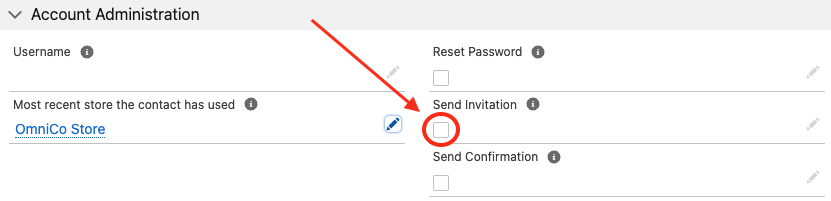
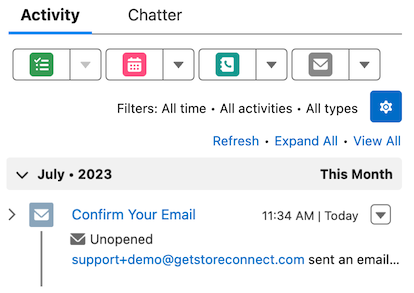
Select the Send Invitation option on the StoreConnect contact record. When selected, accounts without a Username are automatically sent an invitation email. This may take a couple of minutes to send and will show in the activities section once sent.
Tip: If you ever need to access the invite link that was sent, you can open the email in the contact’s Activities section. The link will be in there.
:::warning Invitation emails are sent from Salesforce and count against your org’s daily single-email limit. When you set Send Invitation on many contacts at once, the sends run as a background job. If the daily limit is reached, the remaining invitations stop sending silently: the Send Invitation flag stays checked, no email appears in the contact’s activities, and no sync error is logged. The limit resets at midnight GMT, so two large sends on the same GMT day can tip it over. For large migrations, use Method 4 below instead of sending individual invitations. :::
Track the invitation status
- Open the contact in StoreConnect
- Check if the Invitation Accepted Date (
s_c__invitation_accepted_at__c) field is populated. If this field is blank, the invitation has not yet been accepted.
:::note Customers can set up an account without accepting the invite, so a blank Invitation Accepted Date does not automatically mean they do not have an account. To confirm whether a customer can actually sign in, check whether they have set a password rather than relying on invitation acceptance. :::
Method 3: Store registration form
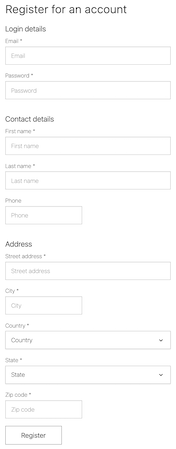
All stores have a registration page which can be found using the following URL: https://[yourstoredomain.com]/accounts/register. You can embed this link as part of checkout.
Once the form is filled in., customers receive an email asking them to verify their email address. This is required to complete account creation.
Method 4: Bulk registration
When registering a large number of existing contacts, sending individual invitation emails can exhaust daily email limits. Instead, pre-populate the SCID and Username fields on contacts in bulk, then let customers self-serve by requesting a password reset when they first visit the store.
- Export your contacts from Salesforce into a CSV.
- For each contact, populate:
- SCID (
s_c__sc_id__c) — a unique UUID for each contact. - Username (
s_c__username__c) — the contact’s email address.
- SCID (
- Import the CSV via Dataloader or a similar tool. Contacts sync to your store automatically.
Monitor registrations:
To confirm the sync has completed, open Sync Summaries in the StoreConnect Console and check that the SC Row Count for Contact matches the number of contacts you expect to have synced. Sync Summaries update every three minutes, so allow a short time after the import before checking.
Communicate to customers:
- Notify customers that they can access the store by visiting the sign-in page and clicking Forgot your password?.
- When a customer requests a reset, their login is created and confirmed automatically, and a reset email is sent.
- The customer sets their password and gains access to complete registration.
See What records sync to your website for tools and Apex code to generate SCIDs in bulk.
:::tip This approach distributes email sending over time as customers need access, rather than triggering all invitation emails at once. It also means customers only receive an email when they actually need it. :::
Review the sign-in flow
When launching a migrated site, customers will arrive at the sign-in page not knowing whether to log in, reset their password, or register. Since passwords cannot be migrated from another platform, consider adding a temporary message to the sign-in page template (pages/auth/login) that explains their options clearly.
For example:
Already have an account with us? Your account details have been carried over. Click Forgot your password? below to set a new password and access your account.
New to our store? Create an account using the registration link below.
To add this message, edit the pages/auth/login template in your store theme. See Theme templates for how to locate and edit auth page templates. Remove or update the message once the initial migration period is over.
Reset a password
You can reset a user password from their contact record, which forces them to set one up on sign in. Customers can also initiate a reset from the sign in page. Resetting a password will set a password, if one was never previously set.
Set session timeout
A session timeout is the length of time a user remains signed in to an account when there is no activity. By default, sessions expire after 30 minutes of no activity or 60 minutes after log in.
You can modify these defaults by creating Store Variables and setting your own values:
| Name | Key | Value |
|---|---|---|
| Inactivity Timeout | session.inactivity_timeout_minutes | 30 |
| Absolute Timeout | session.absolute_timeout_minutes | 60 |
Tip: Longer sessions can diminish security for a customer account. Depending on your business, consider if shorter sessions might be appropriate.
Troubleshooting
If you have any issues inviting a customer:
- Check that a username does not already exist for the contact. If it does exist, use the Reset Password feature instead.
- Check that there are no duplicate contacts with the same email address.
- Check that the email address has not bounced, clear any soft / hard bounces if needed - See: Salesforce - Managing Bounce Data
- If you set Send Invitation on many contacts at once and some invitations did not go out (the flag stays checked and no email appears in the contact’s activities), you may have reached your Salesforce daily single-email limit. Check your remaining capacity, then re-send the missed invitations using the steps below.
Check your remaining email capacity
Salesforce caps the number of single emails your org can send per day, and the count resets at midnight GMT. To see whether there is room to send today, open the Developer Console, choose Debug, then Open Execute Anonymous Window, and run:
Messaging.reserveSingleEmailCapacity(150);
Replace 150 with the number of invitations you plan to send. If it runs without error, there is capacity. If it throws an error, the limit has been reached for the day. This check is safe: it does not send anything or use up any allowance.
To see how many emails were sent on each day, go to Setup and open Email Log Files. Logs are retained for 30 days only, so review them promptly.
Re-send invitations that did not send
An invitation email only re-sends when the Invitation URL (s_c__Invitation_URL__c), the Send Invitation flag (s_c__Send_Invitation__c), or the Email changes on the contact. Clearing and re-setting other fields does not re-trigger it.
To re-send the invitations that were missed:
- Confirm you have email capacity for the day using the check above.
- Export the affected contacts to a CSV, including their
Idand currents_c__Invitation_URL__c. Keep this file as a backup. - Test with a single contact first: blank its
s_c__Invitation_URL__c(nothing sends), then restore the value from your export. This re-fires the email. A single contact sends immediately with no background job, so check that contact: the flag clears and an email appears in its activities. - Repeat for the remaining contacts as one batch, leaving the test contact out: blank the URLs, then restore them from the export. A batch creates a background job, so watch Setup, then Apex Jobs, for it to finish, then confirm no contacts still have the Send Invitation flag set.
:::warning Back up the exported Invitation URL values before you blank them. If you blank the field without a saved copy, the URL is lost and the invitation cannot be re-sent for that contact. :::
Was this article helpful?
Thanks for your feedback! It helps us improve our docs.