

Stripe
On this page
Stripe is a popular third party payment provider. If you use Stripe, you can integrate it directly with StoreConnect. Stripe works for:
- Standard checkout transactions
- Subscription and recurring payments
- Express checkout (Apple Pay, Google Pay, Amazon Pay, and Stripe Link)
- Pre-authorization
- 3D Secure (3DS) authentication
What you need
- A Stripe account
- A publishable key and secret key from your Stripe Dashboard
Step 1: Get Stripe credentials
- Sign in to your Stripe Dashboard.
- Go to Developers > API keys.
-
You can use the Standard Keys or create a set of Restricted Keys. See Create a restricted key.

- Copy the Publishable key and Secret key.
Use test mode keys (pk_test_... / sk_test_...) for sandbox testing and live mode keys (pk_live_... / sk_live_...) for production. StoreConnect detects the mode automatically from the key type — no separate sandbox/production switch is required.
Learn more about API keys in Stripe.
Create a restricted key
A restricted key limits what StoreConnect can do in your Stripe account. To create one, go to Developers > API keys, select Create restricted key, then grant only the permissions below and leave every other resource set to None.
| Stripe resource | Permission | Used for |
|---|---|---|
| PaymentIntents | Write | Creating, confirming, capturing, and cancelling payments |
| Customers | Write | Saved cards and ACH payments |
| Payment Methods | Write | Saving a card and attaching it to a customer |
| Refunds | Write | Issuing refunds |
| SetupIntents | Write | Updating the card on a subscription. Not needed if you don’t use recurring payments |
| Charges | Read | Reading card details and decline reasons from a completed payment |
In Stripe, Write includes read access to the same resource, so you don’t need to grant both.
StoreConnect doesn’t use Stripe webhooks, Stripe Terminal, Stripe Connect, Stripe Radar, or Stripe Billing (products, prices, subscriptions, and invoices), and it never deletes a customer or removes a saved payment method. Leave all of those set to None.
:::note
A restricted key starts with rk_test_ or rk_live_, not sk_. StoreConnect reads the mode from your publishable key, so enter a publishable key from the same mode as your restricted key. Pairing a live publishable key with a test restricted key makes StoreConnect treat the provider as live.
:::
Step 2: Configure Stripe as a payment provider in StoreConnect
- Open StoreConnect and go to Settings > Payments > Payment providers.
-
Select New. The Payment provider information window opens.
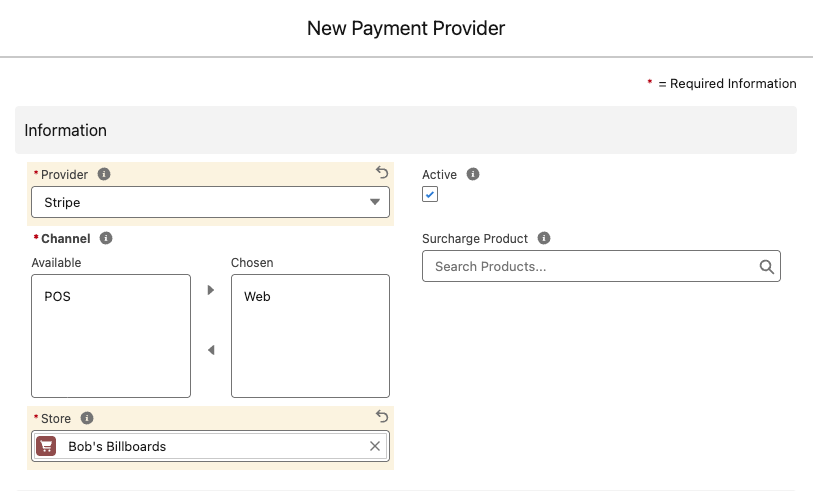
- Complete the fields as follows, then select Save:
| StoreConnect field | Usage |
|---|---|
| Provider | Select Stripe from the list |
| Channels | Select the channels where Stripe is used |
| Store | Select the store that will use Stripe |
| Active | Select to enable the payment provider |
| Surcharge Product | Optional: select a product configured with surcharge pricing to pass processing fees to customers. See Passing payment surcharges to customers. |
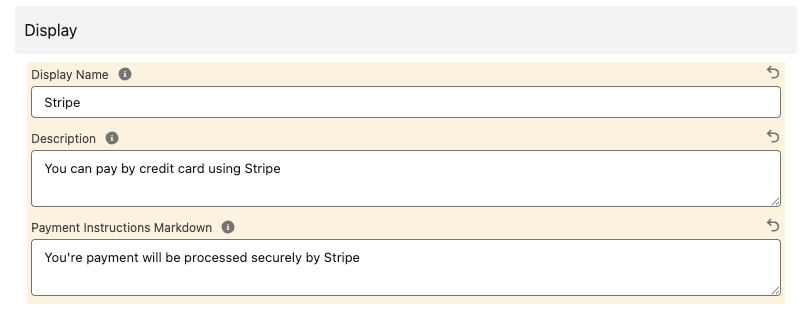
| Display Name | Name shown to customers at checkout |
| Description | Optional description shown at checkout |
| Payment Instructions | Optional instructions shown at checkout |
| API Mode | sandbox or production (use exact terms) |
| API Key | Publishable key |
| API Secret Key | Secret key |
| Position | Optional: controls the display order among payment providers at checkout. Lower numbers appear first. |
| API Options | Optional: additional configuration — see below |

API options
Use the API Options field to enable additional Stripe features. Enter each option on a new line:
| Feature | API option |
|---|---|
| Apple Pay and Google Pay | show_wallets: true |
| Express checkout | express_checkout_enabled: true |
| Pre-authorisation | use_preauth: true |
Was this article helpful?
Thanks for your feedback! It helps us improve our docs.