

How to allow customers to earn loyalty reward points
On this page
Use this process to start awarding loyalty points on purchases. Set up earning first, because there is nothing to spend until points exist. When you are ready for the second half, see How to allow customers to spend loyalty reward points.
Before you begin
- Confirm the points fields are on your page layouts for Store, Price Book, and Price Book Entry. The price book fields are not on the standard layout, so clone and edit the SC Price Book Record Page Layout to add Default Earn Rate and Default Purchase Rate. See Page layouts, profiles and permissions sets.
- Decide which order status means an order is settled. Points activate at that status, and you need its API name. See Customize order statuses.
Step 1: Configure the store
- Open the Store record.
- On the Products tab, set Display Price In to Currency. Add Points later, when you configure spending.
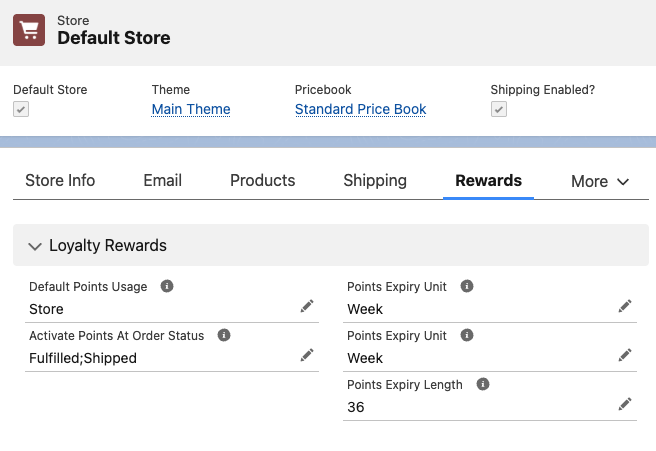
- On the Rewards tab, enter the API names of the order statuses that activate points in Activate Points At Order Status. Separate multiple statuses with a semicolon, as in
activated;completed. - Set Points Expiry Length and Points Expiry Unit if points should lapse. Entering
36and Month gives points a three-year life. Leave the length blank for no expiry. - Select Save.
Step 2: Set a default earn rate on the price book
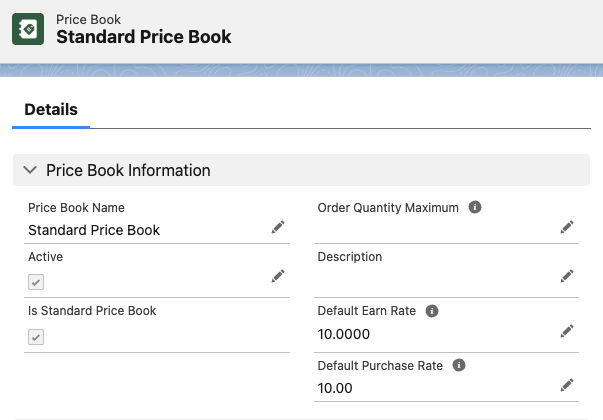
The rate applies to every product in the price book whose price book entry does not name its own points figure, so setting it once saves entering a value per product.
- Open the Price Book your store uses.
- Set Default Earn Rate. A rate of
10means a $10 product earns 100 points. - Select Save.
Step 3: Enable earning on each product
Repeat this for every product that should earn points, and for each of its price book entries.
- Open the Price Book Entry for the product.
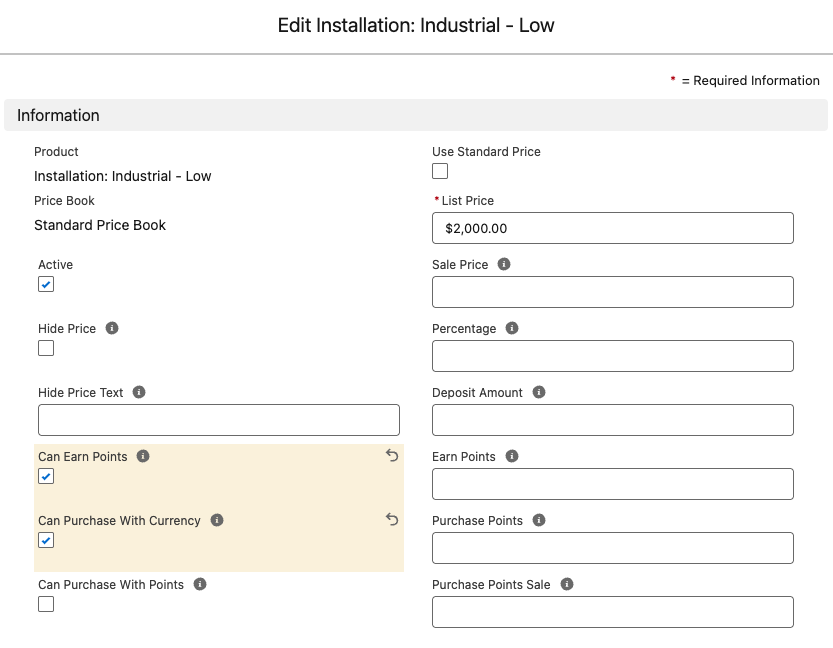
- Select Can Earn Points.
- Set Earn Points to award a fixed number of points, or leave it blank to use the price book’s default earn rate. Whichever applies is the figure shown on the product page.
- (Optional) Set Earn Points Bonus to add extra points on top during a promotion.
- Confirm Purchase with Currency is selected. It is the default.
- Select Save.
Price book entries reach the storefront through a sync, so allow a minute or two before checking the product page.
Step 4: Confirm points are awarded
- Buy a qualifying product from your store and complete the checkout.
- Open the resulting order in Salesforce and set its status to one you listed in Activate Points At Order Status.
- Open the customer’s Account record and check the Account Points Ledger related list.
A credit entry appears for the order with Activated selected, and the account’s Account Points Balance now shows the points. Until the order reaches an activating status, the entry exists but is not yet spendable.
Was this article helpful?
Thanks for your feedback! It helps us improve our docs.